Devil's Catacomb: Difference between revisions
Jump to navigation
Jump to search
No edit summary |
|||
| (13 intermediate revisions by 2 users not shown) | |||
| Line 1: | Line 1: | ||
{{Navigation|[[ | {{Navigation|[[Low-Level Tier]]|}} | ||
[[File:Azrael gif.gif|link=|right|250px]] | |||
== | ==General Informations== | ||
* You must have finished the Demon Tower once. | |||
* You also need a minumum level of 75 up to a maximum level of 90. | |||
* You can then talk to Catacomb Guard in Hwang Temple. Or Teleport via Dungeon Information on F6 | |||
* From the 3rd floor upwards, all group members need a [[File:Schrumpfkopf.png|link=]]Shrunken Head in their inventory. | |||
* Duration: 1 hour | |||
* Cooldown: 30 minutes | |||
==Usefull Bonuses== | |||
{| {{Prettytable}} | |||
|- {{Hl3}} | |||
! Damage/Resistance | |||
! Race Bonus | |||
! Elemental | |||
|- align="center" | |||
| Damage | |||
| Strong vs. Undead | |||
| [[File:Dunkelheit.png|22px]] [[Power_of_Darkness|Power of Darkness]] | |||
|- align="center" | |||
| Resistance | |||
| None | |||
| [[File:Dunkelheit.png|22px]] Darkness Resistance | |||
Skill Damage Resistance | |||
Critical Hit Resistance | |||
|} | |||
=== First floor === | === First floor === | ||
You have to bring [[File:Soul_Crystal_Key.png|link=]]Soul Crystal Key, which can be found from the monsters on that floor, to the Kud Statue which is located in the center of the map. | # You have to bring [[File:Soul_Crystal_Key.png|link=]]Soul Crystal Key, which can be found from the monsters on that floor, to the Kud Statue which is located in the center of the map. | ||
# When you do this, all players in your group will be teleported to the 2nd floor. | |||
When you do this, all players in your group will be teleported to the 2nd floor. | |||
=== Second floor === | === Second floor === | ||
You must find your way to the middle. But Gate of Perdition are blocking your way. You must destroy them to pass. | # You must find your way to the middle. But Gate of Perdition are blocking your way. You must destroy them to pass. | ||
# Once you are in the middle of the map, talk with [[File:Tortoise_Rock.png|50px|link=]]Tortoise Rock and all players who have a Shrunken Head will be teleported to the third floor. | |||
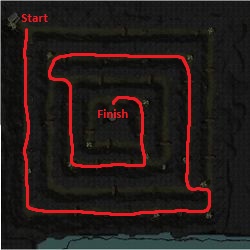
'''''Path through the Labyrinth:''''' | |||
[[File:Devil's_Catacomb_2.jpg|link=]] | |||
=== Third floor === | |||
# You entered a map with 7 Metin of Retribution spawned across the map. | |||
# Only one of them is real. Destroy one by one to find the real Metin. | |||
=== Fourth floor === | === Fourth floor === | ||
You have to find Tartaros but he is hiding in one of the corners. | # You have to find Tartaros but he is hiding in one of the corners. | ||
When you kill him, he will drop a [[File:Grimace_Totem.png|link=]]Grimace Totem. | # When you kill him, he will drop a [[File:Grimace_Totem.png|link=]]Grimace Totem. | ||
# Bring this item to Basalt Obelisk which is located in the center of the map. | |||
=== Fifth floor === | === Fifth floor === | ||
Defeat Charon. | Defeat Charon. | ||
=== Sixth floor (Final floor) === | === Sixth floor (Final floor) === | ||
On the final floor your main objective is to kill Azrael. | [[File:Azrael.png|link=|right|200px]] | ||
But the room is full of monsters who attack you automatically. | # On the final floor your main objective is to kill Azrael. | ||
# But the room is full of monsters who attack you automatically. | |||
== Boss Loot == | |||
{| class="wikitable" | {| class="wikitable" | ||
|- | |- | ||
! Amount !! Item !! Description | ! Amount !! Item !! Description | ||
|- | |- | ||
| 1x || [[File:Bosstruhe.png|link=[[Azrael's Chest]]]] || Azrael's Chest | | 1x || [[File:Bosstruhe.png|link=[[Azrael's Chest]]]] || [[Azrael's Chest]] | ||
|- | |- | ||
| 1x || [[File:Seelenstein.png|link=]] || Soulstone | | 1x || [[File:Seelenstein.png|link=]] || [[Soulstone]] | ||
|- | |- | ||
| 1x || [[File:Young_Pet_Book.png|link=]] || Young Pet Book | | 1x || [[File:Young_Pet_Book.png|link=]] || [[Young Pet Book]] | ||
|- | |- | ||
| 1x || [[File:Wild_Pet_Book.png|link=]] || Wild Pet Book | | 1x || [[File:Wild_Pet_Book.png|link=]] || [[Wild Pet Book]] | ||
|- | |- | ||
| 1x || [[File:Valiant_Pet_Book.png|link=]] || Valiant Pet Book | | 1x || [[File:Valiant_Pet_Book.png|link=]] || [[Valiant Pet Book]] | ||
|- | |- | ||
| 1x || [[File:Pet_Book_Chest.png]] || Pet Book Chest | | 1x || [[File:Pet_Book_Chest.png]] || [[Pet Book Chest]] | ||
|- | |- | ||
| 1x || [[File:Azraelchens_Ei.png|link=]] || Mini Azrael Egg | | 1x || [[File:Azraelchens_Ei.png|link=]] || Mini Azrael Egg | ||
|- | |- | ||
| 1x || [[File:Elixier_des_Forschers.png|link=]] || Researchers Elixir | | 1x || [[File:Elixier_des_Forschers.png|link=]] || [[Researchers Elixir]] | ||
|- | |- | ||
| 1x || [[File:Magic_Stone.png|link=]] || Magic Stone | | 1x || [[File:Magic_Stone.png|link=]] || [[Magic Stone]] | ||
|- | |- | ||
| 5x || [[File:Segenskugel.png|link=]] || | | 5x || [[File:Segenskugel.png|link=]] || [[Blessing Marble]] | ||
|- | |- | ||
| 1x || [[File:Lucent Yellow Powershard.png|link=]] || Lucent Yellow Powershard | | 1x || [[File:Lucent Yellow Powershard.png|link=]] || [[Lucent Yellow Powershard]] | ||
|- | |- | ||
| 1x || [[File:Rainbow Powershard.png|link=]] || Rainbow Powershard | | 1x || [[File:Rainbow Powershard.png|link=]] || [[Rainbow Powershard]] | ||
|- | |- | ||
| 100x || [[File:Gegenstand_verzaubern.png|link=]] || Enchant Item | | 100x || [[File:Gegenstand_verzaubern.png|link=]] || [[Enchant Item]] | ||
|- | |- | ||
| 10x || [[File:Cor_Draconis_(Roh).png|link=]] || Cor Draconis (Rough) | | 10x || [[File:Cor_Draconis_(Roh).png|link=]] || [[Cor Draconis (Rough)]] | ||
|- | |- | ||
| 5x || [[File:Feines_Tuch.png|link=]] || Fine Cloth | | 5x || [[File:Feines_Tuch.png|link=]] || Fine Cloth | ||
|- | |- | ||
| 1x || [[File:Iron Seal.png|link=]] || Iron Seal | | 1x || [[File:Iron Seal.png|link=]] || [[Iron Seal]] | ||
|} | |} | ||
Latest revision as of 22:42, 12 December 2024

General Informations
- You must have finished the Demon Tower once.
- You also need a minumum level of 75 up to a maximum level of 90.
- You can then talk to Catacomb Guard in Hwang Temple. Or Teleport via Dungeon Information on F6
- From the 3rd floor upwards, all group members need a
 Shrunken Head in their inventory.
 - Duration: 1 hour
- Cooldown: 30 minutes
Usefull Bonuses
| Damage/Resistance | Race Bonus | Elemental |
|---|---|---|
| Damage | Strong vs. Undead | |
| Resistance | None | Skill Damage Resistance Critical Hit Resistance |
First floor
- You have to bring
 Soul Crystal Key, which can be found from the monsters on that floor, to the Kud Statue which is located in the center of the map.
 - When you do this, all players in your group will be teleported to the 2nd floor.
Second floor
- You must find your way to the middle. But Gate of Perdition are blocking your way. You must destroy them to pass.
- Once you are in the middle of the map, talk with
 Tortoise Rock and all players who have a Shrunken Head will be teleported to the third floor.
Path through the Labyrinth:
Third floor
- You entered a map with 7 Metin of Retribution spawned across the map.
- Only one of them is real. Destroy one by one to find the real Metin.
Fourth floor
- You have to find Tartaros but he is hiding in one of the corners.
- When you kill him, he will drop a
 Grimace Totem.
 - Bring this item to Basalt Obelisk which is located in the center of the map.
Fifth floor
Defeat Charon.
Sixth floor (Final floor)

- On the final floor your main objective is to kill Azrael.
- But the room is full of monsters who attack you automatically.
Boss Loot
| Amount | Item | Description |
|---|---|---|
| 1x | Azrael's Chest | |
| 1x | Soulstone | |
| 1x | Young Pet Book | |
| 1x | Wild Pet Book | |
| 1x | Valiant Pet Book | |
| 1x | Pet Book Chest | |
| 1x | Mini Azrael Egg | |
| 1x | Researchers Elixir | |
| 1x | Magic Stone | |
| 5x | Blessing Marble | |
| 1x | Lucent Yellow Powershard | |
| 1x | Rainbow Powershard | |
| 100x | Enchant Item | |
| 10x | Cor Draconis (Rough) | |
| 5x | Fine Cloth | |
| 1x | Iron Seal |