Zodiac Temple: Difference between revisions
Jump to navigation
Jump to search
m (Protected "Zodiac Temple" ([Edit=Allow only administrators] (indefinite) [Move=Allow only administrators] (indefinite)) [cascading]) |
No edit summary |
||
| (13 intermediate revisions by 3 users not shown) | |||
| Line 1: | Line 1: | ||
{{Navigation|[[Dungeons]]|}} | |||
__NOTOC__ | |||
== General Information == | |||
<center> | |||
{| {{Prettytable}} | |||
|- align="center" | |||
!{{Hl3}} colspan="7"|Opened Dungeons | |||
|- align="center" | |||
!{{Hl3}}|Monday | |||
!{{Hl3}}|Thuesday | |||
!{{Hl3}}|Wednesday | |||
!{{Hl3}}|Thursday | |||
!{{Hl3}}|Friday | |||
!{{Hl3}}|Saturday | |||
!{{Hl3}}|Sunday | |||
|- align="center" | |||
|| Tempel of Zi<br>[[File:Dunkelheit.png|40px]]<br>Tempel of Chou<br>[[File:Erde.png|40px]] | |||
|| Tempel of Yin<br>[[File:Feuer.png|40px]]<br>Tempel of Mao<br>[[File:Wind.png|40px]] | |||
|| Tempel of Chen<br>[[File:Blitz.png|40px]]<br>Tempel of Si<br>[[File:Eis.png|40px]] | |||
|| Tempel of Wu<br>[[File:Eis.png|40px]]<br>Tempel of Wei<br>[[File:Blitz.png|40px]] | |||
|| Tempel of Shen<br>[[File:Erde.png|40px]]<br>Tempel of Yu<br>[[File:Wind.png|40px]] | |||
|| Tempel of Xu<br>[[File:Dunkelheit.png|40px]]<br>Tempel of Hai<br>[[File:Feuer.png|40px]] | |||
|| Tempel of Zi<br>Tempel of Chou<br>Tempel of Yin<br>Tempel of Mao<br>Tempel of Chen<br>Tempel of Si<br>Tempel of Wu<br>Tempel of Wei<br>Tempel of Shen<br>Tempel of Yu<br>Tempel of Xu<br>Tempel of Hai | |||
|} | |||
</center> | |||
== Entry requirements == | == Entry requirements == | ||
<ul> | <ul> | ||
| Line 5: | Line 33: | ||
*Here you will find the 12 portals, 12 Gods of the Zodiac. Each day there are 2 temples open, and on sunday, all the temples are available. | *Here you will find the 12 portals, 12 Gods of the Zodiac. Each day there are 2 temples open, and on sunday, all the temples are available. | ||
*You can enter alone or in a group up to 8 players. In the case of a group, the group leader must be the one to click the portal for the run to start to the entire group. | *You can enter alone or in a group up to 8 players. In the case of a group, the group leader must be the one to click the portal for the run to start to the entire group. | ||
*To enter the Portal, each player must have at least [[File:Animasphere.png|20px|link=]] | *To enter the Portal, each player must have at least 12 [[File:Animasphere.png|20px|link=]] Animaspheres. | ||
:*Animaspheres can be seen above your minimap. | :*Animaspheres can be seen above your minimap. | ||
:*Animaspheres are received 1 per hour, even if the character is offline, up to a maximum of 36. | :*Animaspheres are received 1 per hour, even if the character is offline, up to a maximum of 36. | ||
:*Animaspheres can also be refilled using [[File:Sphere_Parchment.png]] and can reach over 36 Animaspheres. | :*Animaspheres can also be refilled using [[File:Sphere_Parchment.png|link=]] Sphere Parchment and can reach over 36 Animaspheres. | ||
*Using [[File:Mark_of_the_Guardian.png]], you can enter the Portal for 3 hours without using Animaspheres. | *Using [[File:Mark_of_the_Guardian.png|link=]] Mark of the Guardian, you can enter the Portal for 3 hours without using Animaspheres. | ||
</ul> | </ul> | ||
== Mechanics == | == Mechanics == | ||
<ul> | <ul> | ||
| Line 18: | Line 47: | ||
*Each floor will have a random objective, out of 4 possible. | *Each floor will have a random objective, out of 4 possible. | ||
*Some floors can have several phases, each with 1 goal. | *Some floors can have several phases, each with 1 goal. | ||
*If a player dies at any floor, they can revive themselves using [[File:Prism_of_Revival_(Q).png]]. | *If a player dies at any floor, they can revive themselves using [[File:Prism_of_Revival_(Q).png|link=]]. | ||
:*Group players can also revive each other, clicking on the character. | :*Group players can also revive each other, clicking on the character. | ||
:*If there is not enough Prism of Revivals, the player is wiped out. | :*If there is not enough Prism of Revivals, the player is wiped out. | ||
| Line 24: | Line 53: | ||
*Floors with the task to not die and you die anyway, the run is over. | *Floors with the task to not die and you die anyway, the run is over. | ||
</ul> | </ul> | ||
== Floors == | == Floors == | ||
<ul> | <ul> | ||
*Floors 7,14,21,28,35,36,37,38,39 are bonus floors, the rest are standard floors. | *Floors 7,14,21,28,35,36,37,38,39 are bonus floors, the rest are standard floors. | ||
*The reward for completing floor 34 is a[[File:Golden_Zodiac_Chest.png]]Golden Zodiac Chest. | *The reward for completing floor 34 is a [[File:Golden_Zodiac_Chest.png|link=[[Golden Zodiac Chest]]]] Golden Zodiac Chest. | ||
*On floor 40, the NPC Zodiac Merchant is available for 5 minutes. | *On floor 40, the NPC Zodiac Merchant is available for 5 minutes. | ||
*For more detailed information about the structure, rewards and goals of the zodiac temple floors please '''[[Zodiac Temple Floor Structure|Click Here]]''' | *For more detailed information about the structure, rewards and goals of the zodiac temple floors please '''[[Zodiac Temple Floor Structure|Click Here]]''' | ||
</ul> | </ul> | ||
== Rewards == | == Rewards == | ||
<ul> | <ul> | ||
*For each completed floor, you receive a Guardian Insignia or a Zodiac Insignia. | *For each completed floor, you receive a Guardian Insignia or a Zodiac Insignia. | ||
*Once you've reached floor 40 the NPC Zodiac Merchant will be available for 5 minutes. | *Once you've reached floor 40 the NPC Zodiac Merchant will be available for 5 minutes. | ||
*He will sell you a Guardian Insignia package purchasable for | *He will sell you a Guardian Insignia package purchasable for 50.000.000 Yang and a Zodiac Insignia package also purchasable for 50.000.000 Yang. | ||
*Additionally, you can also buy 200x [[File:Prism_of_Revival_(Q).png]], 1x[[File:Sphere_Parchment.png]] and 10x [[File:Fragmentkiste.png]] | *Additionally, you can also buy 200x [[File:Prism_of_Revival_(Q).png|link=]], 1x[[File:Sphere_Parchment.png|link=]] and 10x [[File:Fragmentkiste.png|link=[[Fragmentkiste]]]] | ||
*You can also do a daily mission 'Alarm in the Zodiac Temple' to receive 20 [[File:Prism_of_Revival_(Q).png]]. | *You can also do a daily mission 'Alarm in the Zodiac Temple' to receive 20 [[File:Prism_of_Revival_(Q).png|link=]]. | ||
</ul> | </ul> | ||
| Line 45: | Line 76: | ||
*The collected insignias can be exchanged for reward chests at the NPC Monk Milbon. To do this, the conversation option "Redeem treasure chests" must be selected. A window with a table will then appear. | *The collected insignias can be exchanged for reward chests at the NPC Monk Milbon. To do this, the conversation option "Redeem treasure chests" must be selected. A window with a table will then appear. | ||
*To fill a field in the table, 50 identical guardian and star sign insignias are needed. If you have enough insignias, the fields will be highlighted. | *To fill a field in the table, 50 identical guardian and star sign insignias are needed. If you have enough insignias, the fields will be highlighted. | ||
*The field is filled in by clicking on it and confirming the query with Yes. Afterwards the 100 insignias will be removed from the inventory and a checkmark will appear at the respective position in the table. [[File:Tabelle_Zodiak_Haken.png]] | *The field is filled in by clicking on it and confirming the query with Yes. Afterwards the 100 insignias will be removed from the inventory and a checkmark will appear at the respective position in the table. [[File:Tabelle_Zodiak_Haken.png|link=]] | ||
<br> | <br> | ||
<br> | <br> | ||
| Line 51: | Line 82: | ||
[[File:Tabelle_Zodiak_2.png|thumb|300px]] | [[File:Tabelle_Zodiak_2.png|thumb|300px]] | ||
*To obtain the Aventurine Treasure, all green boxes must be checked off. This requires a total of 1,500 guardian and 1,500 zodiac insignia. | *To obtain the [[File:Aventurine Treasure.png|link=[[Aventurine Treasure]]]] Aventurine Treasure, all green boxes must be checked off. This requires a total of 1,500 guardian and 1,500 zodiac insignia. | ||
*Each guardian insignia is required 250 times, while each zodiac insignia is required 300 times. | *Each guardian insignia is required 250 times, while each zodiac insignia is required 300 times. | ||
*After all green boxes are checked, the reward will appear at the bottom left of the table under this button.[[File:Tabelle_Zodiak_Aventurinschatz.png]] | *After all green boxes are checked, the reward will appear at the bottom left of the table under this button.[[File:Tabelle_Zodiak_Aventurinschatz.png|link=]] | ||
<br> | <br> | ||
<br> | <br> | ||
| Line 59: | Line 90: | ||
[[File:Tabelle_Zodiak_3.png|thumb|300px]] | [[File:Tabelle_Zodiak_3.png|thumb|300px]] | ||
*To obtain the Aureolin treasure, all yellow boxes must be checked off. This requires a total of 1,500 guardian insignia and 1,500 zodiac insignia. | *To obtain the [[File:Aureolin Treasure.png|link=[[Aureolin Treasure]]]] Aureolin treasure, all yellow boxes must be checked off. This requires a total of 1,500 guardian insignia and 1,500 zodiac insignia. | ||
*Each guardian insignia is required 250 times, while each zodiac insignia is required 300 times. | *Each guardian insignia is required 250 times, while each zodiac insignia is required 300 times. | ||
*After all yellow boxes are checked, the reward appears at the bottom left of the table under this button.[[File:Tabelle_Zodiak_Aureolinschatz.png]] | *After all yellow boxes are checked, the reward appears at the bottom left of the table under this button.[[File:Tabelle_Zodiak_Aureolinschatz.png|link=]] | ||
<br> | <br> | ||
<br> | <br> | ||
{{clear}} | {{clear}} | ||
*Only after all the green and yellow boxes are checked off, you can get the third possible reward. The | *Only after all the green and yellow boxes are checked off, you can get the third possible reward. The [[File:Astral Treasure.png|link=[[Astral Treasure]]]] Astral Treasure. | ||
*You get one astral treasure each time all the boxes are filled in. | *You get one astral treasure each time all the boxes are filled in. | ||
*It is also possible that, for example, the green boxes have been filled in three times and the yellow ones only once. However, you will only receive one astral treasure for this. But if you fill in the yellow boxes twice, you get two more astral treasures without filling in the green boxes again. | *It is also possible that, for example, the green boxes have been filled in three times and the yellow ones only once. However, you will only receive one astral treasure for this. But if you fill in the yellow boxes twice, you get two more astral treasures without filling in the green boxes again. | ||
*The chest can be picked up by clicking the following button at the bottom right of the table: [[File:Tabelle_Zodiak_Sternenschatz.png]] | *The chest can be picked up by clicking the following button at the bottom right of the table: [[File:Tabelle_Zodiak_Sternenschatz.png|link=]] | ||
Latest revision as of 18:12, 12 January 2025
General Information
Entry requirements
- You can reach the Zodiac Temple through the Teleporters in Map 1 and 2 for each kingdom.
- You need a minimum level of 20 to enter the Zodiac Temple.
- Here you will find the 12 portals, 12 Gods of the Zodiac. Each day there are 2 temples open, and on sunday, all the temples are available.
- You can enter alone or in a group up to 8 players. In the case of a group, the group leader must be the one to click the portal for the run to start to the entire group.
- To enter the Portal, each player must have at least 12
 Animaspheres.
 - Animaspheres can be seen above your minimap.
- Animaspheres are received 1 per hour, even if the character is offline, up to a maximum of 36.
- Animaspheres can also be refilled using
 Sphere Parchment and can reach over 36 Animaspheres.
- Using
 Mark of the Guardian, you can enter the Portal for 3 hours without using Animaspheres.
Mechanics
- There are 40 Floors, most are standard floors, the rest are bonus floors.
- Each standard floor has a time limit of 10 minutes to be completed.
- Each bonus floor has a time limit of 5 minutes to be completed.
- Each floor will have a random objective, out of 4 possible.
- Some floors can have several phases, each with 1 goal.
- If a player dies at any floor, they can revive themselves using
 .
. - Group players can also revive each other, clicking on the character.
- If there is not enough Prism of Revivals, the player is wiped out.
- If you are about to go to the next floor and the player did not revive, the player is wiped out.
- Floors with the task to not die and you die anyway, the run is over.
Floors
- Floors 7,14,21,28,35,36,37,38,39 are bonus floors, the rest are standard floors.
- The reward for completing floor 34 is a
 Golden Zodiac Chest.
 - On floor 40, the NPC Zodiac Merchant is available for 5 minutes.
- For more detailed information about the structure, rewards and goals of the zodiac temple floors please Click Here
Rewards
- For each completed floor, you receive a Guardian Insignia or a Zodiac Insignia.
- Once you've reached floor 40 the NPC Zodiac Merchant will be available for 5 minutes.
- He will sell you a Guardian Insignia package purchasable for 50.000.000 Yang and a Zodiac Insignia package also purchasable for 50.000.000 Yang.
- Additionally, you can also buy 200x
 , 1x
, 1x and 10x
- You can also do a daily mission 'Alarm in the Zodiac Temple' to receive 20
 .
.
Exchaning Insignias at Monk Milbon

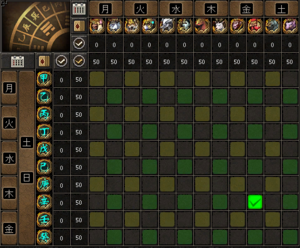
- The collected insignias can be exchanged for reward chests at the NPC Monk Milbon. To do this, the conversation option "Redeem treasure chests" must be selected. A window with a table will then appear.
- To fill a field in the table, 50 identical guardian and star sign insignias are needed. If you have enough insignias, the fields will be highlighted.
- The field is filled in by clicking on it and confirming the query with Yes. Afterwards the 100 insignias will be removed from the inventory and a checkmark will appear at the respective position in the table.


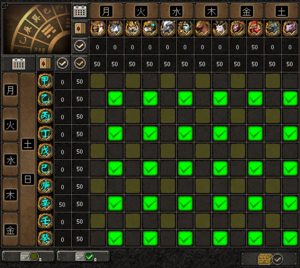
- To obtain the
 Aventurine Treasure, all green boxes must be checked off. This requires a total of 1,500 guardian and 1,500 zodiac insignia.
 - Each guardian insignia is required 250 times, while each zodiac insignia is required 300 times.
- After all green boxes are checked, the reward will appear at the bottom left of the table under this button.


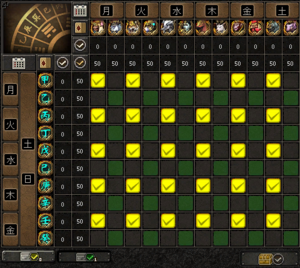
- To obtain the
 Aureolin treasure, all yellow boxes must be checked off. This requires a total of 1,500 guardian insignia and 1,500 zodiac insignia.
 - Each guardian insignia is required 250 times, while each zodiac insignia is required 300 times.
- After all yellow boxes are checked, the reward appears at the bottom left of the table under this button.

- Only after all the green and yellow boxes are checked off, you can get the third possible reward. The
 Astral Treasure.
 - You get one astral treasure each time all the boxes are filled in.
- It is also possible that, for example, the green boxes have been filled in three times and the yellow ones only once. However, you will only receive one astral treasure for this. But if you fill in the yellow boxes twice, you get two more astral treasures without filling in the green boxes again.
- The chest can be picked up by clicking the following button at the bottom right of the table:
