Bosses: Difference between revisions
No edit summary |
|||
| (179 intermediate revisions by 3 users not shown) | |||
| Line 1: | Line 1: | ||
{{Navigation|}} | |||
= General Information = | = General Information = | ||
Boss respawn timers | Boss respawn timers are tied to the time the Server went online. | ||
Boss Chests are clickable to view their content. | ''' Boss Chests are clickable to view their content.''' | ||
== Old Continent == | == Old Continent == | ||
=== Map1 === | === Map1 === | ||
{|width= | {|width=100% align="center" {{NormalTables}} | ||
|- {{Hl3}} | |- {{Hl3}} | ||
!| Boss | !| Boss | ||
| Line 16: | Line 17: | ||
|align="center"| 10 minutes | |align="center"| 10 minutes | ||
|align="center"| [[File:Joan_Lycos.png|link=]] [[File:Pyungmoo_Lycos.png|link=]] [[File:Yongan_Lycos.png|link=]] | |align="center"| [[File:Joan_Lycos.png|link=]] [[File:Pyungmoo_Lycos.png|link=]] [[File:Yongan_Lycos.png|link=]] | ||
|align="center"| [[File:Bamboo Shoes.png|link=]] [[File:Silver Necklace.png|link=]] [[File:Lucent Grey Powershard.png|link=]] 3x[[File:Green_Magic.png|link=]] | |align="center"| [[File:Bamboo Shoes.png|link=]] [[File:Silver Necklace.png|link=]] [[File:Lucent Grey Powershard.png|link=]] 3x[[File:Green_Magic.png|link=Green Magic]] | ||
|- | |- | ||
|align="center"| Scrofa<br>[[File:Scrofa.png|link=]] | |align="center"| Scrofa<br>[[File:Scrofa.png|link=]] | ||
|align="center"| 10 minutes | |align="center"| 10 minutes | ||
|align="center"| [[File:Joan_Scrofa.png|link=]] [[File:Pyungmoo_Scrofa.png|link=]] [[File:Yongan_Scrofa.png|link=]] | |align="center"| [[File:Joan_Scrofa.png|link=]] [[File:Pyungmoo_Scrofa.png|link=]] [[File:Yongan_Scrofa.png|link=]] | ||
|align="center"| [[File:Wooden Shoes.png|link=]] [[File:Lucent Grey Powershard.png|link=]] 3x[[File:Green_Magic.png|link=]] | |align="center"| [[File:Wooden Shoes.png|link=]] [[File:Lucent Grey Powershard.png|link=]] 3x[[File:Green_Magic.png|link=Green Magic]] | ||
|- | |- | ||
|align="center"| Bera<br>[[File:Bera.png|link=]] | |align="center"| Bera<br>[[File:Bera.png|link=]] | ||
|align="center"| 10 minutes | |align="center"| 10 minutes | ||
|align="center"| [[File:Joan_Bera.png|link=]] [[File:Pyungmoo_Bera.png|link=]] [[File:Yongan_Bera.png|link=]] | |align="center"| [[File:Joan_Bera.png|link=]] [[File:Pyungmoo_Bera.png|link=]] [[File:Yongan_Bera.png|link=]] | ||
|align="center"| [[File:Gold Threaded Shoes.png|link=]] [[File:Lucent Grey Powershard.png|link=]] 3x[[File:Green_Magic.png|link=]] | |align="center"| [[File:Gold Threaded Shoes.png|link=]] [[File:Lucent Grey Powershard.png|link=]] 3x[[File:Green_Magic.png|link=Green Magic]] | ||
|- | |- | ||
|align="center"| Tigris<br>[[File:Tigris.png|link=]] | |align="center"| Tigris<br>[[File:Tigris.png|link=]] | ||
|align="center"| 10 minutes | |align="center"| 10 minutes | ||
|align="center"| [[File:Joan_Tigris.png|link=]] [[File:Pyungmoo_Tigris.png|link=]] [[File:Yongan_Tigris.png|link=]] | |align="center"| [[File:Joan_Tigris.png|link=]] [[File:Pyungmoo_Tigris.png|link=]] [[File:Yongan_Tigris.png|link=]] | ||
|align="center"| [[File:Wooden Shoes.png|link=]] [[File:Lucent Grey Powershard.png|link=]] 3x[[File:Green_Magic.png|link=]] | |align="center"| [[File:Wooden Shoes.png|link=]] [[File:Lucent Grey Powershard.png|link=]] 3x[[File:Green_Magic.png|link=Green Magic]] | ||
|} | |} | ||
{{top}} | |||
=== Map 2 === | === Map 2 === | ||
{|width= | {|width=100% align="center" {{NormalTables}} | ||
|- {{Hl3}} | |- {{Hl3}} | ||
!| Boss | !| Boss | ||
| Line 45: | Line 47: | ||
|align="center"| 10 minutes | |align="center"| 10 minutes | ||
|align="center"| [[File:Bokjung_Mahon.png|link=|200px]] [[File:Bakra_Mahon1.png|link=|200px]] [[File:Jayang_Mahon.png|link=|200px]] | |align="center"| [[File:Bokjung_Mahon.png|link=|200px]] [[File:Bakra_Mahon1.png|link=|200px]] [[File:Jayang_Mahon.png|link=|200px]] | ||
|align="center"| [[File:Leather Boots.png|link=]] [[File:Muschel.png|link=]] [[File:Lucent Grey Powershard.png|link=]] 4x[[File:Green_Magic.png|link=]] | |align="center"| [[File:Leather Boots.png|link=]] [[File:Muschel.png|link=]] [[File:Lucent Grey Powershard.png|link=Lucent Grey Powershard]] 4x[[File:Green_Magic.png|link=Green Magic]] | ||
|- | |- | ||
|align="center"| Bo<br>[[File:Bo.png|link=|200px]] | |align="center"| Bo<br>[[File:Bo.png|link=|200px]] | ||
|align="center"| 10 minutes | |align="center"| 10 minutes | ||
|align="center"| [[File:Bokjung_Bo.png|link=|200px]] [[File:Bakra_Bo.png|link=|200px]] [[File:Jayang_Bo.png|link=|200px]] | |align="center"| [[File:Bokjung_Bo.png|link=|200px]] [[File:Bakra_Bo.png|link=|200px]] [[File:Jayang_Bo.png|link=|200px]] | ||
|align="center"| [[File:Gold Threaded Shoes.png|link=]] [[File:Muschel.png|link=]] [[File:Lucent Grey Powershard.png|link=]] 4x[[File:Green_Magic.png|link=]] | |align="center"| [[File:Gold Threaded Shoes.png|link=]] [[File:Muschel.png|link=]] [[File:Lucent Grey Powershard.png|link=Lucent Grey Powershard]] 4x[[File:Green_Magic.png|link=Green Magic]] | ||
|- | |- | ||
|align="center"| Goo-Pae<br>[[File:Goo-Pae.png|link=|180px]] | |align="center"| Goo-Pae<br>[[File:Goo-Pae.png|link=|180px]] | ||
|align="center"| 10 minutes | |align="center"| 10 minutes | ||
|align="center"| [[File:Bokjung_Goo Pae.png|link=|200px]] [[File:Bakra_Goo Pae.png|link=|200px]] [[File:Jayang_Goo Pae.png|link=|200px]] | |align="center"| [[File:Bokjung_Goo Pae.png|link=|200px]] [[File:Bakra_Goo Pae.png|link=|200px]] [[File:Jayang_Goo Pae.png|link=|200px]] | ||
|align="center"| [[File:Silver Necklace.png|link=]] [[File:Muschel.png|link=]] [[File:Lucent Grey Powershard.png|link=]] 4x[[File:Green_Magic.png|link=]] | |align="center"| [[File:Silver Necklace.png|link=]] [[File:Muschel.png|link=]] [[File:Lucent Grey Powershard.png|link=Lucent Grey Powershard]] 4x[[File:Green_Magic.png|link=Green Magic]] | ||
|- | |- | ||
|align="center"| Chuong<br>[[File:Chuong.png|link=|80px]] | |align="center"| Chuong<br>[[File:Chuong.png|link=|80px]] | ||
|align="center"| 10 minutes | |align="center"| 10 minutes | ||
|align="center"| [[File:Bokjung_Chuong.png|link=|200px]] [[File:Bakra_Chuong.png|link=|200px]] [[File:Jayang_Chuong.png|link=|200px]] | |align="center"| [[File:Bokjung_Chuong.png|link=|200px]] [[File:Bakra_Chuong.png|link=|200px]] [[File:Jayang_Chuong.png|link=|200px]] | ||
|align="center"| [[File:Ebony Earrings.png|link=]] [[File:Muschel.png|link=]] [[File:Lucent Grey Powershard.png|link=]] 4x[[File:Green_Magic.png|link=]] | |align="center"| [[File:Ebony Earrings.png|link=]] [[File:Muschel.png|link=]] [[File:Lucent Grey Powershard.png|link=Lucent Grey Powershard]] 4x[[File:Green_Magic.png|link=Green Magic]] | ||
|- | |- | ||
|align="center"| Bestial Captain<br>[[File:Brutaler Hauptmann.png|link=|180px]] | |align="center"| Bestial Captain<br>[[File:Brutaler Hauptmann.png|link=|180px]] | ||
|align="center"| 10 minutes | |align="center"| 10 minutes | ||
|align="center"| [[File:Bokjung Brutaler Hauptmann.png|link=|200px]] [[File:Bakra Brutaler Hauptmann.png|link=|200px]] [[File:Jayang Brutaler Hauptmann.png|link=|200px]] | |align="center"| [[File:Bokjung Brutaler Hauptmann.png|link=|200px]] [[File:Bakra Brutaler Hauptmann.png|link=|200px]] [[File:Jayang Brutaler Hauptmann.png|link=|200px]] | ||
|align="center"| [[File:Full Moon Sword.png|link=]] [[File:Golden Key.png|link=]] [[File:Elixier des Forschers.png|link=]] [[File:Lucent Grey Powershard.png|link=]] | |align="center"| [[File:Full Moon Sword.png|link=]] [[File:Golden Key.png|link=]] [[File:Elixier des Forschers.png|link=]] [[File:Lucent Grey Powershard.png|link=Lucent Grey Powershard]] | ||
|} | |} | ||
{{top}} | |||
=== Ape Dungeon === | === Ape Dungeon === | ||
{|width= | {|width=100% align="center" {{NormalTables}} | ||
|- {{Hl3}} | |- {{Hl3}} | ||
!| Boss | !| Boss | ||
| Line 79: | Line 82: | ||
|align="center"| 20 minutes | |align="center"| 20 minutes | ||
|align="center"| [[File:Ape_Dungeon_Easy.jpg|link=]] | |align="center"| [[File:Ape_Dungeon_Easy.jpg|link=]] | ||
|align="center"| [[File:Herb of Easy Monkeys.png|link=]] [[File:Pet_Book_Chest.png|link=]] [[File:Lucent Grey Powershard.png|link=]] [[File:Horse Medal.png|link=]] [[File:Seelenstein.png|link=]] [[File:Elixier des Forschers.png|link=]] [[File:Monkey_Egg.png|link=]] | |align="center"| [[File:Herb of Easy Monkeys.png|link=]] [[File:Pet_Book_Chest.png|link=]] [[File:Lucent Grey Powershard.png|link=Lucent Grey Powershard]] [[File:Horse Medal.png|link=]] [[File:Seelenstein.png|link=]] [[File:Elixier des Forschers.png|link=]] [[File:Monkey_Egg.png|link=]] | ||
|- | |- | ||
|align="center"| Walking Ape<br>[[File:Walking Ape.png|link=|200px]] | |align="center"| Walking Ape<br>[[File:Walking Ape.png|link=|200px]] | ||
|align="center"| 20 minutes | |align="center"| 20 minutes | ||
|align="center"| [[File:Ape_Dungeon_Normal.jpg|link=]] | |align="center"| [[File:Ape_Dungeon_Normal.jpg|link=]] | ||
|align="center"| [[File:Herb of Medium Monkeys.png|link=]] [[File:Pet_Book_Chest.png|link=]] [[File:Lucent Grey Powershard.png|link=]] [[File:Horse Medal.png|link=]] [[File:Seelenstein.png|link=]] [[File:Elixier des Forschers.png|link=]] [[File:Monkey_Egg.png|link=]] | |align="center"| [[File:Herb of Medium Monkeys.png|link=]] [[File:Pet_Book_Chest.png|link=]] [[File:Lucent Grey Powershard.png|link=Lucent Grey Powershard]] [[File:Horse Medal.png|link=]] [[File:Seelenstein.png|link=]] [[File:Elixier des Forschers.png|link=]] [[File:Monkey_Egg.png|link=]] | ||
|- | |- | ||
|align="center"| Ape Lord<br>[[File:Ape Lord.png|link=|200px]] | |align="center"| Ape Lord<br>[[File:Ape Lord.png|link=|200px]] | ||
|align="center"| 20 minutes | |align="center"| 20 minutes | ||
|align="center"| [[File:Ape_Dungeon_Expert.png|link=]] | |align="center"| [[File:Ape_Dungeon_Expert.png|link=]] | ||
|align="center"| [[File:Herb of Expert Monkeys.png|link=]] [[File:Pet_Book_Chest.png|link=]] [[File:Lucent Green Powershard.png|link=]] [[File:Horse Medal.png|link=]] [[File:Seelenstein.png|link=]] [[File:Elixier des Forschers.png|link=]] [[File:Monkey_Egg.png|link=]] [[File:Young Pet Book.png|link=]] [[File:Wild Pet Book.png|link=]] | |align="center"| [[File:Herb of Expert Monkeys.png|link=]] [[File:Pet_Book_Chest.png|link=]] [[File:Lucent Green Powershard.png|link=Lucent Green Powershard]] [[File:Horse Medal.png|link=]] [[File:Seelenstein.png|link=]] [[File:Elixier des Forschers.png|link=]] [[File:Monkey_Egg.png|link=]] [[File:Young Pet Book.png|link=Young Pet Book]] [[File:Wild Pet Book.png|link=]] | ||
|} | |} | ||
{{top}} | |||
=== Valley of Seungryong === | === Valley of Seungryong === | ||
{|width= | {|width=100% align="center" {{NormalTables}} | ||
|- {{Hl3}} | |- {{Hl3}} | ||
!| Boss | !| Boss | ||
| Line 103: | Line 107: | ||
|align="center"| 25 minutes | |align="center"| 25 minutes | ||
|align="center"| A second Chief Orc spawns in a random location<br>[[File:Valley of Seungryong.png|link=]] | |align="center"| A second Chief Orc spawns in a random location<br>[[File:Valley of Seungryong.png|link=]] | ||
|align="center"| [[File:Seelenstein.png|link=]] [[File:Elixier des Forschers.png|link=]] 3x[[File:Muschel.png|link=]] [[File:Segenskugel.png|link=]] | |align="center"| [[File:Seelenstein.png|link=]] [[File:Elixier des Forschers.png|link=]] 3x[[File:Muschel.png|link=]] [[File:Segenskugel.png|link=]] 10x[[File:Gegenstand verzaubern.png|link=Enchant Item]] [[File:Lucent Grey Powershard.png|link=Lucent Grey Powershard]] [[File:Cor Draconis (Roh).png|link=Cor Draconis (Rough)]] [[File:Erfahrungsring.png|link=]] 2x[[File:Feines Tuch.png|link=]] [[File:Bosstruhe.png|link=[[Chief Orc's Box]]]] | ||
|} | |} | ||
{{top}} | |||
=== Yongbi Desert === | === Yongbi Desert === | ||
{|width= | {|width=100% align="center" {{NormalTables}} | ||
|- {{Hl3}} | |- {{Hl3}} | ||
!| Boss | !| Boss | ||
| Line 114: | Line 119: | ||
!| Drops | !| Drops | ||
|- | |- | ||
|align="center"| Giant Tortoise<br>[[File:Giant Tortoise.png|link=|300px]] | |align="center"| [[File:Wind.png|40px]] | ||
Giant Tortoise<br>[[File:Giant Tortoise.png|link=|300px]] | |||
|align="center"| 25 minutes | |align="center"| 25 minutes | ||
|align="center"| A second Giant Tortoise spawns in a random location<br>[[File:Yongbi Desert.png|link=]] | |align="center"| A second Giant Tortoise spawns in a random location<br>[[File:Yongbi Desert.png|link=]] | ||
|align="center"| [[File:Seelenstein.png|link=]] [[File:Elixier des Forschers.png|link=]] [[File:Lucent Grey Powershard.png|link=]] [[File:Bosstruhe.png|link=[[Desert Tortoise Chest]]]] | |align="center"| 10x[[File:Gegenstand verzaubern.png|link=Enchant Item]] [[File:Seelenstein.png|link=]] [[File:Elixier des Forschers.png|link=]] [[File:Lucent Grey Powershard.png|link=Lucent Grey Powershard]] [[File:Bosstruhe.png|link=[[Desert Tortoise Chest]]]] | ||
|} | |} | ||
{{top}} | |||
=== Hwang-Temple === | === Hwang-Temple === | ||
{|width= | {|width=100% align="center" {{NormalTables}} | ||
|- {{Hl3}} | |- {{Hl3}} | ||
!| Boss | !| Boss | ||
| Line 128: | Line 135: | ||
!| Drops | !| Drops | ||
|- | |- | ||
|align="center"| Dark-Ghost Leader<br>[[File:Dark-Ghost Leader.png|link=|100px]] | |align="center"| [[File:Wind.png|40px]] | ||
Dark-Ghost Leader<br>[[File:Dark-Ghost Leader.png|link=|100px]] | |||
|align="center"| 25 minutes | |align="center"| 25 minutes | ||
|align="center"| [[File:Hwang Temple Dark-Ghost Leader.png|link=]] | |align="center"| [[File:Hwang Temple Dark-Ghost Leader.png|link=]] | ||
|align="center"| [[File:Seelenstein.png|link=]] [[File:Elixier des Forschers.png|link=]] [[File:Lucent Green Powershard.png|link=]] | |align="center"| [[File:Seelenstein.png|link=]] [[File:Elixier des Forschers.png|link=]] [[File:Lucent Green Powershard.png|link=Lucent Green Powershard]] [[File:Bosstruhe.png|link=[[Dark Leader's Chest]]]] | ||
|- | |- | ||
|align="center"| Yellow Tiger Ghost<br>[[File:Yellow Tiger Ghost.png|link=|150px]] | |align="center"| [[File:Wind.png|40px]] | ||
Yellow Tiger Ghost<br>[[File:Yellow Tiger Ghost.png|link=|150px]] | |||
|align="center"| 25 minutes | |align="center"| 25 minutes | ||
|align="center"| A second Yellow Tiger Ghost spawns in a random location<br>[[File:Hwang Temple Yellow Tiger Ghost.png|link=]] | |align="center"| A second Yellow Tiger Ghost spawns in a random location<br>[[File:Hwang Temple Yellow Tiger Ghost.png|link=]] | ||
|align="center"| [[File:Seelenstein.png|link=]] [[File:Elixier des Forschers.png|link=]] 3x[[File:Muschel.png|link=]] [[File:Segenskugel.png|link=]] | |align="center"| [[File:Seelenstein.png|link=]] [[File:Elixier des Forschers.png|link=]] 3x[[File:Muschel.png|link=]] [[File:Segenskugel.png|link=]] 15x[[File:Gegenstand verzaubern.png|link=Enchant item]] [[File:Lucent Green Powershard.png|link=Lucent Green Powershard]] [[File:Cor Draconis (Roh).png|link=Cor Draconis (Rough)]] [[File:Erfahrungsring.png|link=]] 2x[[File:Feines Tuch.png|link=]] [[File:Bosstruhe.png|link=[[Yellow Tiger's Chest]]]] | ||
|} | |} | ||
{{top}} | |||
=== Demon Tower === | |||
{|width=100% align="center" {{NormalTables}} | |||
|- {{Hl3}} | |||
!| Boss | |||
!| Respawn time | |||
!| Where to find | |||
!| Drops | |||
|- | |||
|align="center"| [[File:Dunkelheit.png|40px]] | |||
Blue Death <br>[[File:Blauer Tod.png|link=|150px]] | |||
|align="center"| Only on "[[Events#Blue_Death_Event|Blue Death Event]]" | |||
|align="center"| Demon Tower | |||
[[File:Demontower.png|link=|100px]] | |||
|align="center"| [[File:Enchant Item Chest.png|link=Enchant Item Chest]] 5x[[File:Cor Daemonis (Rough).png|link=]] 10x[[File:Cor Daemonis (Rough).png|link=]] [[File:Flame of the Dragon.png|link=Flame of the Dragon]] [[File:Segnung.png|link=]] | |||
[[File:Event münze.png|link=]] EC Voucher (10) 5x [[File:Bosstruhe.png|link=[[Grim Reaper´s Chest]]]] | |||
1x[[File:Weißdrachenelixir (L).png|link=]] Stoneslayer or Bossslayer or Metinslayer Elixir (L) | |||
1x[[File:Weißdrachenelixir (S).png|link=]] Stoneslayer or Bossslayer or Metinslayer Elixir (S) | |||
|- | |||
|align="center"| [[File:Dunkelheit.png|40px]] | |||
Death Reaper <br>[[File:Death Reaper.png|link=|150px]] | |||
|align="center"| 1x per Dungeon | |||
|align="center"| Demon Tower | |||
[[File:Demontower.png|link=|100px]] | |||
|align="center"| [[File:Seelenstein.png|link=]] 2x[[File:Lucent_Green_Powershard.png|link=Lucent Green Powershard]] 3x[[File:Segenskugel.png|link=]] 10x [[File:Muschel.png|link=]] 100x[[File:Gegenstand_verzaubern.png|link=Enchant Item]] [[File:Cor_Draconis_(Roh).png|link=Cor Draconis (Rough)]] [[File:Blacksmith Handbook.png|link=]] [[File:Azyrah Coin Voucher.png|link=]] [[File:Flame of the Dragon.png|link=]] [[File:Erfahrungsring.png|link=]] 5x[[File:Feines_Tuch.png|link=]] [[File:Small Orison.png|link=]] [[File:Time Spiral.png|link=]] [[File:Elixier_des_Forschers.png|link=]] [[File:Konzentriertes_Lesen.png|link=]] [[File:Rolle_der_Mutation.png|link=]] [[File:Rolle_der_Evolution.png|link=]] [[File:Schrumpfkopf.png|link=]] [[File:Bosstruhe.png|link=[[Death Reaper`s Chest]]]] | |||
|} | |||
{{top}} | |||
=== Spider Dungeon 1 === | === Spider Dungeon 1 === | ||
{|width= | {|width=100% align="center" {{NormalTables}} | ||
|- {{Hl3}} | |- {{Hl3}} | ||
!| Boss | !| Boss | ||
| Line 147: | Line 186: | ||
!| Drops | !| Drops | ||
|- | |- | ||
|align="center"| Queen Spider<br>[[File:Queen Spider.png|link=|300px]] | |align="center"| [[File:Wind.png|40px]] | ||
Queen Spider<br>[[File:Queen Spider.png|link=|300px]] | |||
|align="center"| 30 minutes | |align="center"| 30 minutes | ||
|align="center"| [[File:Spider Dungeon 1.png|link=]] | |align="center"| [[File:Spider Dungeon 1.png|link=]] | ||
|align="center"| [[File:Seelenstein.png|link=]] [[File:Elixier des Forschers.png|link=]] [[File:Passage Ticket.png|link=]] 3x[[File:Muschel.png|link=]] [[File:Segenskugel.png|link=]] 3x[[File:Gegenstand verzaubern.png|link=]] [[File:Lucent Green Powershard.png|link=]] [[File:Cor Draconis (Roh).png|link=]] [[File:Erfahrungsring.png|link=]] 2x[[File:Feines Tuch.png|link=]] [[File:Bosstruhe.png|link=[[Queen Spider Box]]]] [[File:Queen Spider Poison.png|link=]] | |align="center"| [[File:Seelenstein.png|link=]] [[File:Elixier des Forschers.png|link=]] [[File:Passage Ticket.png|link=]] 3x[[File:Muschel.png|link=]] [[File:Segenskugel.png|link=]] 3x[[File:Gegenstand verzaubern.png|link=Enchant Item]] [[File:Lucent Green Powershard.png|link=Lucent Green Powershard]] [[File:Cor Draconis (Roh).png|link=Cor Draconis (Rough)]] [[File:Erfahrungsring.png|link=]] 2x[[File:Feines Tuch.png|link=]] [[File:Bosstruhe.png|link=[[Queen Spider Box]]]] [[File:Queen Spider Poison.png|link=]] | ||
|} | |} | ||
{{top}} | |||
=== Spider Dungeon 2 === | === Spider Dungeon 2 === | ||
{|width= | {|width=100% align="center" {{NormalTables}} | ||
|- {{Hl3}} | |- {{Hl3}} | ||
!| Boss | !| Boss | ||
| Line 161: | Line 202: | ||
!| Drops | !| Drops | ||
|- | |- | ||
|align="center"| Queen Spider<br>[[File:Queen Spider.png|link=|300px]] | |align="center"| [[File:Wind.png|40px]] | ||
Queen Spider<br>[[File:Queen Spider.png|link=|300px]] | |||
|align="center"| 30 minutes | |align="center"| 30 minutes | ||
|align="center"| [[File:Spider Dungeon 2.png|link=|200px]] | |align="center"| [[File:Spider Dungeon 2.png|link=|200px]] | ||
|align="center"| [[File:Seelenstein.png|link=]] [[File:Elixier des Forschers.png|link=]] [[File:Passage Ticket.png|link=]] 3x[[File:Muschel.png|link=]] [[File:Segenskugel.png|link=]] 3x[[File:Gegenstand verzaubern.png|link=]] [[File:Lucent Green Powershard.png|link=]] [[File:Cor Draconis (Roh).png|link=]] [[File:Erfahrungsring.png|link=]] 2x[[File:Feines Tuch.png|link=]] [[File:Bosstruhe.png|link=[[Queen Spider Box]]]] [[File:Queen Spider Poison.png|link=]] | |align="center"| [[File:Seelenstein.png|link=]] [[File:Elixier des Forschers.png|link=]] [[File:Passage Ticket.png|link=]] 3x[[File:Muschel.png|link=]] [[File:Segenskugel.png|link=]] 3x[[File:Gegenstand verzaubern.png|link=]] [[File:Lucent Green Powershard.png|link=]] [[File:Cor Draconis (Roh).png|link=Cor Draconis (Rough)]] [[File:Erfahrungsring.png|link=]] 2x[[File:Feines Tuch.png|link=]] [[File:Bosstruhe.png|link=[[Queen Spider Box]]]] [[File:Queen Spider Poison.png|link=]] | ||
|} | |} | ||
{{top}} | |||
=== Mount Sohan === | === Mount Sohan === | ||
{|width= | {|width=100% align="center" {{NormalTables}} | ||
|- {{Hl3}} | |- {{Hl3}} | ||
!| Boss | !| Boss | ||
| Line 175: | Line 218: | ||
!| Drops | !| Drops | ||
|- | |- | ||
|align="center"| Nine Tails<br>[[File:Nine Tails.png|link=|140px]] | |align="center"| [[File:Eis.png|40px]] | ||
Nine Tails<br>[[File:Nine Tails.png|link=|140px]] | |||
|align="center"| 25 minutes | |align="center"| 25 minutes | ||
|align="center"| A second Nine Tails spawns in a random location<br>[[File:Mount Sohan.png|link=|250px]] | |align="center"| A second Nine Tails spawns in a random location<br>[[File:Mount Sohan.png|link=|250px]] | ||
|align="center"| [[File:Blood Stone.png|link=]] [[File:Seelenstein.png|link=]] [[File:Elixier des Forschers.png|link=]] 3x[[File:Muschel.png|link=]] [[File:Segenskugel.png|link=]] | |align="center"| [[File:Blood Stone.png|link=]] [[File:Seelenstein.png|link=]] [[File:Elixier des Forschers.png|link=]] 3x[[File:Muschel.png|link=]] [[File:Segenskugel.png|link=]] 15x[[File:Gegenstand verzaubern.png|link=Enchant item]] [[File:Lucent Green Powershard.png|link=Lucent Green Powershard]] [[File:Cor Draconis (Roh).png|link=Cor Draconis (Rough)]] [[File:Erfahrungsring.png|link=]] 2x[[File:Feines Tuch.png|link=]] [[File:Bosstruhe.png|link=[[Nine Tails Chest]]]] | ||
|} | |} | ||
{{top}} | |||
=== Doyyumhwan === | === Doyyumhwan === | ||
{|width= | {|width=100% align="center" {{NormalTables}} | ||
|- {{Hl3}} | |- {{Hl3}} | ||
!| Boss | !| Boss | ||
| Line 189: | Line 234: | ||
!| Drops | !| Drops | ||
|- | |- | ||
|align="center"| Flame King<br>[[File:Flame King.png|link=|150px]] | |align="center"| [[File:Feuer.png|40px]] | ||
Flame King<br>[[File:Flame King.png|link=|150px]] | |||
|align="center"| 25 minutes | |align="center"| 25 minutes | ||
|align="center"| A second Flame King spawns in a random location<br>[[File:Doyyumhwan.png|link=]] | |align="center"| A second Flame King spawns in a random location<br>[[File:Doyyumhwan.png|link=]] | ||
|align="center"| [[File:Seelenstein.png|link=]] [[File:Elixier des Forschers.png|link=]] 3x[[File:Muschel.png|link=]] [[File:Segenskugel.png|link=]] | |align="center"| [[File:Seelenstein.png|link=]] [[File:Elixier des Forschers.png|link=]] 3x[[File:Muschel.png|link=]] [[File:Segenskugel.png|link=]] 15x[[File:Gegenstand verzaubern.png|link=Enchant item]] [[File:Lucent Green Powershard.png|link=Lucent Green Powershard]] [[File:Cor Draconis (Roh).png|link=Cor Draconis (Rough)]] [[File:Erfahrungsring.png|link=]] 2x[[File:Feines Tuch.png|link=]] [[File:Bosstruhe.png|link=[[Flame King's Chest]]]] | ||
|} | |} | ||
{{top}} | |||
=== Grotto of Exile 1 === | === Grotto of Exile 1 === | ||
{|width= | {|width=100% align="center" {{NormalTables}} | ||
|- {{Hl3}} | |- {{Hl3}} | ||
!| Boss | !| Boss | ||
| Line 203: | Line 250: | ||
!| Drops | !| Drops | ||
|- | |- | ||
|align="center"| Mighty Ice Witch<br>[[File:Mighty Icewitch.png|link=|100px]] | |align="center"| [[File:Eis.png|40px]] | ||
Mighty Ice Witch<br>[[File:Mighty Icewitch.png|link=|100px]] | |||
|align="center"| 1 hour | |align="center"| 1 hour | ||
|align="center"| Can randomly spawn everywhere<br>[[File:Grotto of Exile.png|link=]] | |align="center"| Can randomly spawn everywhere<br>[[File:Grotto of Exile.png|link=]] | ||
|align="center"| [[File:Blacksteel.gif|link=]]+7 [[File:Shields.gif|link=]]+5 [[File:Shoes.gif|link=]]+6 [[File:Necklace.gif|link=]]+6 [[File:Earrings.gif|link=]]+6 [[File:Stone.gif|link=]]+4 [[File:Blood Stone.png|link=]] [[File:Seelenstein.png|link=]] [[File:Glove Piece.png|link=]] [[File:Lucent Green Powershard.png|link=]] | |align="center"| [[File:Blacksteel.gif|link=]]+7 [[File:Shields.gif|link=]]+5 [[File:Shoes.gif|link=]]+6 [[File:Necklace.gif|link=]]+6 [[File:Earrings.gif|link=]]+6 [[File:Stone.gif|link=]]+4 [[File:Blood Stone.png|link=]] [[File:Seelenstein.png|link=]] [[File:Glove Piece.png|link=]] [[File:Lucent Green Powershard.png|link=Lucent Green Powershard]] | ||
|} | |} | ||
{{top}} | |||
=== Grotto of Exile 2 === | === Grotto of Exile 2 === | ||
{|width= | {|width=100% align="center" {{NormalTables}} | ||
|- {{Hl3}} | |- {{Hl3}} | ||
!| Boss | !| Boss | ||
| Line 217: | Line 266: | ||
!| Drops | !| Drops | ||
|- | |- | ||
|align="center"| Captain Yonghan<br>[[File:Captain Yonghan.png|link=|150px]] | |align="center"| [[File:Blitz.png|40px]] | ||
Captain Yonghan<br>[[File:Captain Yonghan.png|link=|150px]] | |||
|align="center"| 20 minutes | |align="center"| 20 minutes | ||
|align="center"| A second Captain Yonghan spawns in a random location<br>[[File:Grotto of Exile 2.png|link=]] | |align="center"| A second Captain Yonghan spawns in a random location<br>[[File:Grotto of Exile 2.png|link=]] | ||
|align="center"| [[File:Blacksteel.gif|link=]]+2 [[File:Shields.gif|link=]]+5 [[File:Shoes 2.gif|link=]]+5 [[File:Necklace 2.gif|link=]]+6 [[File:Earrings 2.gif|link=]]+6 2x[[File:Muschel.png|link=]] 3x[[File:Twisted Key.png|link=]] [[File:Seelenstein.png|link=]] [[File:Lucent Green Powershard.png|link=]] | |align="center"| [[File:Blacksteel.gif|link=]]+2 [[File:Shields.gif|link=]]+5 [[File:Shoes 2.gif|link=]]+5 [[File:Necklace 2.gif|link=]]+6 [[File:Earrings 2.gif|link=]]+6 2x[[File:Muschel.png|link=]] 3x[[File:Twisted Key.png|link=]] [[File:Seelenstein.png|link=]] [[File:Lucent Green Powershard.png|link=Lucent Green Powershard]] | ||
|} | |} | ||
{{top}} | |||
=== Cape Dragon Fire === | === Cape Dragon Fire === | ||
{|width= | {|width=100% align="center" {{NormalTables}} | ||
|- {{Hl3}} | |- {{Hl3}} | ||
!| Boss | !| Boss | ||
| Line 231: | Line 282: | ||
!| Drops | !| Drops | ||
|- | |- | ||
|align="center"| Gnoll Lord<br>[[File:Lord Gnoll.png|link=|200px]] | |align="center"| [[File:Erde.png|40px]] | ||
Gnoll Lord<br>[[File:Lord Gnoll.png|link=|200px]] | |||
|align="center"| 1 hour | |align="center"| 1 hour | ||
|align="center"| [[File:CapeDragonFire Gnoll Lord.png|link=]] | |align="center"| [[File:CapeDragonFire Gnoll Lord.png|link=]] | ||
|align="center"| [[File:Blacksteel.gif|link=]]+5 [[File:Seelenstein.png|link=]] [[File:Tue Fungus.png|link=]] [[File:Elixier des Forschers.png|link=]] [[File:Ring Piece.png|link=]] [[File:Glove Piece.png|link=]] [[File:Bosstruhe.png|link=[[Chest of Darkness]]]] [[File:Rainbow Powershard.png|link=]] [[File:Lucent Yellow Powershard.png|link=]] [[File:Cor Draconis (Roh).png|link=]] [[File:Feines Tuch.png|link=]] | |align="center"| [[File:Blacksteel.gif|link=]]+5 [[File:Seelenstein.png|link=]] [[File:Tue Fungus.png|link=]] [[File:Elixier des Forschers.png|link=]] [[File:Ring Piece.png|link=]] [[File:Glove Piece.png|link=]] [[File:Bosstruhe.png|link=[[Chest of Darkness]]]] [[File:Rainbow Powershard.png|link=]] [[File:Lucent Yellow Powershard.png|link=]] [[File:Cor Draconis (Roh).png|link=Cor Draconis (Rough)]] [[File:Feines Tuch.png|link=]] | ||
|- | |- | ||
|align="center"| Supreme Gnoll | |align="center"| [[File:Erde.png|40px]] | ||
Supreme Gnoll Guard<br>[[File:Supreme Gnoll Guard.png|link=|250px]] | |||
|align="center"| 1 hour | |align="center"| 1 hour | ||
|align="center"| [[File:CapeDragonFire Supreme Gnoll Guard.png|link=]] | |align="center"| [[File:CapeDragonFire Supreme Gnoll Guard.png|link=]] | ||
|align="center"| [[File:Blacksteel.gif|link=]]+5 [[File:Seelenstein.png|link=]] [[File:Tue Fungus.png|link=]] [[File:Elixier des Forschers.png|link=]] [[File:Ring Piece.png|link=]] [[File:Glove Piece.png|link=]] [[File:Bosstruhe.png|link=[[Chest of Darkness]]]] [[File:Rainbow Powershard.png|link=]] [[File:Lucent Yellow Powershard.png|link=]] [[File:Cor Draconis (Roh).png|link=]] [[File:Feines Tuch.png|link=]] | |align="center"| [[File:Blacksteel.gif|link=]]+5 [[File:Seelenstein.png|link=]] [[File:Tue Fungus.png|link=]] [[File:Elixier des Forschers.png|link=]] [[File:Ring Piece.png|link=]] [[File:Glove Piece.png|link=]] [[File:Bosstruhe.png|link=[[Chest of Darkness]]]] [[File:Rainbow Powershard.png|link=]] [[File:Lucent Yellow Powershard.png|link=]] [[File:Cor Draconis (Roh).png|link=Cor Draconis (Rough)]] [[File:Feines Tuch.png|link=]] | ||
|- | |- | ||
|align="center"| Rakshasa<br>[[File:Rakshasa.png|link=|250px]] | |align="center"| [[File:Wind.png|40px]] | ||
Rakshasa<br>[[File:Rakshasa.png|link=|250px]] | |||
|align="center"| 1 hour | |align="center"| 1 hour | ||
|align="center"| [[File:CapeDragonFire Rakshasa.png|link=]] | |align="center"| [[File:CapeDragonFire Rakshasa.png|link=]] | ||
|align="center"| [[File:Blacksteel.gif|link=]]+5 [[File:Seelenstein.png|link=]] [[File:Tue Fungus.png|link=]] [[File:Elixier des Forschers.png|link=]] [[File:Ring Piece.png|link=]] [[File:Glove Piece.png|link=]] [[File:Bosstruhe.png|link=[[Chest of Darkness]]]] [[File:Rainbow Powershard.png|link=]] [[File:Lucent Yellow Powershard.png|link=]] [[File:Cor Draconis (Roh).png|link=]] [[File:Feines Tuch.png|link=]] | |align="center"| [[File:Blacksteel.gif|link=]]+5 [[File:Seelenstein.png|link=]] [[File:Tue Fungus.png|link=]] [[File:Elixier des Forschers.png|link=]] [[File:Ring Piece.png|link=]] [[File:Glove Piece.png|link=]] [[File:Bosstruhe.png|link=[[Chest of Darkness]]]] [[File:Rainbow Powershard.png|link=]] [[File:Lucent Yellow Powershard.png|link=]] [[File:Cor Draconis (Roh).png|link=Cor Draconis (Rough)]] [[File:Feines Tuch.png|link=]] | ||
|- | |- | ||
|align="center"| Martyaxwar<br>[[File:Martyaxwar.png|link=|250px]] | |align="center"| [[File:Wind.png|40px]] | ||
Martyaxwar<br>[[File:Martyaxwar.png|link=|250px]] | |||
|align="center"| 1 hour | |align="center"| 1 hour | ||
|align="center"| [[File:CapeDragonFire Martyaxwar.png|link=]] | |align="center"| [[File:CapeDragonFire Martyaxwar.png|link=]] | ||
|align="center"| [[File:Blacksteel.gif|link=]]+5 [[File:Seelenstein.png|link=]] [[File:Tue Fungus.png|link=]] [[File:Elixier des Forschers.png|link=]] [[File:Ring Piece.png|link=]] [[File:Glove Piece.png|link=]] [[File:Bosstruhe.png|link=[[Chest of Darkness]]]] [[File:Rainbow Powershard.png|link=]] [[File:Lucent Yellow Powershard.png|link=]] [[File:Cor Draconis (Roh).png|link=]] [[File:Feines Tuch.png|link=]] | |align="center"| [[File:Blacksteel.gif|link=]]+5 [[File:Seelenstein.png|link=]] [[File:Tue Fungus.png|link=]] [[File:Elixier des Forschers.png|link=]] [[File:Ring Piece.png|link=]] [[File:Glove Piece.png|link=]] [[File:Bosstruhe.png|link=[[Chest of Darkness]]]] [[File:Rainbow Powershard.png|link=]] [[File:Lucent Yellow Powershard.png|link=]] [[File:Cor Draconis (Roh).png|link=Cor Draconis (Rough)]] [[File:Feines Tuch.png|link=]] | ||
|- | |- | ||
|align="center"| Bone Face<br>[[File:Bone Face.png|link=|150px]] | |align="center"| [[File:Erde.png|40px]] | ||
Bone Face<br>[[File:Bone Face.png|link=|150px]] | |||
|align="center"| 1 hour | |align="center"| 1 hour | ||
|align="center"| [[File:CapeDragonFire Bone Face.png|link=]] | |align="center"| [[File:CapeDragonFire Bone Face.png|link=]] | ||
|align="center"| [[File:Blacksteel.gif|link=]]+5 [[File:Seelenstein.png|link=]] [[File:Tue Fungus.png|link=]] [[File:Elixier des Forschers.png|link=]] [[File:Ring Piece.png|link=]] [[File:Glove Piece.png|link=]] [[File:Bosstruhe.png|link=[[Chest of Darkness]]]] [[File:Rainbow Powershard.png|link=]] [[File:Lucent Yellow Powershard.png|link=]] [[File:Cor Draconis (Roh).png|link=]] [[File:Feines Tuch.png|link=]] | |align="center"| [[File:Blacksteel.gif|link=]]+5 [[File:Seelenstein.png|link=]] [[File:Tue Fungus.png|link=]] [[File:Elixier des Forschers.png|link=]] [[File:Ring Piece.png|link=]] [[File:Glove Piece.png|link=]] [[File:Bosstruhe.png|link=[[Chest of Darkness]]]] [[File:Rainbow Powershard.png|link=]] [[File:Lucent Yellow Powershard.png|link=]] [[File:Cor Draconis (Roh).png|link=Cor Draconis (Rough)]] [[File:Feines Tuch.png|link=]] | ||
|} | |} | ||
{{top}} | |||
=== Nephrite Bay === | === Nephrite Bay === | ||
{|width= | {|width=100% align="center" {{NormalTables}} | ||
|- {{Hl3}} | |- {{Hl3}} | ||
!| Boss | !| Boss | ||
| Line 265: | Line 322: | ||
!| Drops | !| Drops | ||
|- | |- | ||
|align="center"| General Kappa<br>[[File:General Kappa.png|link=|200px]] | |align="center"| [[File:Eis.png|40px]] | ||
General Kappa<br>[[File:General Kappa.png|link=|200px]] | |||
|align="center"| 1 hour | |align="center"| 1 hour | ||
|align="center"| [[File:Nephrite Bay General Kappa.png|link=]] | |align="center"| [[File:Nephrite Bay General Kappa.png|link=]] | ||
|align="center"| [[File:Blacksteel.gif|link=]]+5 [[File:Seelenstein.png|link=]] [[File:Tue Fungus.png|link=]] [[File:Elixier des Forschers.png|link=]] [[File:Ring Piece.png|link=]] [[File:Glove Piece.png|link=]] [[File:Bosstruhe.png|link=[[Chest of Darkness]]]] [[File:Rainbow Powershard.png|link=]] [[File:Lucent Yellow Powershard.png|link=]] [[File:Cor Draconis (Roh).png|link=]] [[File:Feines Tuch.png|link=]] | |align="center"| [[File:Blacksteel.gif|link=]]+5 [[File:Seelenstein.png|link=]] [[File:Tue Fungus.png|link=]] [[File:Elixier des Forschers.png|link=]] [[File:Ring Piece.png|link=]] [[File:Glove Piece.png|link=]] [[File:Bosstruhe.png|link=[[Chest of Darkness]]]] [[File:Rainbow Powershard.png|link=]] [[File:Lucent Yellow Powershard.png|link=]] [[File:Cor Draconis (Roh).png|link=Cor Draconis (Rough)]] [[File:Feines Tuch.png|link=]] | ||
|- | |- | ||
|align="center"| Triton<br>[[File:Triton.png|link=|150px]] | |align="center"| [[File:Eis.png|40px]] | ||
Triton<br>[[File:Triton.png|link=|150px]] | |||
|align="center"| 1 hour | |align="center"| 1 hour | ||
|align="center"| [[File:Nephrite Bay Triton.png|link=]] | |align="center"| [[File:Nephrite Bay Triton.png|link=]] | ||
|align="center"| [[File:Blacksteel.gif|link=]]+5 [[File:Seelenstein.png|link=]] [[File:Tue Fungus.png|link=]] [[File:Elixier des Forschers.png|link=]] [[File:Ring Piece.png|link=]] [[File:Glove Piece.png|link=]] [[File:Bosstruhe.png|link=[[Chest of Darkness]]]] [[File:Rainbow Powershard.png|link=]] [[File:Lucent Yellow Powershard.png|link=]] [[File:Cor Draconis (Roh).png|link=]] [[File:Feines Tuch.png|link=]] | |align="center"| [[File:Blacksteel.gif|link=]]+5 [[File:Seelenstein.png|link=]] [[File:Tue Fungus.png|link=]] [[File:Elixier des Forschers.png|link=]] [[File:Ring Piece.png|link=]] [[File:Glove Piece.png|link=]] [[File:Bosstruhe.png|link=[[Chest of Darkness]]]] [[File:Rainbow Powershard.png|link=]] [[File:Lucent Yellow Powershard.png|link=]] [[File:Cor Draconis (Roh).png|link=Cor Draconis (Rough)]] [[File:Feines Tuch.png|link=]] | ||
|- | |- | ||
|align="center"| General Lobster<br>[[File:General Lobster.png|link=|200px]] | |align="center"| [[File:Eis.png|40px]] | ||
General Lobster<br>[[File:General Lobster.png|link=|200px]] | |||
|align="center"| 1 hour | |align="center"| 1 hour | ||
|align="center"| [[File:Nephrite Bay General Lobster.png|link=]] | |align="center"| [[File:Nephrite Bay General Lobster.png|link=]] | ||
|align="center"| [[File:Blacksteel.gif|link=]]+5 [[File:Seelenstein.png|link=]] [[File:Tue Fungus.png|link=]] [[File:Elixier des Forschers.png|link=]] [[File:Ring Piece.png|link=]] [[File:Glove Piece.png|link=]] [[File:Bosstruhe.png|link=[[Chest of Darkness]]]] [[File:Rainbow Powershard.png|link=]] [[File:Lucent Yellow Powershard.png|link=]] [[File:Cor Draconis (Roh).png|link=]] [[File:Feines Tuch.png|link=]] | |align="center"| [[File:Blacksteel.gif|link=]]+5 [[File:Seelenstein.png|link=]] [[File:Tue Fungus.png|link=]] [[File:Elixier des Forschers.png|link=]] [[File:Ring Piece.png|link=]] [[File:Glove Piece.png|link=]] [[File:Bosstruhe.png|link=[[Chest of Darkness]]]] [[File:Rainbow Powershard.png|link=]] [[File:Lucent Yellow Powershard.png|link=]] [[File:Cor Draconis (Roh).png|link=Cor Draconis (Rough)]] [[File:Feines Tuch.png|link=]] | ||
|- | |- | ||
|align="center"| King Crab<br>[[File:King Crab.png|link=|200px]] | |align="center"| [[File:Eis.png|40px]] | ||
King Crab<br>[[File:King Crab.png|link=|200px]] | |||
|align="center"| 1 hour | |align="center"| 1 hour | ||
|align="center"| [[File:Nephrite Bay King Crab.png|link=]] | |align="center"| [[File:Nephrite Bay King Crab.png|link=]] | ||
|align="center"| [[File:Blacksteel.gif|link=]]+5 [[File:Seelenstein.png|link=]] [[File:Tue Fungus.png|link=]] [[File:Elixier des Forschers.png|link=]] [[File:Ring Piece.png|link=]] [[File:Glove Piece.png|link=]] [[File:Bosstruhe.png|link=[[Chest of Darkness]]]] [[File:Rainbow Powershard.png|link=]] [[File:Lucent Yellow Powershard.png|link=]] [[File:Cor Draconis (Roh).png|link=]] [[File:Feines Tuch.png|link=]] | |align="center"| [[File:Blacksteel.gif|link=]]+5 [[File:Seelenstein.png|link=]] [[File:Tue Fungus.png|link=]] [[File:Elixier des Forschers.png|link=]] [[File:Ring Piece.png|link=]] [[File:Glove Piece.png|link=]] [[File:Bosstruhe.png|link=[[Chest of Darkness]]]] [[File:Rainbow Powershard.png|link=]] [[File:Lucent Yellow Powershard.png|link=]] [[File:Cor Draconis (Roh).png|link=Cor Draconis (Rough)]] [[File:Feines Tuch.png|link=]] | ||
|- | |- | ||
|align="center"| Bone Face<br>[[File:Bone Face.png|link=|150px]] | |align="center"| [[File:Erde.png|40px]] | ||
Bone Face<br>[[File:Bone Face.png|link=|150px]] | |||
|align="center"| 1 hour | |align="center"| 1 hour | ||
|align="center"| [[File:Nephrite Bay Bone Face.png|link=]] | |align="center"| [[File:Nephrite Bay Bone Face.png|link=]] | ||
|align="center"| [[File:Blacksteel.gif|link=]]+5 [[File:Seelenstein.png|link=]] [[File:Tue Fungus.png|link=]] [[File:Elixier des Forschers.png|link=]] [[File:Ring Piece.png|link=]] [[File:Glove Piece.png|link=]] [[File:Bosstruhe.png|link=[[Chest of Darkness]]]] [[File:Rainbow Powershard.png|link=]] [[File:Lucent Yellow Powershard.png|link=]] [[File:Cor Draconis (Roh).png|link=]] [[File:Feines Tuch.png|link=]] | |align="center"| [[File:Blacksteel.gif|link=]]+5 [[File:Seelenstein.png|link=]] [[File:Tue Fungus.png|link=]] [[File:Elixier des Forschers.png|link=]] [[File:Ring Piece.png|link=]] [[File:Glove Piece.png|link=]] [[File:Bosstruhe.png|link=[[Chest of Darkness]]]] [[File:Rainbow Powershard.png|link=]] [[File:Lucent Yellow Powershard.png|link=]] [[File:Cor Draconis (Roh).png|link=Cor Draconis (Rough)]] [[File:Feines Tuch.png|link=]] | ||
|- | |- | ||
|align="center"| Red Chief<br>[[File:Red Chief.png|link=|150px]] | |align="center"| [[File:Erde.png|40px]] | ||
Red Chief<br>[[File:Red Chief.png|link=|150px]] | |||
|align="center"| 1 hour | |align="center"| 1 hour | ||
|align="center"| [[File:Nephrite Bay Red Chief.png|link=]] | |align="center"| [[File:Nephrite Bay Red Chief.png|link=]] | ||
|align="center"| [[File:Blacksteel.gif|link=]]+5 [[File:Seelenstein.png|link=]] [[File:Tue Fungus.png|link=]] [[File:Elixier des Forschers.png|link=]] [[File:Ring Piece.png|link=]] [[File:Glove Piece.png|link=]] [[File:Bosstruhe.png|link=[[Chest of Darkness]]]] [[File:Rainbow Powershard.png|link=]] [[File:Lucent Yellow Powershard.png|link=]] [[File:Cor Draconis (Roh).png|link=]] [[File:Feines Tuch.png|link=]] | |align="center"| [[File:Blacksteel.gif|link=]]+5 [[File:Seelenstein.png|link=]] [[File:Tue Fungus.png|link=]] [[File:Elixier des Forschers.png|link=]] [[File:Ring Piece.png|link=]] [[File:Glove Piece.png|link=]] [[File:Bosstruhe.png|link=[[Chest of Darkness]]]] [[File:Rainbow Powershard.png|link=]] [[File:Lucent Yellow Powershard.png|link=]] [[File:Cor Draconis (Roh).png|link=Cor Draconis (Rough)]] [[File:Feines Tuch.png|link=]] | ||
|} | |} | ||
{{top}} | |||
=== Thunder Mountains === | === Thunder Mountains === | ||
{|width= | {|width=100% align="center" {{NormalTables}} | ||
|- {{Hl3}} | |- {{Hl3}} | ||
!| Boss | !| Boss | ||
| Line 304: | Line 368: | ||
!| Drops | !| Drops | ||
|- | |- | ||
|align="center"| Brutal Bone Face<br>[[File:Brutal Bone Face.png|link=|150px]] | |align="center"| [[File:Blitz.png|40px]] | ||
Brutal Bone Face<br>[[File:Brutal Bone Face.png|link=|150px]] | |||
|align="center"| 1 hour | |align="center"| 1 hour | ||
|align="center"| [[File:Thunder Mountains Brutal Bone Face.png|link=]] | |align="center"| [[File:Thunder Mountains Brutal Bone Face.png|link=]] | ||
|align="center"| [[File:Blacksteel.gif|link=]]+5 [[File:Seelenstein.png|link=]] [[File:Tue Fungus.png|link=]] [[File:Elixier des Forschers.png|link=]] [[File:Ring Piece.png|link=]] [[File:Glove Piece.png|link=]] [[File:Bosstruhe.png|link=[[Chest of Darkness]]]] [[File:Rainbow Powershard.png|link=]] [[File:Lucent Yellow Powershard.png|link=]] [[File:Cor Draconis (Roh).png|link=]] [[File:Feines Tuch.png|link=]] | |align="center"| [[File:Blacksteel.gif|link=]]+5 [[File:Seelenstein.png|link=]] [[File:Tue Fungus.png|link=]] [[File:Elixier des Forschers.png|link=]] [[File:Ring Piece.png|link=]] [[File:Glove Piece.png|link=]] [[File:Bosstruhe.png|link=[[Chest of Darkness]]]] [[File:Rainbow Powershard.png|link=]] [[File:Lucent Yellow Powershard.png|link=]] [[File:Cor Draconis (Roh).png|link=Cor Draconis (Rough)]] [[File:Feines Tuch.png|link=]] | ||
|- | |- | ||
|align="center"| Brutal Red Chief<br>[[File:Brutal Red Chief.png|link=|150px]] | |align="center"| [[File:Blitz.png|40px]] | ||
Brutal Red Chief<br>[[File:Brutal Red Chief.png|link=|150px]] | |||
|align="center"| 1 hour | |align="center"| 1 hour | ||
|align="center"| [[File:Thunder Mountains Brutal Red Chief.png|link=]] | |align="center"| [[File:Thunder Mountains Brutal Red Chief.png|link=]] | ||
|align="center"| [[File:Blacksteel.gif|link=]]+5 [[File:Seelenstein.png|link=]] [[File:Tue Fungus.png|link=]] [[File:Elixier des Forschers.png|link=]] [[File:Ring Piece.png|link=]] [[File:Glove Piece.png|link=]] [[File:Bosstruhe.png|link=[[Chest of Darkness]]]] [[File:Rainbow Powershard.png|link=]] [[File:Lucent Yellow Powershard.png|link=]] [[File:Cor Draconis (Roh).png|link=]] [[File:Feines Tuch.png|link=]] | |align="center"| [[File:Blacksteel.gif|link=]]+5 [[File:Seelenstein.png|link=]] [[File:Tue Fungus.png|link=]] [[File:Elixier des Forschers.png|link=]] [[File:Ring Piece.png|link=]] [[File:Glove Piece.png|link=]] [[File:Bosstruhe.png|link=[[Chest of Darkness]]]] [[File:Rainbow Powershard.png|link=]] [[File:Lucent Yellow Powershard.png|link=]] [[File:Cor Draconis (Roh).png|link=Cor Draconis (Rough)]] [[File:Feines Tuch.png|link=]] | ||
|- | |- | ||
|align="center"| Gargoyle<br>[[File:Gargoyle.png|link=|250px]] | |align="center"| [[File:Erde.png|40px]] | ||
Gargoyle<br>[[File:Gargoyle.png|link=|250px]] | |||
|align="center"| 1 hour | |align="center"| 1 hour | ||
|align="center"| [[File:Thunder Mountains Gargoyle.png|link=]] | |align="center"| [[File:Thunder Mountains Gargoyle.png|link=]] | ||
|align="center"| [[File:Blacksteel.gif|link=]]+5 [[File:Seelenstein.png|link=]] [[File:Tue Fungus.png|link=]] [[File:Elixier des Forschers.png|link=]] [[File:Ring Piece.png|link=]] [[File:Glove Piece.png|link=]] [[File:Bosstruhe.png|link=[[Chest of Darkness]]]] [[File:Rainbow Powershard.png|link=]] [[File:Lucent Yellow Powershard.png|link=]] [[File:Cor Draconis (Roh).png|link=]] [[File:Feines Tuch.png|link=]] | |align="center"| [[File:Blacksteel.gif|link=]]+5 [[File:Seelenstein.png|link=]] [[File:Tue Fungus.png|link=]] [[File:Elixier des Forschers.png|link=]] [[File:Ring Piece.png|link=]] [[File:Glove Piece.png|link=]] [[File:Bosstruhe.png|link=[[Chest of Darkness]]]] [[File:Rainbow Powershard.png|link=]] [[File:Lucent Yellow Powershard.png|link=]] [[File:Cor Draconis (Roh).png|link=Cor Draconis (Rough)]] [[File:Feines Tuch.png|link=]] | ||
|- | |- | ||
|align="center"| King Wubba<br>[[File:King Wubba.png|link=|350px]] | |align="center"| [[File:Erde.png|40px]] | ||
King Wubba<br>[[File:King Wubba.png|link=|350px]] | |||
|align="center"| 1 hour | |align="center"| 1 hour | ||
|align="center"| [[File:Thunder Mountains King Wubba.png|link=]] | |align="center"| [[File:Thunder Mountains King Wubba.png|link=]] | ||
|align="center"| [[File:Blacksteel.gif|link=]]+5 [[File:Seelenstein.png|link=]] [[File:Tue Fungus.png|link=]] [[File:Elixier des Forschers.png|link=]] [[File:Ring Piece.png|link=]] [[File:Glove Piece.png|link=]] [[File:Bosstruhe.png|link=[[Chest of Darkness]]]] [[File:Rainbow Powershard.png|link=]] [[File:Lucent Yellow Powershard.png|link=]] [[File:Cor Draconis (Roh).png|link=]] [[File:Feines Tuch.png|link=]] | |align="center"| [[File:Blacksteel.gif|link=]]+5 [[File:Seelenstein.png|link=]] [[File:Tue Fungus.png|link=]] [[File:Elixier des Forschers.png|link=]] [[File:Ring Piece.png|link=]] [[File:Glove Piece.png|link=]] [[File:Bosstruhe.png|link=[[Chest of Darkness]]]] [[File:Rainbow Powershard.png|link=]] [[File:Lucent Yellow Powershard.png|link=]] [[File:Cor Draconis (Roh).png|link=Cor Draconis (Rough)]] [[File:Feines Tuch.png|link=]] | ||
|- | |- | ||
|align="center"| Arges<br>[[File:Arges.png|link=|180px]] | |align="center"| [[File:Blitz.png|40px]] | ||
Arges<br>[[File:Arges.png|link=|180px]] | |||
|align="center"| 1 hour | |align="center"| 1 hour | ||
|align="center"| [[File:Thunder Mountains Arges.png|link=]] | |align="center"| [[File:Thunder Mountains Arges.png|link=]] | ||
|align="center"| [[File:Blacksteel.gif|link=]]+5 [[File:Seelenstein.png|link=]] [[File:Tue Fungus.png|link=]] [[File:Elixier des Forschers.png|link=]] [[File:Ring Piece.png|link=]] [[File:Glove Piece.png|link=]] [[File:Bosstruhe.png|link=[[Chest of Darkness]]]] [[File:Rainbow Powershard.png|link=]] [[File:Lucent Yellow Powershard.png|link=]] [[File:Cor Draconis (Roh).png|link=]] [[File:Feines Tuch.png|link=]] | |align="center"| [[File:Blacksteel.gif|link=]]+5 [[File:Seelenstein.png|link=]] [[File:Tue Fungus.png|link=]] [[File:Elixier des Forschers.png|link=]] [[File:Ring Piece.png|link=]] [[File:Glove Piece.png|link=]] [[File:Bosstruhe.png|link=[[Chest of Darkness]]]] [[File:Rainbow Powershard.png|link=]] [[File:Lucent Yellow Powershard.png|link=]] [[File:Cor Draconis (Roh).png|link=Cor Draconis (Rough)]] [[File:Feines Tuch.png|link=]] | ||
|- | |- | ||
|align="center"| Polyphemos<br>[[File:Polyphemos.png|link=|180px]] | |align="center"| [[File:Blitz.png|40px]] | ||
Polyphemos<br>[[File:Polyphemos.png|link=|180px]] | |||
|align="center"| 1 hour | |align="center"| 1 hour | ||
|align="center"| [[File:Thunder Mountains Polyphemos.png|link=]] | |align="center"| [[File:Thunder Mountains Polyphemos.png|link=]] | ||
|align="center"| [[File:Blacksteel.gif|link=]]+5 [[File:Seelenstein.png|link=]] [[File:Tue Fungus.png|link=]] [[File:Elixier des Forschers.png|link=]] [[File:Ring Piece.png|link=]] [[File:Glove Piece.png|link=]] [[File:Bosstruhe.png|link=[[Chest of Darkness]]]] [[File:Rainbow Powershard.png|link=]] [[File:Lucent Yellow Powershard.png|link=]] [[File:Cor Draconis (Roh).png|link=]] [[File:Feines Tuch.png|link=]] | |align="center"| [[File:Blacksteel.gif|link=]]+5 [[File:Seelenstein.png|link=]] [[File:Tue Fungus.png|link=]] [[File:Elixier des Forschers.png|link=]] [[File:Ring Piece.png|link=]] [[File:Glove Piece.png|link=]] [[File:Bosstruhe.png|link=[[Chest of Darkness]]]] [[File:Rainbow Powershard.png|link=]] [[File:Lucent Yellow Powershard.png|link=]] [[File:Cor Draconis (Roh).png|link=Cor Draconis (Rough)]] [[File:Feines Tuch.png|link=]] | ||
|} | |} | ||
{{top}} | |||
=== Gautamacliff === | === Gautamacliff === | ||
{|width= | {|width=100% align="center" {{NormalTables}} | ||
|- {{Hl3}} | |- {{Hl3}} | ||
!| Boss | !| Boss | ||
| Line 343: | Line 414: | ||
!| Drops | !| Drops | ||
|- | |- | ||
|align="center"| Captain Shruk<br>[[File:Captain Shruk.png|link=|150px]] | |align="center"| [[File:Erde.png|40px]] | ||
Bone Face<br>[[File:Skeletos.png|120px|link=]] | |||
|align="center"| 1 hour | |||
|align="center"| [[File:Bone Face spawn.png|link=]] | |||
|align="center"| [[File:Seelenstein.png|link=]] [[File:Bosstruhe.png|link=Chest of Darkness]] | |||
|- | |||
|align="center"| [[File:Erde.png|40px]] | |||
Captain Shruk<br>[[File:Captain Shruk.png|link=|150px]] | |||
|align="center"| 1 hour | |align="center"| 1 hour | ||
|align="center"| [[File:Gautamacliff Captain Shruk.png|link=]] | |align="center"| [[File:Gautamacliff Captain Shruk.png|link=]] | ||
|align="center"| [[File:Blacksteel.gif|link=]]+5 [[File:Seelenstein.png|link=]] [[File:Tue Fungus.png|link=]] [[File:Elixier des Forschers.png|link=]] [[File:Ring Piece.png|link=]] [[File:Glove Piece.png|link=]] [[File:Bosstruhe.png|link=[[Chest of Darkness]]]] [[File:Rainbow Powershard.png|link=]] [[File:Lucent Yellow Powershard.png|link=]] [[File:Cor Draconis (Roh).png|link=]] [[File:Feines Tuch.png|link=]] | |align="center"| [[File:Blacksteel.gif|link=]]+5 [[File:Seelenstein.png|link=]] [[File:Tue Fungus.png|link=]] [[File:Elixier des Forschers.png|link=]] [[File:Ring Piece.png|link=]] [[File:Glove Piece.png|link=]] [[File:Bosstruhe.png|link=[[Chest of Darkness]]]] [[File:Rainbow Powershard.png|link=]] [[File:Lucent Yellow Powershard.png|link=]] [[File:Cor Draconis (Roh).png|link=Cor Draconis (Rough)]] [[File:Feines Tuch.png|link=]] | ||
|- | |- | ||
|align="center"| The Great Ogre<br>[[File:The Great Ogre.png|link=|80px]] | |align="center"| [[File:Erde.png|40px]] | ||
The Great Ogre<br>[[File:The Great Ogre.png|link=|80px]] | |||
|align="center"| 1 hour | |align="center"| 1 hour | ||
|align="center"| [[File:Gautamacliff The Great Ogre.png|link=]] | |align="center"| [[File:Gautamacliff The Great Ogre.png|link=]] | ||
|align="center"| [[File:Blacksteel.gif|link=]]+5 [[File:Seelenstein.png|link=]] [[File:Tue Fungus.png|link=]] [[File:Elixier des Forschers.png|link=]] [[File:Ring Piece.png|link=]] [[File:Glove Piece.png|link=]] [[File:Bosstruhe.png|link=[[Chest of Darkness]]]] [[File:Rainbow Powershard.png|link=]] [[File:Lucent Yellow Powershard.png|link=]] [[File:Cor Draconis (Roh).png|link=]] [[File:Feines Tuch.png|link=]] | |align="center"| [[File:Blacksteel.gif|link=]]+5 [[File:Seelenstein.png|link=]] [[File:Tue Fungus.png|link=]] [[File:Elixier des Forschers.png|link=]] [[File:Ring Piece.png|link=]] [[File:Glove Piece.png|link=]] [[File:Bosstruhe.png|link=[[Chest of Darkness]]]] [[File:Rainbow Powershard.png|link=]] [[File:Lucent Yellow Powershard.png|link=]] [[File:Cor Draconis (Roh).png|link=Cor Draconis (Rough)]] [[File:Feines Tuch.png|link=]] | ||
|- | |- | ||
|align="center"| Lemures Prince<br>[[File:Lemures Prince.png|link=|150px]] | |align="center"| [[File:Wind.png|40px]] | ||
Lemures Prince<br>[[File:Lemures Prince.png|link=|150px]] | |||
|align="center"| 1 hour | |align="center"| 1 hour | ||
|align="center"| [[File:Gautamacliff Lemures Prince.png|link=]] | |align="center"| [[File:Gautamacliff Lemures Prince.png|link=]] | ||
|align="center"| [[File:Blacksteel.gif|link=]]+5 [[File:Seelenstein.png|link=]] [[File:Tue Fungus.png|link=]] [[File:Elixier des Forschers.png|link=]] [[File:Ring Piece.png|link=]] [[File:Glove Piece.png|link=]] [[File:Bosstruhe.png|link=[[Chest of Darkness]]]] [[File:Rainbow Powershard.png|link=]] [[File:Lucent Yellow Powershard.png|link=]] [[File:Cor Draconis (Roh).png|link=]] [[File:Feines Tuch.png|link=]] | |align="center"| [[File:Blacksteel.gif|link=]]+5 [[File:Seelenstein.png|link=]] [[File:Tue Fungus.png|link=]] [[File:Elixier des Forschers.png|link=]] [[File:Ring Piece.png|link=]] [[File:Glove Piece.png|link=]] [[File:Bosstruhe.png|link=[[Chest of Darkness]]]] [[File:Rainbow Powershard.png|link=]] [[File:Lucent Yellow Powershard.png|link=]] [[File:Cor Draconis (Roh).png|link=Cor Draconis (Rough)]] [[File:Feines Tuch.png|link=]] | ||
|- | |- | ||
|align="center"| Lemures Bodyguard<br>[[File:Lemures Bodyguard.png|link=|220px]] | |align="center"| [[File:Eis.png|40px]] | ||
Lemures Bodyguard<br>[[File:Lemures Bodyguard.png|link=|220px]] | |||
|align="center"| 1 hour | |align="center"| 1 hour | ||
|align="center"| [[File:Gautamacliff Lemures Bodyguard.png|link=]] | |align="center"| [[File:Gautamacliff Lemures Bodyguard.png|link=]] | ||
|align="center"| [[File:Blacksteel.gif|link=]]+5 [[File:Seelenstein.png|link=]] [[File:Tue Fungus.png|link=]] [[File:Elixier des Forschers.png|link=]] [[File:Ring Piece.png|link=]] [[File:Glove Piece.png|link=]] [[File:Bosstruhe.png|link=[[Chest of Darkness]]]] [[File:Rainbow Powershard.png|link=]] [[File:Lucent Yellow Powershard.png|link=]] [[File:Cor Draconis (Roh).png|link=]] [[File:Feines Tuch.png|link=]] | |align="center"| [[File:Blacksteel.gif|link=]]+5 [[File:Seelenstein.png|link=]] [[File:Tue Fungus.png|link=]] [[File:Elixier des Forschers.png|link=]] [[File:Ring Piece.png|link=]] [[File:Glove Piece.png|link=]] [[File:Bosstruhe.png|link=[[Chest of Darkness]]]] [[File:Rainbow Powershard.png|link=]] [[File:Lucent Yellow Powershard.png|link=]] [[File:Cor Draconis (Roh).png|link=Cor Draconis (Rough)]] [[File:Feines Tuch.png|link=]] | ||
|- | |- | ||
| Line 381: | Line 462: | ||
|align="center"| [[File:Seelenstein.png|link=]] | |align="center"| [[File:Seelenstein.png|link=]] | ||
|} | |} | ||
{{top}} | |||
=== Temple of Ochao === | === Temple of Ochao === | ||
{|width= | {|width=100% align="center" {{NormalTables}} | ||
|- {{Hl3}} | |- {{Hl3}} | ||
!| Boss | !| Boss | ||
| Line 390: | Line 472: | ||
!| Drops | !| Drops | ||
|- | |- | ||
|align="center"| Ochao Bodyguard<br>[[File:Ochao Bodyguard.png|link=|200px]] | |align="center"| [[File:Wind.png|40px]] | ||
Ochao Bodyguard<br>[[File:Ochao Bodyguard.png|link=|200px]] | |||
|align="center"| 1 hour | |align="center"| 1 hour | ||
|align="center"| [[File:Temple of Ochao Ochao Bodyguard.png|link=]] | |align="center"| [[File:Temple of Ochao Ochao Bodyguard.png|link=]] | ||
|align="center"| [[File:Blacksteel.gif|link=]]+5 [[File:Seelenstein.png|link=]] [[File:Titanium Dioxide.png|link=]] [[File:Ward Book Chest.png|link=]] [[File:Boost Book Chest.png|link=]] [[File:Boost Manual.png|link=]] [[File:Ward Manual.png|link=]] [[File:Wild Pet Book.png|link=]] [[File:Elixier des Forschers.png|link=]] [[File:Ring Piece.png|link=]] [[File:Glove Piece.png|link=]] [[File:Bosstruhe.png|link=[[Chest of Darkness]]]] [[File:Rainbow Powershard.png|link=]] [[File:Lucent Yellow Powershard.png|link=]] | |align="center"| [[File:Blacksteel.gif|link=]]+5 [[File:Seelenstein.png|link=]] [[File:Titanium Dioxide.png|link=]] [[File:Ward Book Chest.png|link=]] [[File:Boost Book Chest.png|link=]] [[File:Boost Manual.png|link=]] [[File:Ward Manual.png|link=]] [[File:Wild Pet Book.png|link=]] [[File:Elixier des Forschers.png|link=]] [[File:Ring Piece.png|link=]] [[File:Glove Piece.png|link=]] [[File:Bosstruhe.png|link=[[Chest of Darkness]]]] [[File:Rainbow Powershard.png|link=]] [[File:Lucent Yellow Powershard.png|link=]] | ||
|- | |- | ||
|align="center"| Ochao Lord<br>[[File:Ochao Lord.png|link=|200px]] | |align="center"| [[File:Wind.png|40px]] | ||
Ochao Lord<br>[[File:Ochao Lord.png|link=|200px]] | |||
|align="center"| 1 hour | |align="center"| 1 hour | ||
|align="center"| [[File:Temple of Ochao Ochao Lord.png|link=]] | |align="center"| [[File:Temple of Ochao Ochao Lord.png|link=]] | ||
|align="center"| [[File:Blacksteel.gif|link=]]+5 [[File:Seelenstein.png|link=]] [[File:Titanium Dioxide.png|link=]] [[File:Ward Book Chest.png|link=]] [[File:Boost Book Chest.png|link=]] [[File:Boost Manual.png|link=]] [[File:Ward Manual.png|link=]] [[File:Wild Pet Book.png|link=]] [[File:Elixier des Forschers.png|link=]] [[File:Ring Piece.png|link=]] [[File:Glove Piece.png|link=]] [[File:Bosstruhe.png|link=[[Chest of Darkness]]]] [[File:Rainbow Powershard.png|link=]] [[File:Lucent Yellow Powershard.png|link=]] | |align="center"| [[File:Blacksteel.gif|link=]]+5 [[File:Seelenstein.png|link=]] [[File:Titanium Dioxide.png|link=]] [[File:Ward Book Chest.png|link=]] [[File:Boost Book Chest.png|link=]] [[File:Boost Manual.png|link=]] [[File:Ward Manual.png|link=]] [[File:Wild Pet Book.png|link=]] [[File:Elixier des Forschers.png|link=]] [[File:Ring Piece.png|link=]] [[File:Glove Piece.png|link=]] [[File:Bosstruhe.png|link=[[Chest of Darkness]]]] [[File:Rainbow Powershard.png|link=]] [[File:Lucent Yellow Powershard.png|link=]] | ||
|- | |- | ||
|align="center"| En-Tai-Guardian<br>[[File:En-Tai-Guardian.png|link=|150px]] | |align="center"| [[File:Wind.png|40px]] | ||
En-Tai-Guardian<br>[[File:En-Tai-Guardian.png|link=|150px]] | |||
|align="center"| Always there | |align="center"| Always there | ||
|align="center"| Changes location every 5 minutes<br>[[File:Temple of Ochao En Tai Guardian.jpg|link=]] | |align="center"| Changes location every 5 minutes<br>[[File:Temple of Ochao En Tai Guardian.jpg|link=]] | ||
|align="center"| Opens up a Portal to enter the Enchanted Forest<br>[[File:Portal.png|link=]] | |align="center"| Opens up a Portal to enter the Enchanted Forest<br>[[File:Portal.png|link=]] | ||
|} | |} | ||
{{top}} | |||
=== Enchanted Forest === | |||
{|width=100% align="center" {{NormalTables}} | |||
|- {{Hl3}} | |||
!| Boss | |||
!| Respawn time | |||
!| Where to find | |||
!| Drops | |||
|- | |||
|align="center"| [[File:Wind.png|40px]] | |||
En-Tai Sovereign<br>[[File:En-Tai Sovereign.png|link]] | |||
|align="center"| 20 Minutes | |||
|align="center"| [[File:Enchanted Forest Interactive Map.png|link=]] | |||
|align="center"| [[File:Green Potion (L).png|link=]] [[File:Purple Potion (L).png|link=]] [[File:Rüstungsplan.png|link=]] [[File:Metallic_Gold_Dye.png|link=]] [[File:Seelenstein.png|link=]] [[File:Peach Blossom.png|link=]] [[File:Bell Flower.png|link=]] [[File:Gango_Root.png|link=]] [[File:Lilac.png|link=]] [[File:Tue-Pilz.png|link=]] [[File:Alpenrose.png|link=]] [[File:Maulbeeren.png|link=]] [[File:Elixier_des_Forschers.png|link=]] | |||
|} | |||
{{top}} | |||
== New Continent (Yohara) == | == New Continent (Yohara) == | ||
=== Abandoned Fortress === | === Abandoned Fortress === | ||
{|width= | {|width=100% align="center" {{NormalTables}} | ||
|- {{Hl3}} | |- {{Hl3}} | ||
!| Boss | !| Boss | ||
| Line 415: | Line 517: | ||
!| Drops | !| Drops | ||
|- | |- | ||
|align="center"| Kao | |align="center"| [[File:Eis.png|40px]] | ||
Kao<br>[[File:Kao (Ice).png|link=|200px]] | |||
|align="center"| 1 hour | |align="center"| 1 hour | ||
|align="center"| [[File:Abandoned Fortress Kao (Ice).png|link=]] | |align="center"| [[File:Abandoned Fortress Kao (Ice).png|link=]] | ||
|align="center"| [[File:Inspiration of a Rookie.png|link=]] [[File:Inspiration of an Adept.png|link=]] [[File:Inspiration of an Expert.png|link=]] [[File:Charisma of a Rookie.png|link=]] [[File:Charisma of an Adept.png|link=]] [[File:Charisma of an Expert.png|link=]] [[File:Red Sung Ma Rune.png|link=]] [[File:Purple Sung Ma Rune.png|link=]] [[File:Blue Sung Ma Rune.png|link=]] [[File:Green Sung Ma Rune.png|link=]] [[File:Leather Hardener.png|link=]] [[File:Leather Hardener+.png|link=]] [[File:9th Path Book Chest.png|link=]] [[File:Bosstruhe.png|link=[[Yohara Treasure Chest]]]] [[File:Will Topaz.png|link=]] [[File:Random Treasure Chest.png|link=[[Random Treasure Chest]]]] [[File:Frost Root.png|link=]] [[File:Aura Fire Rune (10).png|link=]] [[File:Holy Powershard.png|link=]] [[File:Mysterious Ticket.png|link=]] 200x[[File:Glimmerstone.png|link=]] | |align="center"| [[File:Inspiration of a Rookie.png|link=]] [[File:Inspiration of an Adept.png|link=]] [[File:Inspiration of an Expert.png|link=]] [[File:Charisma of a Rookie.png|link=]] [[File:Charisma of an Adept.png|link=]] [[File:Charisma of an Expert.png|link=]] [[File:Red Sung Ma Rune.png|link=]] [[File:Purple Sung Ma Rune.png|link=]] [[File:Blue Sung Ma Rune.png|link=]] [[File:Green Sung Ma Rune.png|link=]] [[File:Leather Hardener.png|link=]] [[File:Leather Hardener+.png|link=]] [[File:9th Path Book Chest.png|link=]] [[File:Bosstruhe.png|link=[[Yohara Treasure Chest]]]] [[File:Will Topaz.png|link=]] [[File:Random Treasure Chest.png|link=[[Random Treasure Chest]]]] [[File:Frost Root.png|link=]] [[File:Aura Fire Rune (10).png|link=]] [[File:Holy Powershard.png|link=]] [[File:Mysterious Ticket.png|link=]] 200x[[File:Glimmerstone.png|link=]] | ||
|- | |- | ||
|align="center"| Kao | |align="center"| [[File:Dunkelheit.png|40px]] | ||
Kao<br>[[File:Kao (Darkness).png|link=|200px]] | |||
|align="center"| 1 hour | |align="center"| 1 hour | ||
|align="center"| [[File:Abandoned Fortress Kao (Darkness).png|link=]] | |align="center"| [[File:Abandoned Fortress Kao (Darkness).png|link=]] | ||
|align="center"| [[File:Inspiration of a Rookie.png|link=]] [[File:Inspiration of an Adept.png|link=]] [[File:Inspiration of an Expert.png|link=]] [[File:Charisma of a Rookie.png|link=]] [[File:Charisma of an Adept.png|link=]] [[File:Charisma of an Expert.png|link=]] [[File:Red Sung Ma Rune.png|link=]] [[File:Purple Sung Ma Rune.png|link=]] [[File:Blue Sung Ma Rune.png|link=]] [[File:Green Sung Ma Rune.png|link=]] [[File:Leather Hardener.png|link=]] [[File:Leather Hardener+.png|link=]] [[File:9th Path Book Chest.png|link=]] [[File:Bosstruhe.png|link=[[Yohara Treasure Chest]]]] [[File:Will Topaz.png|link=]] [[File:Random Treasure Chest.png|link=[[Random Treasure Chest]]]] [[File:Darkthorn.png|link=]] [[File:Aura Fire Rune (10).png|link=]] [[File:Holy Powershard.png|link=]] [[File:Mysterious Ticket.png|link=]] 200x[[File:Glimmerstone.png|link=]] | |align="center"| [[File:Inspiration of a Rookie.png|link=]] [[File:Inspiration of an Adept.png|link=]] [[File:Inspiration of an Expert.png|link=]] [[File:Charisma of a Rookie.png|link=]] [[File:Charisma of an Adept.png|link=]] [[File:Charisma of an Expert.png|link=]] [[File:Red Sung Ma Rune.png|link=]] [[File:Purple Sung Ma Rune.png|link=]] [[File:Blue Sung Ma Rune.png|link=]] [[File:Green Sung Ma Rune.png|link=]] [[File:Leather Hardener.png|link=]] [[File:Leather Hardener+.png|link=]] [[File:9th Path Book Chest.png|link=]] [[File:Bosstruhe.png|link=[[Yohara Treasure Chest]]]] [[File:Will Topaz.png|link=]] [[File:Random Treasure Chest.png|link=[[Random Treasure Chest]]]] [[File:Darkthorn.png|link=]] [[File:Aura Fire Rune (10).png|link=]] [[File:Holy Powershard.png|link=]] [[File:Mysterious Ticket.png|link=]] 200x[[File:Glimmerstone.png|link=]] | ||
|- | |- | ||
|align="center"| King Bao<br>[[File:King Bao.png|link=|200px]] | |align="center"| [[File:Eis.png|40px]] | ||
King Bao<br>[[File:King Bao.png|link=|200px]] | |||
|align="center"| 1 hour | |align="center"| 1 hour | ||
|align="center"| [[File:Abandoned Fortress King Bao.png|link=]] | |align="center"| [[File:Abandoned Fortress King Bao.png|link=]] | ||
|align="center"| [[File:Inspiration of a Rookie.png|link=]] [[File:Inspiration of an Adept.png|link=]] [[File:Inspiration of an Expert.png|link=]] [[File:Charisma of a Rookie.png|link=]] [[File:Charisma of an Adept.png|link=]] [[File:Charisma of an Expert.png|link=]] [[File:Book of Precision.png|link=]] [[File:Red Sung Ma Rune.png|link=]] [[File:Purple Sung Ma Rune.png|link=]] [[File:Blue Sung Ma Rune.png|link=]] [[File:Green Sung Ma Rune.png|link=]] [[File:Leather Hardener.png|link=]] [[File:Leather Hardener+.png|link=]] [[File:9th Path Book Chest.png|link=]] [[File:Bosstruhe.png|link=[[Yohara Treasure Chest]]]] [[File:Will Topaz.png|link=]] [[File:Hard Leather.png|link=]] [[File:Glove Design.png|link=]] [[File:Talent Potion.png|link=]] [[File:Tainted Core.png|link=]] [[File:Random Treasure Chest.png|link=[[Random Treasure Chest]]]] [[File:Frost Root.png|link=]] 3x[[File:Fog Jadite.png|link=]] [[File:Aura Fire Rune (10).png|link=]] [[File:Holy Powershard.png|link=]] [[File:Mysterious Ticket.png|link=]] 200x[[File:Glimmerstone.png|link=]] | |align="center"| [[File:Inspiration of a Rookie.png|link=]] [[File:Inspiration of an Adept.png|link=]] [[File:Inspiration of an Expert.png|link=]] [[File:Charisma of a Rookie.png|link=]] [[File:Charisma of an Adept.png|link=]] [[File:Charisma of an Expert.png|link=]] [[File:Book of Precision.png|link=]] [[File:Red Sung Ma Rune.png|link=]] [[File:Purple Sung Ma Rune.png|link=]] [[File:Blue Sung Ma Rune.png|link=]] [[File:Green Sung Ma Rune.png|link=]] [[File:Leather Hardener.png|link=]] [[File:Leather Hardener+.png|link=]] [[File:9th Path Book Chest.png|link=]] [[File:Bosstruhe.png|link=[[Yohara Treasure Chest]]]] [[File:Will Topaz.png|link=]] [[File:Hard Leather.png|link=]] [[File:Glove Design.png|link=]] [[File:Talent Potion.png|link=]] [[File:Tainted Core.png|link=]] [[File:Random Treasure Chest.png|link=[[Random Treasure Chest]]]] [[File:Frost Root.png|link=]] 3x[[File:Fog Jadite.png|link=]] [[File:Aura Fire Rune (10).png|link=]] [[File:Holy Powershard.png|link=]] [[File:Mysterious Ticket.png|link=]] 200x[[File:Glimmerstone.png|link=]] | ||
|} | |} | ||
{{top}} | |||
=== Dong Gwang Plain === | === Dong Gwang Plain === | ||
{|width= | {|width=100% align="center" {{NormalTables}} | ||
|- {{Hl3}} | |- {{Hl3}} | ||
!| Boss | !| Boss | ||
| Line 439: | Line 545: | ||
!| Drops | !| Drops | ||
|- | |- | ||
|align="center"| Natanan | |align="center"| [[File:Feuer.png|40px]] | ||
Natanan <br>[[File:Natanan (Fire).png|link=|200px]] | |||
|align="center"| 1 hour | |align="center"| 1 hour | ||
|align="center"| [[File:Dong Gwang Plain Natanan Fire.png|link=]] | |align="center"| [[File:Dong Gwang Plain Natanan Fire.png|link=]] | ||
|align="center"| [[File:Inspiration of a Rookie.png|link=]] [[File:Inspiration of an Adept.png|link=]] [[File:Charisma of a Rookie.png|link=]] [[File:Book of Precision.png|link=]] [[File:Red Sung Ma Rune.png|link=]] [[File:Purple Sung Ma Rune.png|link=]] [[File:Blue Sung Ma Rune.png|link=]] [[File:Green Sung Ma Rune.png|link=]] [[File:Leather Hardener.png|link=]] [[File:Leather Hardener+.png|link=]] [[File:9th Path Book Chest.png|link=]] [[File:Bosstruhe.png|link=[[Yohara Treasure Chest]]]] [[File:Hard Leather.png|link=]] [[File:Glove Design.png|link=]] [[File:Talent Potion.png|link=]] 3x[[File:Sun Jadite.png|link=]] [[File:Random Treasure Chest.png|link=[[Random Treasure Chest]]]] [[File:Flaming Leaf.png|link=]] [[File:Aura Fire Rune (10).png|link=]] [[File:Holy Powershard.png|link=]] [[File:Mysterious Ticket.png|link=]] 200x[[File:Glimmerstone.png|link=]] | |align="center"| [[File:Inspiration of a Rookie.png|link=]] [[File:Inspiration of an Adept.png|link=]] [[File:Charisma of a Rookie.png|link=]] [[File:Book of Precision.png|link=]] [[File:Red Sung Ma Rune.png|link=]] [[File:Purple Sung Ma Rune.png|link=]] [[File:Blue Sung Ma Rune.png|link=]] [[File:Green Sung Ma Rune.png|link=]] [[File:Leather Hardener.png|link=]] [[File:Leather Hardener+.png|link=]] [[File:9th Path Book Chest.png|link=]] [[File:Bosstruhe.png|link=[[Yohara Treasure Chest]]]] [[File:Hard Leather.png|link=]] [[File:Glove Design.png|link=]] [[File:Talent Potion.png|link=]] 3x[[File:Sun Jadite.png|link=]] [[File:Random Treasure Chest.png|link=[[Random Treasure Chest]]]] [[File:Flaming Leaf.png|link=]] [[File:Aura Fire Rune (10).png|link=]] [[File:Holy Powershard.png|link=]] [[File:Mysterious Ticket.png|link=]] 200x[[File:Glimmerstone.png|link=]] | ||
|- | |- | ||
|align="center"| Argos | |align="center"| [[File:Dunkelheit.png|40px]] | ||
Argos<br>[[File:Argos (Darkness).png|link=|200px]] | |||
|align="center"| 1 hour | |align="center"| 1 hour | ||
|align="center"| [[File:Dong Gwang Plain Argos Darkness.png|link=]] | |align="center"| [[File:Dong Gwang Plain Argos Darkness.png|link=]] | ||
|align="center"| [[File:Inspiration of a Rookie.png|link=]] [[File:Charisma of an Adept.png|link=]] [[File:Book of Precision.png|link=]] [[File:Red Sung Ma Rune.png|link=]] [[File:Purple Sung Ma Rune.png|link=]] [[File:Blue Sung Ma Rune.png|link=]] [[File:Green Sung Ma Rune.png|link=]] [[File:Leather Hardener.png|link=]] [[File:Leather Hardener+.png|link=]] [[File:9th Path Book Chest.png|link=]] [[File:Bosstruhe.png|link=[[Yohara Treasure Chest]]]] [[File:Hard Leather.png|link=]] [[File:Glove Design.png|link=]] [[File:Talent Potion.png|link=]] [[File:Argos Fang.png|link=]] 3x[[File:Sun Jadite.png|link=]] [[File:Random Treasure Chest.png|link=[[Random Treasure Chest]]]] [[File:Darkthorn.png|link=]] [[File:Aura Fire Rune (10).png|link=]] [[File:Holy Powershard.png|link=]] [[File:Mysterious Ticket.png|link=]] 200x[[File:Glimmerstone.png|link=]] | |align="center"| [[File:Inspiration of a Rookie.png|link=]] [[File:Charisma of an Adept.png|link=]] [[File:Book of Precision.png|link=]] [[File:Red Sung Ma Rune.png|link=]] [[File:Purple Sung Ma Rune.png|link=]] [[File:Blue Sung Ma Rune.png|link=]] [[File:Green Sung Ma Rune.png|link=]] [[File:Leather Hardener.png|link=]] [[File:Leather Hardener+.png|link=]] [[File:9th Path Book Chest.png|link=]] [[File:Bosstruhe.png|link=[[Yohara Treasure Chest]]]] [[File:Hard Leather.png|link=]] [[File:Glove Design.png|link=]] [[File:Talent Potion.png|link=]] [[File:Argos Fang.png|link=]] 3x[[File:Sun Jadite.png|link=]] [[File:Random Treasure Chest.png|link=[[Random Treasure Chest]]]] [[File:Darkthorn.png|link=]] [[File:Aura Fire Rune (10).png|link=]] [[File:Holy Powershard.png|link=]] [[File:Mysterious Ticket.png|link=]] 200x[[File:Glimmerstone.png|link=]] [[File:Skull_Banner.png|link]] | ||
|- | |- | ||
|align="center"| Argos | |align="center"| [[File:Feuer.png|40px]] | ||
Argos <br>[[File:Argos (Fire).png|link=|200px]] | |||
|align="center"| 1 hour | |align="center"| 1 hour | ||
|align="center"| [[File:Dong Gwang Plain Argos Fire.png|link=]] | |align="center"| [[File:Dong Gwang Plain Argos Fire.png|link=]] | ||
|align="center"| [[File:Inspiration of a Rookie.png|link=]] [[File:Charisma of an Adept.png|link=]] [[File:Book of Precision.png|link=]] [[File:Red Sung Ma Rune.png|link=]] [[File:Purple Sung Ma Rune.png|link=]] [[File:Blue Sung Ma Rune.png|link=]] [[File:Green Sung Ma Rune.png|link=]] [[File:Leather Hardener.png|link=]] [[File:Leather Hardener+.png|link=]] [[File:9th Path Book Chest.png|link=]] [[File:Bosstruhe.png|link=[[Yohara Treasure Chest]]]] [[File:Hard Leather.png|link=]] [[File:Glove Design.png|link=]] [[File:Talent Potion.png|link=]] [[File:Argos Fang.png|link=]] 3x[[File:Sun Jadite.png|link=]] [[File:Random Treasure Chest.png|link=[[Random Treasure Chest]]]] [[File:Flaming Leaf.png|link=]] [[File:Aura Fire Rune (10).png|link=]] [[File:Holy Powershard.png|link=]] [[File:Mysterious Ticket.png|link=]] 200x[[File:Glimmerstone.png|link=]] | |align="center"| [[File:Inspiration of a Rookie.png|link=]] [[File:Charisma of an Adept.png|link=]] [[File:Book of Precision.png|link=]] [[File:Red Sung Ma Rune.png|link=]] [[File:Purple Sung Ma Rune.png|link=]] [[File:Blue Sung Ma Rune.png|link=]] [[File:Green Sung Ma Rune.png|link=]] [[File:Leather Hardener.png|link=]] [[File:Leather Hardener+.png|link=]] [[File:9th Path Book Chest.png|link=]] [[File:Bosstruhe.png|link=[[Yohara Treasure Chest]]]] [[File:Hard Leather.png|link=]] [[File:Glove Design.png|link=]] [[File:Talent Potion.png|link=]] [[File:Argos Fang.png|link=]] 3x[[File:Sun Jadite.png|link=]] [[File:Random Treasure Chest.png|link=[[Random Treasure Chest]]]] [[File:Flaming Leaf.png|link=]] [[File:Aura Fire Rune (10).png|link=]] [[File:Holy Powershard.png|link=]] [[File:Mysterious Ticket.png|link=]] 200x[[File:Glimmerstone.png|link=]] [[File:Skull_Banner.png|link]] | ||
|} | |} | ||
{{top}} | |||
=== Gnoll Cave Floor 1 === | === Gnoll Cave Floor 1 === | ||
{|width= | {|width=100% align="center" {{NormalTables}} | ||
|- {{Hl3}} | |- {{Hl3}} | ||
!| Boss | !| Boss | ||
| Line 462: | Line 572: | ||
!| Where to find | !| Where to find | ||
!| Drops | !| Drops | ||
|- | |||
|align="center"| [[File:Erde.png|40px]] | |||
Gnoll Master<br>[[File:Gnoll Captain.png|link=|200px]] | |||
|align="center"| 30 minutes | |||
|align="center"| [[File:Gnoll Cave 1.jpg|link=]] | |||
|align="center"| [[File:Red Sung Ma Rune.png|link=]] [[File:Purple Sung Ma Rune.png|link=]] [[File:Blue Sung Ma Rune.png|link=]] [[File:Green Sung Ma Rune.png|link=]] [[File:Hard Leather.png|link=]] [[File:Glove Design.png|link=]] [[File:Aura Fire Rune (10).png|link=]] [[File:Holy Powershard.png|link=]] | |||
|- | |||
|align="center"| [[File:Erde.png|40px]] | |||
Gnoll Captain<br>[[File:Gnoll Captain.png|link=|200px]] | |||
|align="center"| 1 hour | |||
|align="center"| [[File:Gnoll Cave 1.jpg|link=]] | |||
|align="center"| [[File:Bosstruhe.png|link=[[Labyrinth Chest]]]] [[File:Gnoll Master Chest.png|link=[[Gnoll Master Chest]]]] [[File:Hard Leather.png|link=]] [[File:Glove Design.png|link=]] [[File:Earth Vine.png|link=]] [[File:Aura Fire Rune (10).png|link=]] [[File:Holy Powershard.png|link=]] | |||
|} | |} | ||
{{top}} | |||
=== Gnoll Cave Floor 2 === | === Gnoll Cave Floor 2 === | ||
{|width= | {|width=100% align="center" {{NormalTables}} | ||
|- {{Hl3}} | |- {{Hl3}} | ||
!| Boss | !| Boss | ||
| Line 471: | Line 594: | ||
!| Where to find | !| Where to find | ||
!| Drops | !| Drops | ||
|- | |||
|align="center"| [[File:Dunkelheit.png|40px]] | |||
Ahtrin Captain<br>[[File:Ahtrin Captain 126.png|link=|200px]] | |||
|align="center"| 45 minutes | |||
|align="center"| [[File:Gnoll Cave 2.jpg|link=]] | |||
|align="center"| [[File:Red Sung Ma Rune.png|link=]] [[File:Purple Sung Ma Rune.png|link=]] [[File:Blue Sung Ma Rune.png|link=]] [[File:Green Sung Ma Rune.png|link=]] [[File:Hard Leather.png|link=]] [[File:Glove Design.png|link=]] [[File:Aura Fire Rune (10).png|link=]] [[File:Holy Powershard.png|link=]] | |||
|- | |||
|align="center"| [[File:Dunkelheit.png|40px]] | |||
Ahtrin Captain<br>[[File:Ahtrin Captain 127.png|link=|200px]] | |||
|align="center"| 1 hour 30 minutes | |||
|align="center"| [[File:Gnoll Cave 2.jpg|link=]] | |||
|align="center"| [[File:Red Sung Ma Rune.png|link=]] [[File:Purple Sung Ma Rune.png|link=]] [[File:Blue Sung Ma Rune.png|link=]] [[File:Green Sung Ma Rune.png|link=]] [[File:Ahtrin Master Chest.png|link=[[Ahtrin Master Chest]]]] [[File:Hard Leather.png|link=]] [[File:Glove Design.png|link=]] [[File:Darkthorn.png|link=]] [[File:Aura Fire Rune (10).png|link=]] [[File:Holy Powershard.png|link=]] | |||
|} | |} | ||
{{top}} | |||
=== Gnoll Cave Floor 3 === | === Gnoll Cave Floor 3 === | ||
{|width= | {|width=100% align="center" {{NormalTables}} | ||
|- {{Hl3}} | |- {{Hl3}} | ||
!| Boss | !| Boss | ||
| Line 480: | Line 616: | ||
!| Where to find | !| Where to find | ||
!| Drops | !| Drops | ||
|- | |||
|align="center"| [[File:Erde.png|40px]] | |||
Ahtrin Master<br>[[File:Ahtrin Master.png|link=|200px]] | |||
|align="center"| 1 hour | |||
|align="center"| [[File:Gnoll Cave 3.jpg|link=]] | |||
|align="center"| [[File:Bosstruhe.png|link=[[Labyrinth Chest]]]] [[File:Glove Design.png|link=]] [[File:Earth Vine.png|link=]] [[File:Aura Fire Rune (10).png|link=]] [[File:Holy Powershard.png|link=]] | |||
|- | |||
|align="center"| [[File:Dunkelheit.png|40px]] | |||
Ahtrin Grandmaster<br>[[File:Ahtrin Grandmaster.png|link=|200px]] | |||
|align="center"| 2 hours | |||
|align="center"| [[File:Gnoll Cave 3.jpg|link=]] | |||
|align="center"| [[File:Red Sung Ma Rune.png|link=]] [[File:Purple Sung Ma Rune.png|link=]] [[File:Blue Sung Ma Rune.png|link=]] [[File:Green Sung Ma Rune.png|link=]] [[File:Bosstruhe.png|link=[[Labyrinth Chest]]]] [[File:Gold Threaded Chest.png|link=[[Gold Threaded Chest]]]] [[File:Hard Leather.png|link=]] [[File:Glove Design.png|link=]] [[File:Darkthorn.png|link=]] [[File:Aura Fire Rune (10).png|link=]] [[File:Holy Powershard.png|link=]] [[File:Royal Helmet Shard II.png|link=]] [[File:Royal Weapon Shard II.png|link=]] [[File:Royal Armour Shard II.png|link=]] | |||
|} | |} | ||
{{top}} | |||
=== Seo Gwang Wastelands === | === Seo Gwang Wastelands === | ||
{|width= | {|width=100% align="center" {{NormalTables}} | ||
|- {{Hl3}} | |- {{Hl3}} | ||
!| Boss | !| Boss | ||
| Line 490: | Line 639: | ||
!| Drops | !| Drops | ||
|- | |- | ||
|align="center"| Quag Veteran | |align="center"| [[File:Erde.png|40px]] | ||
Quag Veteran<br>[[File:Quag Veteran (Earth).png|link=|100px]]<br><br><br> | |||
[[File:Erde.png|40px]] | |||
Quag Primus<br>[[File:Quag Primus (Earth).png|link=|200px]] | |||
|align="center"| 1 hour | |align="center"| 1 hour | ||
|align="center"| either Quag Veteran or Quag Primus will spawn at those locations<br>[[File:Seo Gwang Wastelands Spawns.png|link=]] | |align="center"| either Quag Veteran or Quag Primus will spawn at those locations<br>[[File:Seo Gwang Wastelands Spawns.png|link=]] | ||
|align="center"| Quag Veteran<br>[[File:Inspiration of a Rookie.png|link=]] [[File:Inspiration of an Adept.png|link=]] [[File:Inspiration of an Expert.png|link=]] [[File:Charisma of a Rookie.png|link=]] [[File:Charisma of an Adept.png|link=]] [[File:Charisma of an Expert.png|link=]] [[File:Book of Precision.png|link=]] [[File:Red Sung Ma Rune.png|link=]] [[File:Purple Sung Ma Rune.png|link=]] [[File:Blue Sung Ma Rune.png|link=]] [[File:Green Sung Ma Rune.png|link=]] [[File:Leather Hardener.png|link=]] [[File:Leather Hardener+.png|link=]] [[File:9th Path Book Chest.png|link=]] [[File:Bosstruhe.png|link=[[Yohara Treasure Chest]]]] [[File:Hard Leather.png|link=]] [[File:Random Treasure Chest.png|link=[[Random Treasure Chest]]]] [[File:Earth Vine.png|link=]] [[File:Mysterious Ticket.png|link=]] | |align="center"| Quag Veteran<br>[[File:Inspiration of a Rookie.png|link=]] [[File:Inspiration of an Adept.png|link=]] [[File:Inspiration of an Expert.png|link=]] [[File:Charisma of a Rookie.png|link=]] [[File:Charisma of an Adept.png|link=]] [[File:Charisma of an Expert.png|link=]] [[File:Book of Precision.png|link=]] [[File:Red Sung Ma Rune.png|link=]] [[File:Purple Sung Ma Rune.png|link=]] [[File:Blue Sung Ma Rune.png|link=]] [[File:Green Sung Ma Rune.png|link=]] [[File:Leather Hardener.png|link=]] [[File:Leather Hardener+.png|link=]] [[File:9th Path Book Chest.png|link=]] [[File:Bosstruhe.png|link=[[Yohara Treasure Chest]]]] [[File:Hard Leather.png|link=]] [[File:Random Treasure Chest.png|link=[[Random Treasure Chest]]]] [[File:Earth Vine.png|link=]] [[File:Mysterious Ticket.png|link=]] | ||
<br><br><br> | <br><br><br> | ||
Quag Primus<br>[[File:Inspiration of a Rookie.png|link=]] [[File:Inspiration of an Adept.png|link=]] [[File:Inspiration of an Expert.png|link=]] [[File:Charisma of a Rookie.png|link=]] [[File:Charisma of an Adept.png|link=]] [[File:Charisma of an Expert.png|link=]] [[File:Book of Precision.png|link=]] [[File:Red Sung Ma Rune.png|link=]] [[File:Purple Sung Ma Rune.png|link=]] [[File:Blue Sung Ma Rune.png|link=]] [[File:Green Sung Ma Rune.png|link=]] [[File:Leather Hardener.png|link=]] [[File:Leather Hardener+.png|link=]] [[File:9th Path Book Chest.png|link=]] [[File:Bosstruhe.png|link=[[Yohara Treasure Chest]]]] [[File:Hard Leather.png|link=]] [[File:Glove Design.png|link=]] [[File:Talent Potion.png|link=]] [[File:Argos Scale.png|link=]] 3x[[File:Night Jadite.png|link=]] [[File:Random Treasure Chest.png|link=[[Random Treasure Chest]]]] [[File:Earth Vine.png|link=]] [[File:Aura Fire Rune (10).png|link=]] [[File:Holy Powershard.png|link=]] [[File:Mysterious Ticket.png|link=]] 200x[[File:Glimmerstone.png|link=]] | Quag Primus<br>[[File:Inspiration of a Rookie.png|link=]] [[File:Inspiration of an Adept.png|link=]] [[File:Inspiration of an Expert.png|link=]] [[File:Charisma of a Rookie.png|link=]] [[File:Charisma of an Adept.png|link=]] [[File:Charisma of an Expert.png|link=]] [[File:Book of Precision.png|link=]] [[File:Red Sung Ma Rune.png|link=]] [[File:Purple Sung Ma Rune.png|link=]] [[File:Blue Sung Ma Rune.png|link=]] [[File:Green Sung Ma Rune.png|link=]] [[File:Leather Hardener.png|link=]] [[File:Leather Hardener+.png|link=]] [[File:9th Path Book Chest.png|link=]] [[File:Bosstruhe.png|link=[[Yohara Treasure Chest]]]] [[File:Hard Leather.png|link=]] [[File:Glove Design.png|link=]] [[File:Talent Potion.png|link=]] [[File:Argos Scale.png|link=]] 3x[[File:Night Jadite.png|link=]] [[File:Random Treasure Chest.png|link=[[Random Treasure Chest]]]] [[File:Earth Vine.png|link=]] [[File:Aura Fire Rune (10).png|link=]] [[File:Holy Powershard.png|link=]] [[File:Mysterious Ticket.png|link=]] 200x[[File:Glimmerstone.png|link=]] [[File:Skull_Banner.png|link]] | ||
|} | |} | ||
{{top}} | |||
=== Nam Gwang Chasm === | === Nam Gwang Chasm === | ||
{|width= | {|width=100% align="center" {{NormalTables}} | ||
|- {{Hl3}} | |- {{Hl3}} | ||
!| Boss | !| Boss | ||
| Line 506: | Line 660: | ||
!| Drops | !| Drops | ||
|- | |- | ||
|align="center"| Natanan | |align="center"| [[File:Dunkelheit.png|40px]] | ||
Natanan<br>[[File:Natanan (Darkness).png|link=|200px]] | |||
|align="center"| 1 hour | |align="center"| 1 hour | ||
|align="center"| [[File:Nam Gwang Chasm Natanan Spawn.png|link=|400px]] | |align="center"| [[File:Nam Gwang Chasm Natanan Spawn.png|link=|400px]] | ||
|align="center"| [[File:Inspiration of a Rookie.png|link=]] [[File:Inspiration of an Adept.png|link=]] [[File:Charisma of a Rookie.png|link=]] [[File:Book of Precision.png|link=]] [[File:Red Sung Ma Rune.png|link=]] [[File:Purple Sung Ma Rune.png|link=]] [[File:Blue Sung Ma Rune.png|link=]] [[File:Green Sung Ma Rune.png|link=]] [[File:Leather Hardener.png|link=]] [[File:Leather Hardener+.png|link=]] [[File:9th Path Book Chest.png|link=]] [[File:Bosstruhe.png|link=[[Yohara Treasure Chest]]]] [[File:Hard Leather.png|link=]] [[File:Glove Design.png|link=]] [[File:Talent Potion.png|link=]] 3x[[File:Sun Jadite.png|link=]] [[File:Random Treasure Chest.png|link=[[Random Treasure Chest]]]] [[File:Darkthorn.png|link=]] [[File:Aura Fire Rune (10).png|link=]] [[File:Holy Powershard.png|link=]] [[File:Mysterious Ticket.png|link=]] 200x[[File:Glimmerstone.png|link=]] | |align="center"| [[File:Inspiration of a Rookie.png|link=]] [[File:Inspiration of an Adept.png|link=]] [[File:Charisma of a Rookie.png|link=]] [[File:Book of Precision.png|link=]] [[File:Red Sung Ma Rune.png|link=]] [[File:Purple Sung Ma Rune.png|link=]] [[File:Blue Sung Ma Rune.png|link=]] [[File:Green Sung Ma Rune.png|link=]] [[File:Leather Hardener.png|link=]] [[File:Leather Hardener+.png|link=]] [[File:9th Path Book Chest.png|link=]] [[File:Bosstruhe.png|link=[[Yohara Treasure Chest]]]] [[File:Hard Leather.png|link=]] [[File:Glove Design.png|link=]] [[File:Talent Potion.png|link=]] 3x[[File:Sun Jadite.png|link=]] [[File:Random Treasure Chest.png|link=[[Random Treasure Chest]]]] [[File:Darkthorn.png|link=]] [[File:Aura Fire Rune (10).png|link=]] [[File:Holy Powershard.png|link=]] [[File:Mysterious Ticket.png|link=]] 200x[[File:Glimmerstone.png|link=]] | ||
|- | |- | ||
|align="center"| Quag Veteran | |align="center"| [[File:Wind.png|40px]] | ||
Quag Veteran <br>[[File:Quag Veteran (Wind).png|link=|100px]]<br><br><br> | |||
[[File:Wind.png|40px]] | |||
Quag Primus<br>[[File:Quag Primus (Wind).png|link=|200px]] | |||
|align="center"| 1 hour | |align="center"| 1 hour | ||
|align="center"| either Quag Veteran or Quag Primus will spawn at those locations<br>[[File:Nam Gwang Chasm Quag Spawn.png|link=|400px]] | |align="center"| either Quag Veteran or Quag Primus will spawn at those locations<br>[[File:Nam Gwang Chasm Quag Spawn.png|link=|400px]] | ||
|align="center"| Quag Veteran<br>[[File:Inspiration of a Rookie.png|link=]] [[File:Inspiration of an Adept.png|link=]] [[File:Inspiration of an Expert.png|link=]] [[File:Charisma of a Rookie.png|link=]] [[File:Charisma of an Adept.png|link=]] [[File:Charisma of an Expert.png|link=]] [[File:Book of Precision.png|link=]] [[File:Red Sung Ma Rune.png|link=]] [[File:Purple Sung Ma Rune.png|link=]] [[File:Blue Sung Ma Rune.png|link=]] [[File:Green Sung Ma Rune.png|link=]] [[File:Leather Hardener.png|link=]] [[File:Leather Hardener+.png|link=]] [[File:9th Path Book Chest.png|link=]] [[File:Bosstruhe.png|link=[[Yohara Treasure Chest]]]] [[File:Hard Leather.png|link=]] [[File:Random Treasure Chest.png|link=[[Random Treasure Chest]]]] [[File:Northwind Blossom.png|link=]] [[File:Mysterious Ticket.png|link=]] | |align="center"| Quag Veteran<br>[[File:Inspiration of a Rookie.png|link=]] [[File:Inspiration of an Adept.png|link=]] [[File:Inspiration of an Expert.png|link=]] [[File:Charisma of a Rookie.png|link=]] [[File:Charisma of an Adept.png|link=]] [[File:Charisma of an Expert.png|link=]] [[File:Book of Precision.png|link=]] [[File:Red Sung Ma Rune.png|link=]] [[File:Purple Sung Ma Rune.png|link=]] [[File:Blue Sung Ma Rune.png|link=]] [[File:Green Sung Ma Rune.png|link=]] [[File:Leather Hardener.png|link=]] [[File:Leather Hardener+.png|link=]] [[File:9th Path Book Chest.png|link=]] [[File:Bosstruhe.png|link=[[Yohara Treasure Chest]]]] [[File:Hard Leather.png|link=]] [[File:Random Treasure Chest.png|link=[[Random Treasure Chest]]]] [[File:Northwind Blossom.png|link=]] [[File:Mysterious Ticket.png|link=]] | ||
<br><br><br> | <br><br><br> | ||
Quag Primus<br>[[File:Inspiration of a Rookie.png|link=]] [[File:Inspiration of an Adept.png|link=]] [[File:Inspiration of an Expert.png|link=]] [[File:Charisma of a Rookie.png|link=]] [[File:Charisma of an Adept.png|link=]] [[File:Charisma of an Expert.png|link=]] [[File:Book of Precision.png|link=]] [[File:Red Sung Ma Rune.png|link=]] [[File:Purple Sung Ma Rune.png|link=]] [[File:Blue Sung Ma Rune.png|link=]] [[File:Green Sung Ma Rune.png|link=]] [[File:Leather Hardener.png|link=]] [[File:Leather Hardener+.png|link=]] [[File:9th Path Book Chest.png|link=]] [[File:Bosstruhe.png|link=[[Yohara Treasure Chest]]]] [[File:Hard Leather.png|link=]] [[File:Glove Design.png|link=]] [[File:Talent Potion.png|link=]] [[File:Argos Scale.png|link=]] 3x[[File:Night Jadite.png|link=]] [[File:Random Treasure Chest.png|link=[[Random Treasure Chest]]]] [[File:Northwind Blossom.png|link=]] [[File:Aura Fire Rune (10).png|link=]] [[File:Holy Powershard.png|link=]] [[File:Mysterious Ticket.png|link=]] 200x[[File:Glimmerstone.png|link=]] | Quag Primus<br>[[File:Inspiration of a Rookie.png|link=]] [[File:Inspiration of an Adept.png|link=]] [[File:Inspiration of an Expert.png|link=]] [[File:Charisma of a Rookie.png|link=]] [[File:Charisma of an Adept.png|link=]] [[File:Charisma of an Expert.png|link=]] [[File:Book of Precision.png|link=]] [[File:Red Sung Ma Rune.png|link=]] [[File:Purple Sung Ma Rune.png|link=]] [[File:Blue Sung Ma Rune.png|link=]] [[File:Green Sung Ma Rune.png|link=]] [[File:Leather Hardener.png|link=]] [[File:Leather Hardener+.png|link=]] [[File:9th Path Book Chest.png|link=]] [[File:Bosstruhe.png|link=[[Yohara Treasure Chest]]]] [[File:Hard Leather.png|link=]] [[File:Glove Design.png|link=]] [[File:Talent Potion.png|link=]] [[File:Argos Scale.png|link=]] 3x[[File:Night Jadite.png|link=]] [[File:Random Treasure Chest.png|link=[[Random Treasure Chest]]]] [[File:Northwind Blossom.png|link=]] [[File:Aura Fire Rune (10).png|link=]] [[File:Holy Powershard.png|link=]] [[File:Mysterious Ticket.png|link=]] 200x[[File:Glimmerstone.png|link=]] [[File:Skull_Banner.png|link]] | ||
|} | |} | ||
{{top}} | |||
=== Mysterious Dungeon === | === Mysterious Dungeon === | ||
{|width= | {|width=100% align="center" {{NormalTables}} | ||
|- {{Hl3}} | |- {{Hl3}} | ||
!| Boss | !| Boss | ||
| Line 527: | Line 687: | ||
!| Drops | !| Drops | ||
|- | |- | ||
|align="center"| Mysterious Monk | |align="center"| [[File:Dunkelheit.png|40px]] | ||
Mysterious Monk<br>[[File:Mysterious Monk (Darkness).png|link=|100px]]<br><br><br> | |||
[[File:Eis.png|40px]] | |||
Mysterious Monk <br>[[File:Mysterious Monk (Ice).png|link=|100px]] | |||
|align="center"| 1 hour | |align="center"| 1 hour | ||
|align="center"| Can randomly spawn everywhere<br>There is always 1 Dark & 1 Ice Mysterious Monk<br>[[File:Mysterious Dungeon.png|link=|400px]] | |align="center"| Can randomly spawn everywhere<br>There is always 1 Dark & 1 Ice Mysterious Monk<br>[[File:Mysterious Dungeon.png|link=|400px]] | ||
|align="center"| [[File:Stone.gif|link=]] [[File:Demon Stone.png|link=]]+4 [[File:Perfect Chest.png|link=[[Perfect Talisman Chest]]]] [[File:Perfect Chest.png|link=[[Perfect Chest]]]] [[File:Perfect Key.png|link=]] 2x[[File:Holy Powershard.png|link=]] [[File:Mysterious Ticket.png|link=]] | |align="center"| [[File:Stone.gif|link=]] [[File:Demon Stone.png|link=]]+4 [[File:Perfect Chest.png|link=[[Perfect Talisman Chest]]]] [[File:Perfect Chest.png|link=[[Perfect Chest]]]] [[File:Perfect Key.png|link=]] 2x[[File:Holy Powershard.png|link=]] [[File:Mysterious Ticket.png|link=]] [[File:Skull_Banner.png|link]] | ||
|} | |} | ||
{{top}} | |||
=== Yilad Pass === | === Yilad Pass === | ||
{|width= | {|width=100% align="center" {{NormalTables}} | ||
|- {{Hl3}} | |- {{Hl3}} | ||
!| Boss | !| Boss | ||
| Line 541: | Line 706: | ||
!| Drops | !| Drops | ||
|- | |- | ||
|align="center"| Tainted Chief | |align="center"| [[File:Dunkelheit.png|40px]] | ||
Tainted Chief<br>[[File:Tainted Chief (Darkness).png|link=|150px]]<br><br><br> | |||
[[File:Dunkelheit.png|40px]] | |||
Tainted War Chief (Darkness)<br>[[File:Tainted War Chief (Darkness).png|link=]] | |||
|align="center"| 1 hour | |align="center"| 1 hour | ||
|align="center"| either Tainted Chief (Darkness) or Tainted War Chief (Darkness)<br>will spawn at those locations<br>[[File:Yilad Pass Darkness.png|link=|400px]] | |align="center"| either Tainted Chief (Darkness) or Tainted War Chief (Darkness)<br>will spawn at those locations<br>[[File:Yilad Pass Darkness.png|link=|400px]] | ||
|align="center"| Tainted Chief (Darkness)<br>[[File:Charisma of an Adept.png|link=]] [[File:Will Topaz.png|link=]] [[File:Red Sung Ma Rune.png|link=]] [[File:Purple Sung Ma Rune.png|link=]] [[File:Blue Sung Ma Rune.png|link=]] [[File:Green Sung Ma Rune.png|link=]] [[File:Leather Hardener.png|link=]] [[File:Leather Hardener+.png|link=]] [[File:Serpent Design.png|link=]] [[File:9th Path Book Chest.png|link=]] [[File:Bosstruhe.png|link=[[Yohara Treasure Chest]]]] [[File:Talent Potion.png|link=]] [[File:Random Treasure Chest.png|link=[[Random Treasure Chest]]]] [[File:Darkthorn.png|link=]] [[File:Aura Fire Rune (10).png|link=]] [[File:Holy Powershard.png|link=]] [[File:Mysterious Ticket.png|link=]] | |align="center"| Tainted Chief (Darkness)<br>[[File:Charisma of an Adept.png|link=]] [[File:Will Topaz.png|link=]] [[File:Red Sung Ma Rune.png|link=]] [[File:Purple Sung Ma Rune.png|link=]] [[File:Blue Sung Ma Rune.png|link=]] [[File:Green Sung Ma Rune.png|link=]] [[File:Leather Hardener.png|link=]] [[File:Leather Hardener+.png|link=]] [[File:Serpent Design.png|link=]] [[File:9th Path Book Chest.png|link=]] [[File:Bosstruhe.png|link=[[Yohara Treasure Chest]]]] [[File:Talent Potion.png|link=]] [[File:Random Treasure Chest.png|link=[[Random Treasure Chest]]]] [[File:Darkthorn.png|link=]] [[File:Aura Fire Rune (10).png|link=]] [[File:Holy Powershard.png|link=]] [[File:Mysterious Ticket.png|link=]] | ||
<br><br><br> | <br><br><br> | ||
Tainted War Chief (Darkness)<br>[[File:Book of Precision.png|link=]] [[File:Will Topaz.png|link=]] [[File:Red Sung Ma Rune.png|link=]] [[File:Purple Sung Ma Rune.png|link=]] [[File:Blue Sung Ma Rune.png|link=]] [[File:Green Sung Ma Rune.png|link=]] [[File:Leather Hardener.png|link=]] [[File:Leather Hardener+.png|link=]] [[File:Serpent Silk.png|link=]] [[File:Serpent Design.png|link=]] [[File:Hard Leather.png|link=]] [[File:Glove Design.png|link=]] [[File:9th Path Book Chest.png|link=]] [[File:Bosstruhe.png|link=[[Yohara Treasure Chest]]]] [[File:Shimmering Seashell.png|link=]] [[File:Serpent Dust.png|link=]] [[File:Talent Potion.png|link=]] [[File:Smoky Jadite.png|link=]] [[File:Random Treasure Chest.png|link=[[Random Treasure Chest]]]] [[File:Darkthorn.png|link=]] [[File:Aura Fire Rune (10).png|link=]] [[File:Holy Powershard.png|link=]] [[File:Mysterious Ticket.png|link=]] 200x[[File:Glimmerstone.png|link=]] | Tainted War Chief (Darkness)<br>[[File:Book of Precision.png|link=]] [[File:Will Topaz.png|link=]] [[File:Red Sung Ma Rune.png|link=]] [[File:Purple Sung Ma Rune.png|link=]] [[File:Blue Sung Ma Rune.png|link=]] [[File:Green Sung Ma Rune.png|link=]] [[File:Leather Hardener.png|link=]] [[File:Leather Hardener+.png|link=]] [[File:Serpent Silk.png|link=]] [[File:Serpent Design.png|link=]] [[File:Hard Leather.png|link=]] [[File:Glove Design.png|link=]] [[File:9th Path Book Chest.png|link=]] [[File:Bosstruhe.png|link=[[Yohara Treasure Chest]]]] [[File:Shimmering Seashell.png|link=]] [[File:Serpent Dust.png|link=]] [[File:Talent Potion.png|link=]] [[File:Smoky Jadite.png|link=]] [[File:Random Treasure Chest.png|link=[[Random Treasure Chest]]]] [[File:Darkthorn.png|link=]] [[File:Aura Fire Rune (10).png|link=]] [[File:Holy Powershard.png|link=]] [[File:Mysterious Ticket.png|link=]] 200x[[File:Glimmerstone.png|link=]] [[File:Skull_Banner.png|link]] | ||
|- | |- | ||
|align="center"| Tainted Chief | |align="center"| [[File:Erde.png|40px]] | ||
Tainted Chief <br>[[File:Tainted Chief (Earth).png|link=|150px]]<br><br><br> | |||
[[File:Erde.png|40px]] | |||
Tainted War Chief <br>[[File:Tainted War Chief (Earth).png|link=]] | |||
|align="center"| 1 hour | |align="center"| 1 hour | ||
|align="center"| either Tainted Chief (Earth) or Tainted War Chief (Earth)<br>will spawn at those locations<br>[[File:Yilad Pass Earth.png|link=|400px]] | |align="center"| either Tainted Chief (Earth) or Tainted War Chief (Earth)<br>will spawn at those locations<br>[[File:Yilad Pass Earth.png|link=|400px]] | ||
|align="center"| Tainted Chief (Earth)<br>[[File:Charisma of an Adept.png|link=]] [[File:Will Topaz.png|link=]] [[File:Red Sung Ma Rune.png|link=]] [[File:Purple Sung Ma Rune.png|link=]] [[File:Blue Sung Ma Rune.png|link=]] [[File:Green Sung Ma Rune.png|link=]] [[File:Leather Hardener.png|link=]] [[File:Leather Hardener+.png|link=]] [[File:Serpent Design.png|link=]] [[File:9th Path Book Chest.png|link=]] [[File:Bosstruhe.png|link=[[Yohara Treasure Chest]]]] [[File:Talent Potion.png|link=]] [[File:Random Treasure Chest.png|link=[[Random Treasure Chest]]]] [[File:Earth Vine.png|link=]] [[File:Aura Fire Rune (10).png|link=]] [[File:Holy Powershard.png|link=]] [[File:Mysterious Ticket.png|link=]] | |align="center"| Tainted Chief (Earth)<br>[[File:Charisma of an Adept.png|link=]] [[File:Will Topaz.png|link=]] [[File:Red Sung Ma Rune.png|link=]] [[File:Purple Sung Ma Rune.png|link=]] [[File:Blue Sung Ma Rune.png|link=]] [[File:Green Sung Ma Rune.png|link=]] [[File:Leather Hardener.png|link=]] [[File:Leather Hardener+.png|link=]] [[File:Serpent Design.png|link=]] [[File:9th Path Book Chest.png|link=]] [[File:Bosstruhe.png|link=[[Yohara Treasure Chest]]]] [[File:Talent Potion.png|link=]] [[File:Random Treasure Chest.png|link=[[Random Treasure Chest]]]] [[File:Earth Vine.png|link=]] [[File:Aura Fire Rune (10).png|link=]] [[File:Holy Powershard.png|link=]] [[File:Mysterious Ticket.png|link=]] | ||
<br><br><br> | <br><br><br> | ||
Tainted War Chief (Earth)<br>[[File:Book of Precision.png|link=]] [[File:Will Topaz.png|link=]] [[File:Red Sung Ma Rune.png|link=]] [[File:Purple Sung Ma Rune.png|link=]] [[File:Blue Sung Ma Rune.png|link=]] [[File:Green Sung Ma Rune.png|link=]] [[File:Leather Hardener.png|link=]] [[File:Leather Hardener+.png|link=]] [[File:Serpent Silk.png|link=]] [[File:Serpent Design.png|link=]] [[File:Hard Leather.png|link=]] [[File:Glove Design.png|link=]] [[File:9th Path Book Chest.png|link=]] [[File:Bosstruhe.png|link=[[Yohara Treasure Chest]]]] [[File:Shimmering Seashell.png|link=]] [[File:Serpent Dust.png|link=]] [[File:Talent Potion.png|link=]] [[File:Smoky Jadite.png|link=]] [[File:Random Treasure Chest.png|link=[[Random Treasure Chest]]]] [[File:Earth Vine.png|link=]] [[File:Aura Fire Rune (10).png|link=]] [[File:Holy Powershard.png|link=]] [[File:Mysterious Ticket.png|link=]] 200x[[File:Glimmerstone.png|link=]] | Tainted War Chief (Earth)<br>[[File:Book of Precision.png|link=]] [[File:Will Topaz.png|link=]] [[File:Red Sung Ma Rune.png|link=]] [[File:Purple Sung Ma Rune.png|link=]] [[File:Blue Sung Ma Rune.png|link=]] [[File:Green Sung Ma Rune.png|link=]] [[File:Leather Hardener.png|link=]] [[File:Leather Hardener+.png|link=]] [[File:Serpent Silk.png|link=]] [[File:Serpent Design.png|link=]] [[File:Hard Leather.png|link=]] [[File:Glove Design.png|link=]] [[File:9th Path Book Chest.png|link=]] [[File:Bosstruhe.png|link=[[Yohara Treasure Chest]]]] [[File:Shimmering Seashell.png|link=]] [[File:Serpent Dust.png|link=]] [[File:Talent Potion.png|link=]] [[File:Smoky Jadite.png|link=]] [[File:Random Treasure Chest.png|link=[[Random Treasure Chest]]]] [[File:Earth Vine.png|link=]] [[File:Aura Fire Rune (10).png|link=]] [[File:Holy Powershard.png|link=]] [[File:Mysterious Ticket.png|link=]] 200x[[File:Glimmerstone.png|link=]] [[File:Skull_Banner.png|link]] | ||
|} | |} | ||
{{top}} | |||
=== Serpent Temple (Base Floor) === | === Serpent Temple (Base Floor) === | ||
{|width= | {|width=100% align="center" {{NormalTables}} | ||
|- {{Hl3}} | |- {{Hl3}} | ||
!| Boss | !| Boss | ||
| Line 564: | Line 738: | ||
!| Drops | !| Drops | ||
|- | |- | ||
|align="center"| Kappa-Soldier*<br>[[File:Kappa Soldier.png|link=|150px]] | |align="center"| [[File:Wind.png|40px]] | ||
Kappa-Soldier*<br>[[File:Kappa Soldier.png|link=|150px]] | |||
|align="center"| 2 hours | |align="center"| 2 hours | ||
|align="center"| Defeating Kappa-Soldier* has a chance to spawn Mighty Kappa<br>[[File:Serpent Temple Kappa Soldier.png|link=]] | |align="center"| Defeating Kappa-Soldier* has a chance to spawn Mighty Kappa<br>[[File:Serpent Temple Kappa Soldier.png|link=]] | ||
|align="center"| | |align="center"| | ||
|- | |- | ||
|align="center"| Mighty Kappa<br>[[File:Mighty Kappa.png|link=|200px]] | |align="center"| [[File:Wind.png|40px]] | ||
Mighty Kappa<br>[[File:Mighty Kappa.png|link=|200px]] | |||
|align="center"| 2 hours | |align="center"| 2 hours | ||
|align="center"| [[File:Serpent Temple Mighty Kappa.png|link=]] | |align="center"| [[File:Serpent Temple Mighty Kappa.png|link=]] | ||
|align="center"| [[File:Inspiration of an Expert.png|link=]] [[File:Charisma of an Expert.png|link=]] [[File:Book of Precision.png|link=]] [[File:Will Topaz.png|link=]] [[File:Red Sung Ma Rune.png|link=]] [[File:Purple Sung Ma Rune.png|link=]] [[File:Blue Sung Ma Rune.png|link=]] [[File:Green Sung Ma Rune.png|link=]] [[File:9th Path Book Chest.png|link=]] [[File:Bosstruhe.png|link=[[Yohara Treasure Chest]]]] 5x[[File:Serpent Dust.png|link=]] [[File:Serpent Design.png|link=]] [[File:Shimmering Seashell.png|link=]] [[File:Glove Design.png|link=]] [[File:Talent Potion.png|link=]] 3x[[File:Night Jadite.png|link=]] [[File:Smoky Jadite.png|link=]] [[File:Perfect Chest.png|link=[[Perfect Chest]]]] [[File:Random Treasure Chest.png|link=[[Random Treasure Chest]]]] 5x[[File:Northwind Blossom.png|link=]] [[File:Demon Stone.png|link=]]+4 [[File:Aura Fire Rune (10).png|link=]] [[File:Holy Powershard.png|link=]] [[File:Mysterious Ticket.png|link=]] 200x[[File:Glimmerstone.png|link=]] | |align="center"| [[File:Inspiration of an Expert.png|link=]] [[File:Charisma of an Expert.png|link=]] [[File:Book of Precision.png|link=]] [[File:Will Topaz.png|link=]] [[File:Red Sung Ma Rune.png|link=]] [[File:Purple Sung Ma Rune.png|link=]] [[File:Blue Sung Ma Rune.png|link=]] [[File:Green Sung Ma Rune.png|link=]] [[File:9th Path Book Chest.png|link=]] [[File:Bosstruhe.png|link=[[Yohara Treasure Chest]]]] 5x[[File:Serpent Dust.png|link=]] [[File:Serpent Design.png|link=]] [[File:Shimmering Seashell.png|link=]] [[File:Glove Design.png|link=]] [[File:Talent Potion.png|link=]] 3x[[File:Night Jadite.png|link=]] [[File:Smoky Jadite.png|link=]] [[File:Perfect Chest.png|link=[[Perfect Chest]]]] [[File:Random Treasure Chest.png|link=[[Random Treasure Chest]]]] 5x[[File:Northwind Blossom.png|link=]] [[File:Demon Stone.png|link=]]+4 [[File:Aura Fire Rune (10).png|link=]] [[File:Holy Powershard.png|link=]] [[File:Mysterious Ticket.png|link=]] 200x[[File:Glimmerstone.png|link=]] | ||
|} | |} | ||
{{top}} | |||
=== Northwind Canyon === | === Northwind Canyon === | ||
{|width= | {|width=100% align="center" {{NormalTables}} | ||
|- {{Hl3}} | |- {{Hl3}} | ||
!| Boss | !| Boss | ||
| Line 583: | Line 760: | ||
!| Drops | !| Drops | ||
|- | |- | ||
|align="center"| Frozen Chief | |align="center"| [[File:Blitz.png|40px]] | ||
Frozen Chief<br>[[File:Frozen Chief (Lightning).png|link=]] | |||
|align="center"| 1 hour | |align="center"| 1 hour | ||
|align="center"| [[File:Northwind Canyon Frozen Chief (Lightning).png|link=]] | |align="center"| [[File:Northwind Canyon Frozen Chief (Lightning).png|link=]] | ||
|align="center"| [[File:Inspiration of a Rookie.png|link=]] [[File:Inspiration of an Adept.png|link=]] [[File:Inspiration of an Expert.png|link=]] [[File:Charisma of a Rookie.png|link=]] [[File:Charisma of an Adept.png|link=]] [[File:Charisma of an Expert.png|link=]] [[File:Talent Potion.png|link=]] [[File:Leather Hardener.png|link=]] [[File:Leather Hardener+.png|link=]] [[File:9th Path Book Chest.png|link=]] [[File:Bosstruhe.png|link=[[Yohara Treasure Chest]]]] [[File:Random Treasure Chest.png|link=[[Random Treasure Chest]]]] [[File:Shimmering Seashell.png|link=]] [[File:Serpent Stone.png|link=]] [[File:Serpent Stone+.png|link=]] [[File:Serpent Design.png|link=]] [[File:Serpent Silk.png|link=]] [[File:Will Topaz.png|link=]] 5x[[File:Thunder Herb.png|link=]] [[File:Aura Fire Rune (10).png|link=]] [[File:Holy Powershard.png|link=]] 200x[[File:Glimmerstone.png|link=]] | |align="center"| [[File:Inspiration of a Rookie.png|link=]] [[File:Inspiration of an Adept.png|link=]] [[File:Inspiration of an Expert.png|link=]] [[File:Charisma of a Rookie.png|link=]] [[File:Charisma of an Adept.png|link=]] [[File:Charisma of an Expert.png|link=]] [[File:Talent Potion.png|link=]] [[File:Leather Hardener.png|link=]] [[File:Leather Hardener+.png|link=]] [[File:9th Path Book Chest.png|link=]] [[File:Bosstruhe.png|link=[[Yohara Treasure Chest]]]] [[File:Random Treasure Chest.png|link=[[Random Treasure Chest]]]] [[File:Shimmering Seashell.png|link=]] [[File:Serpent Stone.png|link=]] [[File:Serpent Stone+.png|link=]] [[File:Serpent Design.png|link=]] [[File:Serpent Silk.png|link=]] [[File:Will Topaz.png|link=]] 5x[[File:Thunder Herb.png|link=]] [[File:Aura Fire Rune (10).png|link=]] [[File:Holy Powershard.png|link=]] 200x[[File:Glimmerstone.png|link=]] [[File:Frozen Key Shard.png|link=]] | ||
|- | |- | ||
|align="center"| Frozen War Chief | |align="center"| [[File:Blitz.png|40px]] | ||
Frozen War Chief <br>[[File:Frozen War Chief (Lightning).png|link=]] | |||
|align="center"| 1 hour | |align="center"| 1 hour | ||
|align="center"| [[File:Northwind Canyon Frozen War Chief (Lightning).png|link=]] | |align="center"| [[File:Northwind Canyon Frozen War Chief (Lightning).png|link=]] | ||
|align="center"| [[File:Inspiration of a Rookie.png|link=]] [[File:Inspiration of an Adept.png|link=]] [[File:Inspiration of an Expert.png|link=]] [[File:Charisma of a Rookie.png|link=]] [[File:Charisma of an Adept.png|link=]] [[File:Charisma of an Expert.png|link=]] [[File:Talent Potion.png|link=]] [[File:Leather Hardener.png|link=]] [[File:Leather Hardener+.png|link=]] [[File:9th Path Book Chest.png|link=]] [[File:Bosstruhe.png|link=[[Yohara Treasure Chest]]]] [[File:Random Treasure Chest.png|link=[[Random Treasure Chest]]]] [[File:Shimmering Seashell.png|link=]] [[File:Serpent Stone.png|link=]] [[File:Serpent Stone+.png|link=]] [[File:Serpent Design.png|link=]] [[File:Serpent Silk.png|link=]] [[File:Will Topaz.png|link=]] [[File:Smoky Jadite.png|link=]] [[File:Elixir Sung Ma St. (STR).png|link=]] [[File:Elixir Sung Ma St. (VIT).png|link=]] [[File:Elixir Sung Ma St. (RES).png|link=]] [[File:Elixir Sung Ma St. (INT).png|link=]] 5x[[File:Thunder Herb.png|link=]] [[File:Demon Stone.png|link=]]+4 [[File:Aura Fire Rune (10).png|link=]] [[File:Holy Powershard.png|link=]] 200x[[File:Glimmerstone.png|link=]] | |align="center"| [[File:Inspiration of a Rookie.png|link=]] [[File:Inspiration of an Adept.png|link=]] [[File:Inspiration of an Expert.png|link=]] [[File:Charisma of a Rookie.png|link=]] [[File:Charisma of an Adept.png|link=]] [[File:Charisma of an Expert.png|link=]] [[File:Talent Potion.png|link=]] [[File:Leather Hardener.png|link=]] [[File:Leather Hardener+.png|link=]] [[File:9th Path Book Chest.png|link=]] [[File:Bosstruhe.png|link=[[Yohara Treasure Chest]]]] [[File:Random Treasure Chest.png|link=[[Random Treasure Chest]]]] [[File:Shimmering Seashell.png|link=]] [[File:Serpent Stone.png|link=]] [[File:Serpent Stone+.png|link=]] [[File:Serpent Design.png|link=]] [[File:Serpent Silk.png|link=]] [[File:Will Topaz.png|link=]] [[File:Smoky Jadite.png|link=]] [[File:Elixir Sung Ma St. (STR).png|link=]] [[File:Elixir Sung Ma St. (VIT).png|link=]] [[File:Elixir Sung Ma St. (RES).png|link=]] [[File:Elixir Sung Ma St. (INT).png|link=]] 5x[[File:Thunder Herb.png|link=]] [[File:Demon Stone.png|link=]]+4 [[File:Aura Fire Rune (10).png|link=]] [[File:Holy Powershard.png|link=]] 200x[[File:Glimmerstone.png|link=]] 2x[[File:Frozen Key Shard.png|link=]] | ||
|- | |- | ||
|align="center"| Frozen Chief | |align="center"| [[File:Eis.png|40px]] | ||
Frozen Chief<br>[[File:Frozen Chief (Ice).png|link=]] | |||
|align="center"| 1 hour | |align="center"| 1 hour | ||
|align="center"| [[File:Northwind Canyon Frozen Chief (Ice).png|link=]] | |align="center"| [[File:Northwind Canyon Frozen Chief (Ice).png|link=]] | ||
|align="center"| [[File:Inspiration of a Rookie.png|link=]] [[File:Inspiration of an Adept.png|link=]] [[File:Inspiration of an Expert.png|link=]] [[File:Charisma of a Rookie.png|link=]] [[File:Charisma of an Adept.png|link=]] [[File:Charisma of an Expert.png|link=]] [[File:Talent Potion.png|link=]] [[File:Leather Hardener.png|link=]] [[File:Leather Hardener+.png|link=]] [[File:9th Path Book Chest.png|link=]] [[File:Bosstruhe.png|link=[[Yohara Treasure Chest]]]] [[File:Random Treasure Chest.png|link=[[Random Treasure Chest]]]] [[File:Shimmering Seashell.png|link=]] [[File:Serpent Stone.png|link=]] [[File:Serpent Stone+.png|link=]] [[File:Serpent Design.png|link=]] [[File:Serpent Silk.png|link=]] [[File:Will Topaz.png|link=]] 5x[[File:Frost Root.png|link=]] [[File:Aura Fire Rune (10).png|link=]] [[File:Holy Powershard.png|link=]] 200x[[File:Glimmerstone.png|link=]] | |align="center"| [[File:Inspiration of a Rookie.png|link=]] [[File:Inspiration of an Adept.png|link=]] [[File:Inspiration of an Expert.png|link=]] [[File:Charisma of a Rookie.png|link=]] [[File:Charisma of an Adept.png|link=]] [[File:Charisma of an Expert.png|link=]] [[File:Talent Potion.png|link=]] [[File:Leather Hardener.png|link=]] [[File:Leather Hardener+.png|link=]] [[File:9th Path Book Chest.png|link=]] [[File:Bosstruhe.png|link=[[Yohara Treasure Chest]]]] [[File:Random Treasure Chest.png|link=[[Random Treasure Chest]]]] [[File:Shimmering Seashell.png|link=]] [[File:Serpent Stone.png|link=]] [[File:Serpent Stone+.png|link=]] [[File:Serpent Design.png|link=]] [[File:Serpent Silk.png|link=]] [[File:Will Topaz.png|link=]] 5x[[File:Frost Root.png|link=]] [[File:Aura Fire Rune (10).png|link=]] [[File:Holy Powershard.png|link=]] 200x[[File:Glimmerstone.png|link=]] [[File:Frozen Key Shard.png|link=]] | ||
|- | |- | ||
|align="center"| Frozen War Chief | |align="center"| [[File:Eis.png|40px]] | ||
Frozen War Chief<br>[[File:Frozen War Chief (Ice).png|link=]] | |||
|align="center"| 1 hour | |align="center"| 1 hour | ||
|align="center"| [[File:Northwind Canyon Frozen War Chief (Ice).png|link=]] | |align="center"| [[File:Northwind Canyon Frozen War Chief (Ice).png|link=]] | ||
|align="center"| [[File:Inspiration of a Rookie.png|link=]] [[File:Inspiration of an Adept.png|link=]] [[File:Inspiration of an Expert.png|link=]] [[File:Charisma of a Rookie.png|link=]] [[File:Charisma of an Adept.png|link=]] [[File:Charisma of an Expert.png|link=]] [[File:Talent Potion.png|link=]] [[File:Leather Hardener.png|link=]] [[File:Leather Hardener+.png|link=]] [[File:9th Path Book Chest.png|link=]] [[File:Bosstruhe.png|link=[[Yohara Treasure Chest]]]] [[File:Random Treasure Chest.png|link=[[Random Treasure Chest]]]] [[File:Shimmering Seashell.png|link=]] [[File:Serpent Stone.png|link=]] [[File:Serpent Stone+.png|link=]] [[File:Serpent Design.png|link=]] [[File:Serpent Silk.png|link=]] [[File:Will Topaz.png|link=]] [[File:Smoky Jadite.png|link=]] [[File:Elixir Sung Ma St. (STR).png|link=]] [[File:Elixir Sung Ma St. (VIT).png|link=]] [[File:Elixir Sung Ma St. (RES).png|link=]] [[File:Elixir Sung Ma St. (INT).png|link=]] 5x[[File:Frost Root.png|link=]] [[File:Demon Stone.png|link=]]+4 [[File:Aura Fire Rune (10).png|link=]] [[File:Holy Powershard.png|link=]] 200x[[File:Glimmerstone.png|link=]] | |align="center"| [[File:Inspiration of a Rookie.png|link=]] [[File:Inspiration of an Adept.png|link=]] [[File:Inspiration of an Expert.png|link=]] [[File:Charisma of a Rookie.png|link=]] [[File:Charisma of an Adept.png|link=]] [[File:Charisma of an Expert.png|link=]] [[File:Talent Potion.png|link=]] [[File:Leather Hardener.png|link=]] [[File:Leather Hardener+.png|link=]] [[File:9th Path Book Chest.png|link=]] [[File:Bosstruhe.png|link=[[Yohara Treasure Chest]]]] [[File:Random Treasure Chest.png|link=[[Random Treasure Chest]]]] [[File:Shimmering Seashell.png|link=]] [[File:Serpent Stone.png|link=]] [[File:Serpent Stone+.png|link=]] [[File:Serpent Design.png|link=]] [[File:Serpent Silk.png|link=]] [[File:Will Topaz.png|link=]] [[File:Smoky Jadite.png|link=]] [[File:Elixir Sung Ma St. (STR).png|link=]] [[File:Elixir Sung Ma St. (VIT).png|link=]] [[File:Elixir Sung Ma St. (RES).png|link=]] [[File:Elixir Sung Ma St. (INT).png|link=]] 5x[[File:Frost Root.png|link=]] [[File:Demon Stone.png|link=]]+4 [[File:Aura Fire Rune (10).png|link=]] [[File:Holy Powershard.png|link=]] 200x[[File:Glimmerstone.png|link=]] 2x[[File:Frozen Key Shard.png|link=]] | ||
|} | |} | ||
{{top}} | |||
=== Soul Gorge === | === Soul Gorge === | ||
{|width= | {|width=100% align="center" {{NormalTables}} | ||
|- {{Hl3}} | |- {{Hl3}} | ||
!| Boss | !| Boss | ||
| Line 612: | Line 794: | ||
!| Drops | !| Drops | ||
|- | |- | ||
|align="center"| Bigfoot | |align="center"| [[File:Blitz.png|40px]] | ||
Bigfoot <br>[[File:Bigfoot (Lightning).png|link=|220px]] | |||
|align="center"| 1 hour | |align="center"| 1 hour | ||
|align="center"| [[File:Soul Gorge Bigfoot (Lightning).png|link=|220px]] | |align="center"| [[File:Soul Gorge Bigfoot (Lightning).png|link=|220px]] | ||
|align="center"| [[File:Inspiration of a Rookie.png|link=]] [[File:Inspiration of an Adept.png|link=]] [[File:Inspiration of an Expert.png|link=]] [[File:Charisma of a Rookie.png|link=]] [[File:Charisma of an Adept.png|link=]] [[File:Charisma of an Expert.png|link=]] [[File:Talent Potion.png|link=]] [[File:Leather Hardener.png|link=]] [[File:Leather Hardener+.png|link=]] [[File:9th Path Book Chest.png|link=]] [[File:Bosstruhe.png|link=[[Yohara Treasure Chest]]]] [[File:Random Treasure Chest.png|link=[[Random Treasure Chest]]]] [[File:Shimmering Seashell.png|link=]] [[File:Serpent Stone.png|link=]] [[File:Serpent Stone+.png|link=]] [[File:Serpent Design.png|link=]] [[File:Serpent Silk.png|link=]] [[File:Will Topaz.png|link=]] [[File:Northwind Anvil.png|link=]] 5x[[File:Thunder Herb.png|link=]] [[File:Aura Fire Rune (10).png|link=]] [[File:Holy Powershard.png|link=]] 200x[[File:Glimmerstone.png|link=]] | |align="center"| [[File:Inspiration of a Rookie.png|link=]] [[File:Inspiration of an Adept.png|link=]] [[File:Inspiration of an Expert.png|link=]] [[File:Charisma of a Rookie.png|link=]] [[File:Charisma of an Adept.png|link=]] [[File:Charisma of an Expert.png|link=]] [[File:Talent Potion.png|link=]] [[File:Leather Hardener.png|link=]] [[File:Leather Hardener+.png|link=]] [[File:9th Path Book Chest.png|link=]] [[File:Bosstruhe.png|link=[[Yohara Treasure Chest]]]] [[File:Random Treasure Chest.png|link=[[Random Treasure Chest]]]] [[File:Shimmering Seashell.png|link=]] [[File:Serpent Stone.png|link=]] [[File:Serpent Stone+.png|link=]] [[File:Serpent Design.png|link=]] [[File:Serpent Silk.png|link=]] [[File:Will Topaz.png|link=]] [[File:Northwind Anvil.png|link=]] 5x[[File:Thunder Herb.png|link=]] [[File:Aura Fire Rune (10).png|link=]] [[File:Holy Powershard.png|link=]] 200x[[File:Glimmerstone.png|link=]] [[File:Frozen Key Shard.png|link=]] | ||
|- | |- | ||
|align="center"| Northwind War Chief | |align="center"| [[File:Blitz.png|40px]] | ||
Northwind War Chief <br>[[File:Northwind War Chief (Lightning).png|link=]] | |||
|align="center"| 1 hour | |align="center"| 1 hour | ||
|align="center"| [[File:Soul Gorge Northwind War Chief (Lightning).png|link=|220px]] | |align="center"| [[File:Soul Gorge Northwind War Chief (Lightning).png|link=|220px]] | ||
|align="center"| [[File:Inspiration of a Rookie.png|link=]] [[File:Inspiration of an Adept.png|link=]] [[File:Inspiration of an Expert.png|link=]] [[File:Charisma of a Rookie.png|link=]] [[File:Charisma of an Adept.png|link=]] [[File:Charisma of an Expert.png|link=]] [[File:Talent Potion.png|link=]] [[File:Leather Hardener.png|link=]] [[File:Leather Hardener+.png|link=]] [[File:9th Path Book Chest.png|link=]] [[File:Bosstruhe.png|link=[[Yohara Treasure Chest]]]] [[File:Random Treasure Chest.png|link=[[Random Treasure Chest]]]] [[File:Shimmering Seashell.png|link=]] [[File:Serpent Stone.png|link=]] [[File:Serpent Stone+.png|link=]] [[File:Serpent Design.png|link=]] [[File:Serpent Silk.png|link=]] [[File:Will Topaz.png|link=]] [[File:Smoky Jadite.png|link=]] [[File:Northwind Anvil.png|link=]] [[File:Northwind Soulstone.png|link=]] [[File:Elixir Sung Ma St. (STR).png|link=]] [[File:Elixir Sung Ma St. (VIT).png|link=]] [[File:Elixir Sung Ma St. (RES).png|link=]] [[File:Elixir Sung Ma St. (INT).png|link=]] 5x[[File:Thunder Herb.png|link=]] [[File:Demon Stone.png|link=]]+4 [[File:Aura Fire Rune (10).png|link=]] [[File:Holy Powershard.png|link=]] 200x[[File:Glimmerstone.png|link=]] | |align="center"| [[File:Inspiration of a Rookie.png|link=]] [[File:Inspiration of an Adept.png|link=]] [[File:Inspiration of an Expert.png|link=]] [[File:Charisma of a Rookie.png|link=]] [[File:Charisma of an Adept.png|link=]] [[File:Charisma of an Expert.png|link=]] [[File:Talent Potion.png|link=]] [[File:Leather Hardener.png|link=]] [[File:Leather Hardener+.png|link=]] [[File:9th Path Book Chest.png|link=]] [[File:Bosstruhe.png|link=[[Yohara Treasure Chest]]]] [[File:Random Treasure Chest.png|link=[[Random Treasure Chest]]]] [[File:Shimmering Seashell.png|link=]] [[File:Serpent Stone.png|link=]] [[File:Serpent Stone+.png|link=]] [[File:Serpent Design.png|link=]] [[File:Serpent Silk.png|link=]] [[File:Will Topaz.png|link=]] [[File:Smoky Jadite.png|link=]] [[File:Northwind Anvil.png|link=]] [[File:Northwind Soulstone.png|link=]] [[File:Elixir Sung Ma St. (STR).png|link=]] [[File:Elixir Sung Ma St. (VIT).png|link=]] [[File:Elixir Sung Ma St. (RES).png|link=]] [[File:Elixir Sung Ma St. (INT).png|link=]] 5x[[File:Thunder Herb.png|link=]] [[File:Demon Stone.png|link=]]+4 [[File:Aura Fire Rune (10).png|link=]] [[File:Holy Powershard.png|link=]] 200x[[File:Glimmerstone.png|link=]] 2x[[File:Frozen Key Shard.png|link=]] | ||
|- | |- | ||
|align="center"| Bigfoot | |align="center"| [[File:Eis.png|40px]] | ||
Bigfoot<br>[[File:Bigfoot (Ice).png|link=|220px]] | |||
|align="center"| 1 hour | |align="center"| 1 hour | ||
|align="center"| [[File:Soul Gorge Bigfoot (Ice).png|link=|220px]] | |align="center"| [[File:Soul Gorge Bigfoot (Ice).png|link=|220px]] | ||
|align="center"| [[File:Inspiration of a Rookie.png|link=]] [[File:Inspiration of an Adept.png|link=]] [[File:Inspiration of an Expert.png|link=]] [[File:Charisma of a Rookie.png|link=]] [[File:Charisma of an Adept.png|link=]] [[File:Charisma of an Expert.png|link=]] [[File:Talent Potion.png|link=]] [[File:Leather Hardener.png|link=]] [[File:Leather Hardener+.png|link=]] [[File:9th Path Book Chest.png|link=]] [[File:Bosstruhe.png|link=[[Yohara Treasure Chest]]]] [[File:Random Treasure Chest.png|link=[[Random Treasure Chest]]]] [[File:Shimmering Seashell.png|link=]] [[File:Serpent Stone.png|link=]] [[File:Serpent Stone+.png|link=]] [[File:Serpent Design.png|link=]] [[File:Serpent Silk.png|link=]] [[File:Will Topaz.png|link=]] [[File:Northwind Anvil.png|link=]] 5x[[File:Frost Root.png|link=]] [[File:Aura Fire Rune (10).png|link=]] [[File:Holy Powershard.png|link=]] 200x[[File:Glimmerstone.png|link=]] | |align="center"| [[File:Inspiration of a Rookie.png|link=]] [[File:Inspiration of an Adept.png|link=]] [[File:Inspiration of an Expert.png|link=]] [[File:Charisma of a Rookie.png|link=]] [[File:Charisma of an Adept.png|link=]] [[File:Charisma of an Expert.png|link=]] [[File:Talent Potion.png|link=]] [[File:Leather Hardener.png|link=]] [[File:Leather Hardener+.png|link=]] [[File:9th Path Book Chest.png|link=]] [[File:Bosstruhe.png|link=[[Yohara Treasure Chest]]]] [[File:Random Treasure Chest.png|link=[[Random Treasure Chest]]]] [[File:Shimmering Seashell.png|link=]] [[File:Serpent Stone.png|link=]] [[File:Serpent Stone+.png|link=]] [[File:Serpent Design.png|link=]] [[File:Serpent Silk.png|link=]] [[File:Will Topaz.png|link=]] [[File:Northwind Anvil.png|link=]] 5x[[File:Frost Root.png|link=]] [[File:Aura Fire Rune (10).png|link=]] [[File:Holy Powershard.png|link=]] 200x[[File:Glimmerstone.png|link=]] [[File:Frozen Key Shard.png|link=]] | ||
|- | |- | ||
|align="center"| Northwind War Chief | |align="center"| [[File:Eis.png|40px]] | ||
Northwind War Chief<br>[[File:Northwind War Chief (Ice).png|link=]] | |||
|align="center"| 1 hour | |align="center"| 1 hour | ||
|align="center"| [[File:Soul Gorge Northwind War Chief (Ice).png|link=|220px]] | |align="center"| [[File:Soul Gorge Northwind War Chief (Ice).png|link=|220px]] | ||
|align="center"| [[File:Inspiration of a Rookie.png|link=]] [[File:Inspiration of an Adept.png|link=]] [[File:Inspiration of an Expert.png|link=]] [[File:Charisma of a Rookie.png|link=]] [[File:Charisma of an Adept.png|link=]] [[File:Charisma of an Expert.png|link=]] [[File:Talent Potion.png|link=]] [[File:Leather Hardener.png|link=]] [[File:Leather Hardener+.png|link=]] [[File:9th Path Book Chest.png|link=]] [[File:Bosstruhe.png|link=[[Yohara Treasure Chest]]]] [[File:Random Treasure Chest.png|link=[[Random Treasure Chest]]]] [[File:Shimmering Seashell.png|link=]] [[File:Serpent Stone.png|link=]] [[File:Serpent Stone+.png|link=]] [[File:Serpent Design.png|link=]] [[File:Serpent Silk.png|link=]] [[File:Will Topaz.png|link=]] [[File:Smoky Jadite.png|link=]] [[File:Northwind Anvil.png|link=]] [[File:Northwind Soulstone.png|link=]] [[File:Elixir Sung Ma St. (STR).png|link=]] [[File:Elixir Sung Ma St. (VIT).png|link=]] [[File:Elixir Sung Ma St. (RES).png|link=]] [[File:Elixir Sung Ma St. (INT).png|link=]] 5x[[File:Frost Root.png|link=]] [[File:Demon Stone.png|link=]]+4 [[File:Aura Fire Rune (10).png|link=]] [[File:Holy Powershard.png|link=]] 200x[[File:Glimmerstone.png|link=]] | |align="center"| [[File:Inspiration of a Rookie.png|link=]] [[File:Inspiration of an Adept.png|link=]] [[File:Inspiration of an Expert.png|link=]] [[File:Charisma of a Rookie.png|link=]] [[File:Charisma of an Adept.png|link=]] [[File:Charisma of an Expert.png|link=]] [[File:Talent Potion.png|link=]] [[File:Leather Hardener.png|link=]] [[File:Leather Hardener+.png|link=]] [[File:9th Path Book Chest.png|link=]] [[File:Bosstruhe.png|link=[[Yohara Treasure Chest]]]] [[File:Random Treasure Chest.png|link=[[Random Treasure Chest]]]] [[File:Shimmering Seashell.png|link=]] [[File:Serpent Stone.png|link=]] [[File:Serpent Stone+.png|link=]] [[File:Serpent Design.png|link=]] [[File:Serpent Silk.png|link=]] [[File:Will Topaz.png|link=]] [[File:Smoky Jadite.png|link=]] [[File:Northwind Anvil.png|link=]] [[File:Northwind Soulstone.png|link=]] [[File:Elixir Sung Ma St. (STR).png|link=]] [[File:Elixir Sung Ma St. (VIT).png|link=]] [[File:Elixir Sung Ma St. (RES).png|link=]] [[File:Elixir Sung Ma St. (INT).png|link=]] 5x[[File:Frost Root.png|link=]] [[File:Demon Stone.png|link=]]+4 [[File:Aura Fire Rune (10).png|link=]] [[File:Holy Powershard.png|link=]] 200x[[File:Glimmerstone.png|link=]] 2x[[File:Frozen Key Shard.png|link=]] | ||
|} | |||
{{top}} | |||
===Northwind Shelter=== | |||
{|width=100% align="center" {{NormalTables}} | |||
|- {{Hl3}} | |||
!| Boss | |||
!| Respawn time | |||
!| Where to find | |||
!| Drops | |||
|- | |||
|align="center"| [[File:Eis.png|40px]] | |||
Northwind Sh. General <br>[[File:Northwind Sh. General Ice.png|link=]] | |||
|align="center"| 1 hour | |||
|align="center"| [[File:Nordwindhort General.png|link=|220px]] | |||
|align="center"| [[File:Leather Hardener.png|link=]] [[File:Leather Hardener+.png|link=]] [[File:Shimmering Seashell.png|link=]] [[File:Bosstruhe.png|link=[[Yohara Treasure Chest]]]] [[File:Random Treasure Chest.png|link=[[Random Treasure Chest]]]] 3x[[File:Night Jadite.png|link=]] 3x[[File:Smoky Jadite.png|link=]] [[File:Northwind Glove Stone.png|link=]] [[File:Northwind Anvil.png|link=]] [[File:Perfect Key.png|link=]] [[File:Perfect Chest.png|link=[[Perfect Chest]]]] 5x[[File:Frost Root.png|link=]] [[File:Aura Fire Rune (10).png|link=|Aura Fire Rune (100)]] 5x[[File:Empty Power Elixir.png|link=]] 5x[[File:Empty Resistance Elixir.png|link=]] [[File:Frozen Key Shard.png|link=]] | |||
|- | |||
|align="center"| [[File:Eis.png|40px]] | |||
Northwind Sh. War Chief<br>[[File:Northwind Sh. War Chief Ice.png|link=]] | |||
|align="center"| 1 hour | |||
|align="center"| [[File:Nordwindhort Kriegshäuptling.png|link=|220px]] | |||
|align="center"| [[File:Shimmering Seashell.png|link=]] [[File:Bosstruhe.png|link=[[Yohara Treasure Chest]]]] [[File:Random Treasure Chest.png|link=[[Random Treasure Chest]]]] 3x[[File:Night Jadite.png|link=]] 3x[[File:Smoky Jadite.png|link=]] [[File:Northwind Glove Stone.png|link=]] [[File:Northwind Anvil.png|link=]] [[File:Perfect Key.png|link=]] [[File:Perfect Chest.png|link=[[Perfect Chest]]]] 5x[[File:Frost Root.png|link=]] 3x[[File:Frozen Key.png|link=]] [[File:Stone.gif|link=]]+4 [[File:White Dragon Scale.png|link=]] [[File:Northwind Soulstone.png|link=]] [[File:Northwind Weapon Stone.png|link=]] [[File:Northwind Weapon Stone+.png|link=]] [[File:Northwind Polish.png|link=]] [[File:Aura Fire Rune (10).png|link=|Aura Fire Rune (100)]] [[File:Aura Fire Rune (10).png|link=|Aura Fire Rune (50)]] [[File:Holy Powershard.png|link=]] | |||
|} | |||
{{top}} | |||
===Northwind Depths=== | |||
{|width=100% align="center" {{NormalTables}} | |||
|- {{Hl3}} | |||
!| Boss | |||
!| Respawn time | |||
!| Where to find | |||
!| Drops | |||
|- | |||
|align="center"| [[File:Eis.png|40px]][[File:Blitz.png|40px]] | |||
Northwind Sh. General<br>[[File:Northwind Depths General Ice Lightning.png|link=]] | |||
|align="center"| 2 hours | |||
|align="center"| [[File:Northwind Depths.jpg|link=|220px]] | |||
|align="center"| [[File:Leather Hardener.png|link=]] [[File:Leather Hardener+.png|link=]] [[File:Shimmering Seashell.png|link=]] [[File:Bosstruhe.png|link=[[Yohara Treasure Chest]]]] [[File:Random Treasure Chest.png|link=[[Random Treasure Chest]]]] 3x[[File:Night Jadite.png|link=]] 3x[[File:Smoky Jadite.png|link=]] [[File:Northwind Glove Stone.png|link=]] [[File:Northwind Anvil.png|link=]] [[File:Perfect Key.png|link=]] [[File:Perfect Chest.png|link=[[Perfect Chest]]]] 5x[[File:Frost Root.png|link=]] 5x[[File:Thunder Herb.png|link=]] [[File:Aura Fire Rune (10).png|link=|Aura Fire Rune (100)]] 5x[[File:Empty Power Elixir.png|link=]] 5x[[File:Empty Resistance Elixir.png|link=]] [[File:Frozen Key Shard.png|link=]] | |||
|- | |||
|align="center"| [[File:Eis.png|40px]][[File:Blitz.png|40px]] | |||
Northwind Sh. War Chief<br>[[File:Northwind Depths War Chief Ice Lightning.png|link=]] | |||
|align="center"| 2 hours | |||
|align="center"| [[File:Northwind Depths.jpg|link=|220px]] | |||
|align="center"| [[File:Shimmering Seashell.png|link=]] [[File:Bosstruhe.png|link=[[Yohara Treasure Chest]]]] [[File:Random Treasure Chest.png|link=[[Random Treasure Chest]]]] 3x[[File:Night Jadite.png|link=]] 3x[[File:Smoky Jadite.png|link=]] [[File:Northwind Glove Stone.png|link=]] [[File:Northwind Anvil.png|link=]] [[File:Perfect Key.png|link=]] [[File:Perfect Chest.png|link=[[Perfect Chest]]]] 5x[[File:Frost Root.png|link=]] 5x[[File:Thunder Herb.png|link=]] 3x[[File:Frozen Key.png|link=]] [[File:Stone.gif|link=]]+4 [[File:White Dragon Scale.png|link=]] [[File:Northwind Soulstone.png|link=]] [[File:Northwind Weapon Stone.png|link=]] [[File:Northwind Weapon Stone+.png|link=]] [[File:Northwind Polish.png|link=]] [[File:Aura Fire Rune (10).png|link=|Aura Fire Rune (100)]] [[File:Aura Fire Rune (10).png|link=|Aura Fire Rune (50)]] [[File:Holy Powershard.png|link=]] | |||
|} | |} | ||
{{top}} | |||
Latest revision as of 12:03, 1 January 2025
General Information
Boss respawn timers are tied to the time the Server went online.
Boss Chests are clickable to view their content.
Old Continent
Map1
| Boss | Respawn time | Where to find | Drops |
|---|---|---|---|
Lycos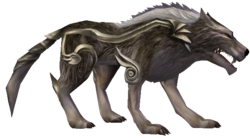
|
10 minutes | 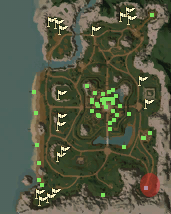 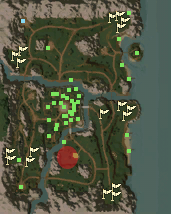 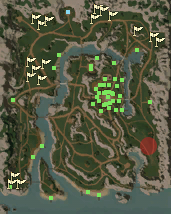
|
|
Scrofa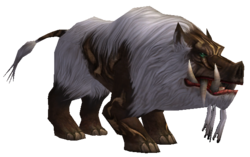
|
10 minutes | 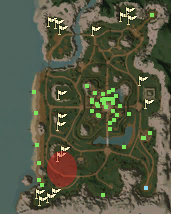 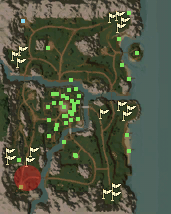 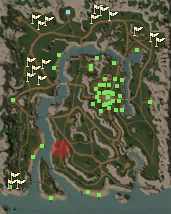
|
|
Bera
|
10 minutes | 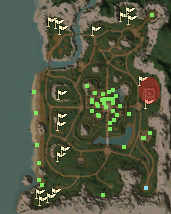 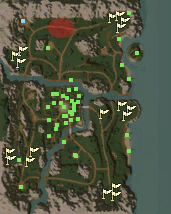 
|
|
Tigris
|
10 minutes | 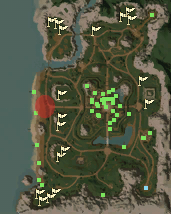 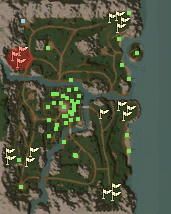 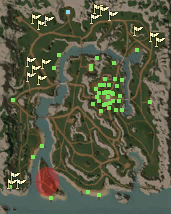
|
▲ Go to the top ▲
Map 2
| Boss | Respawn time | Where to find | Drops |
|---|---|---|---|
Mahon
|
10 minutes | 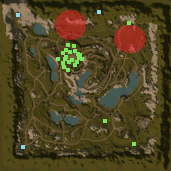 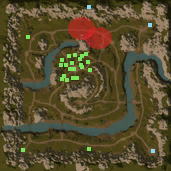 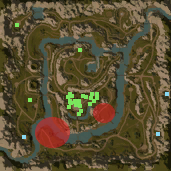
|
|
Bo
|
10 minutes | 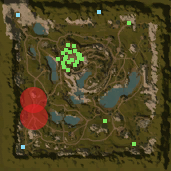 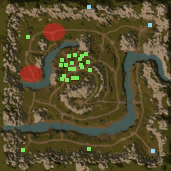 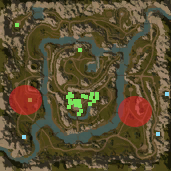
|
|
Goo-Pae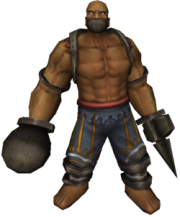
|
10 minutes | 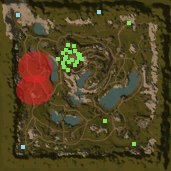 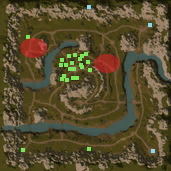 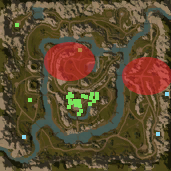
|
|
Chuong
|
10 minutes | 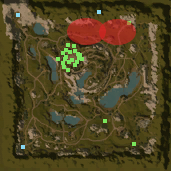 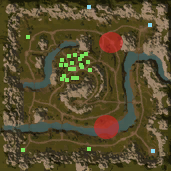 
|
|
Bestial Captain
|
10 minutes | 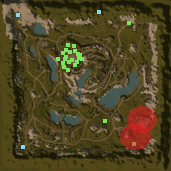 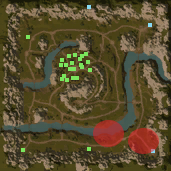 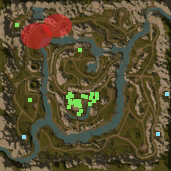
|
▲ Go to the top ▲
Ape Dungeon
| Boss | Respawn time | Where to find | Drops |
|---|---|---|---|
Rock Ape
|
20 minutes | 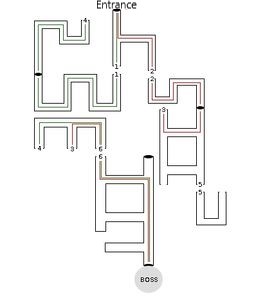
|
|
Walking Ape
|
20 minutes | 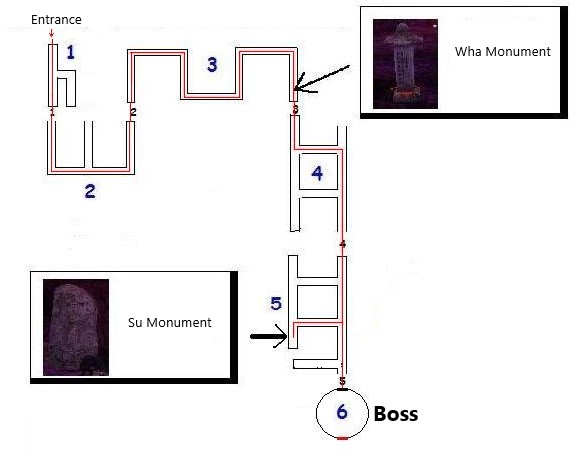
|
|
Ape Lord
|
20 minutes | 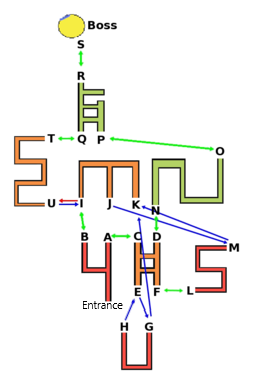
|
▲ Go to the top ▲
Valley of Seungryong
| Boss | Respawn time | Where to find | Drops |
|---|---|---|---|
Chief Orc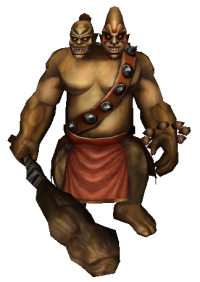
|
25 minutes | A second Chief Orc spawns in a random location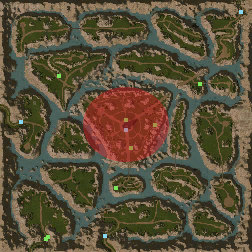
|
▲ Go to the top ▲
Yongbi Desert
| Boss | Respawn time | Where to find | Drops |
|---|---|---|---|
Giant Tortoise |
25 minutes | A second Giant Tortoise spawns in a random location
|
10x |
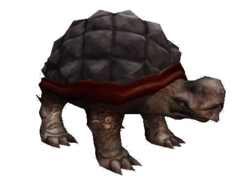
▲ Go to the top ▲
Hwang-Temple
| Boss | Respawn time | Where to find | Drops |
|---|---|---|---|
Dark-Ghost Leader |
25 minutes | 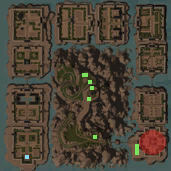
|
|
Yellow Tiger Ghost |
25 minutes | A second Yellow Tiger Ghost spawns in a random location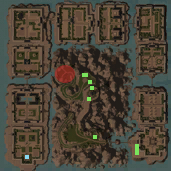
|

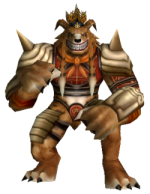
▲ Go to the top ▲
Demon Tower
| Boss | Respawn time | Where to find | Drops |
|---|---|---|---|
Blue Death |
Only on "Blue Death Event" | Demon Tower
|
1x 1x |
Death Reaper |
1x per Dungeon | Demon Tower
|
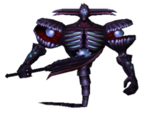

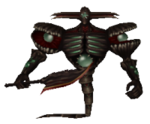
▲ Go to the top ▲
Spider Dungeon 1
| Boss | Respawn time | Where to find | Drops |
|---|---|---|---|
Queen Spider |
30 minutes | 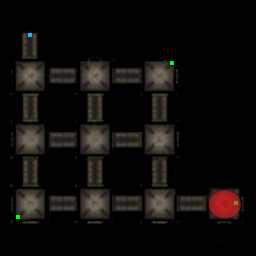
|

▲ Go to the top ▲
Spider Dungeon 2
| Boss | Respawn time | Where to find | Drops |
|---|---|---|---|
Queen Spider |
30 minutes | 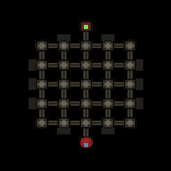
|
▲ Go to the top ▲
Mount Sohan
| Boss | Respawn time | Where to find | Drops |
|---|---|---|---|
Nine Tails |
25 minutes | A second Nine Tails spawns in a random location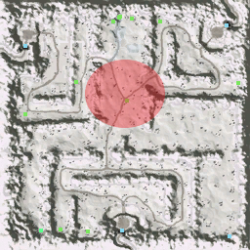
|
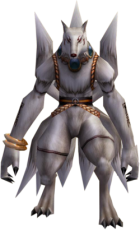
▲ Go to the top ▲
Doyyumhwan
| Boss | Respawn time | Where to find | Drops |
|---|---|---|---|
Flame King |
25 minutes | A second Flame King spawns in a random location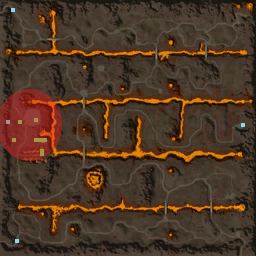
|
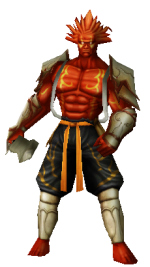
▲ Go to the top ▲
Grotto of Exile 1
| Boss | Respawn time | Where to find | Drops |
|---|---|---|---|
Mighty Ice Witch |
1 hour | Can randomly spawn everywhere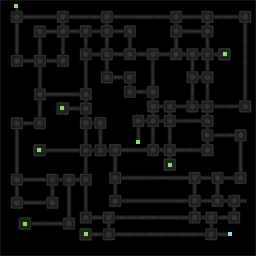
|

▲ Go to the top ▲
Grotto of Exile 2
| Boss | Respawn time | Where to find | Drops |
|---|---|---|---|
Captain Yonghan |
20 minutes | A second Captain Yonghan spawns in a random location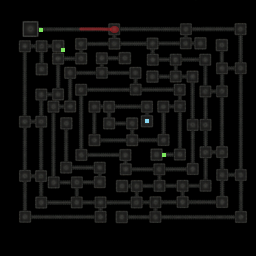
|

▲ Go to the top ▲
Cape Dragon Fire
| Boss | Respawn time | Where to find | Drops |
|---|---|---|---|
Gnoll Lord |
1 hour | 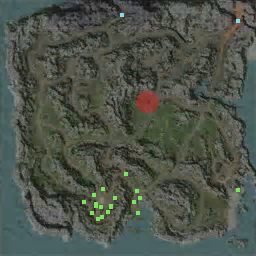
|
|
Supreme Gnoll Guard |
1 hour | 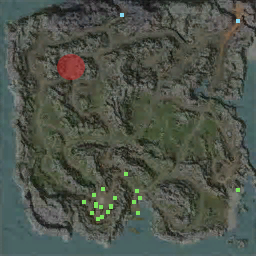
|
|
Rakshasa |
1 hour | 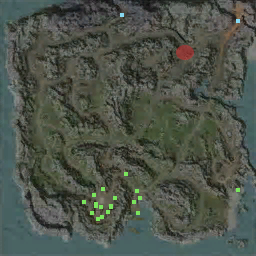
|
|
Martyaxwar |
1 hour | 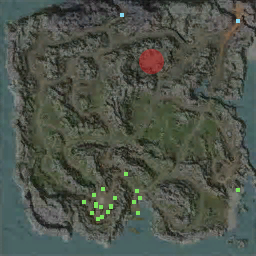
|
|
Bone Face |
1 hour | 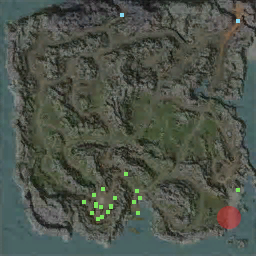
|
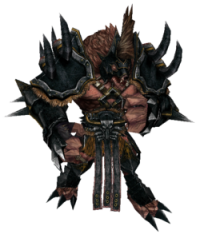
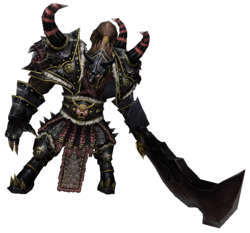
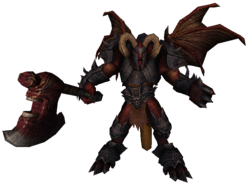
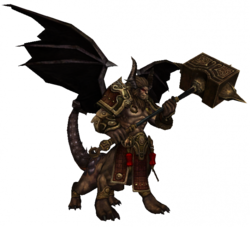

▲ Go to the top ▲
Nephrite Bay
| Boss | Respawn time | Where to find | Drops |
|---|---|---|---|
General Kappa |
1 hour | 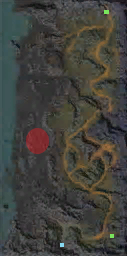
|
|
Triton |
1 hour | 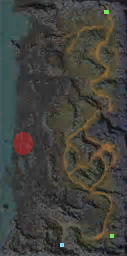
|
|
General Lobster |
1 hour | 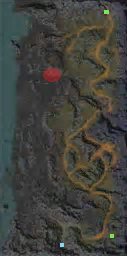
|
|
King Crab |
1 hour | 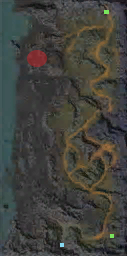
|
|
Bone Face |
1 hour | 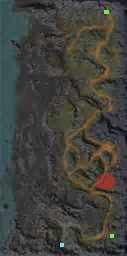
|
|
Red Chief |
1 hour | 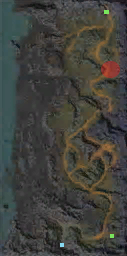
|
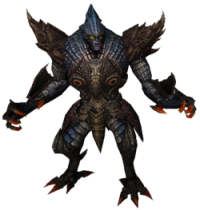
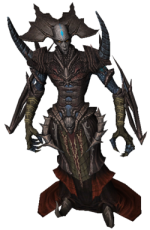
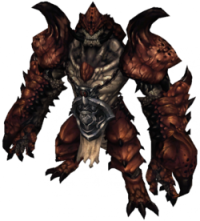


▲ Go to the top ▲
Thunder Mountains
| Boss | Respawn time | Where to find | Drops |
|---|---|---|---|
Brutal Bone Face |
1 hour | 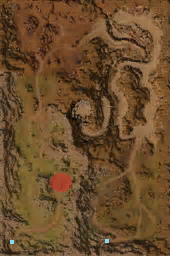
|
|
Brutal Red Chief |
1 hour | 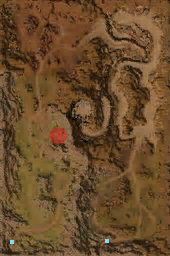
|
|
Gargoyle |
1 hour | 
|
|
King Wubba |
1 hour | 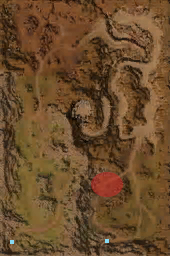
|
|
Arges |
1 hour | 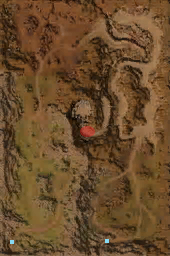
|
|
Polyphemos |
1 hour | 
|
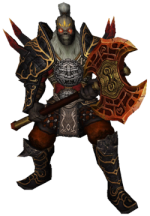
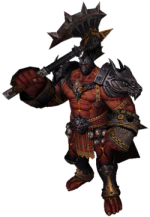
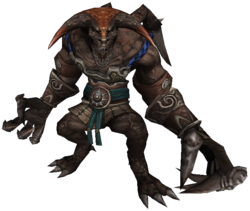
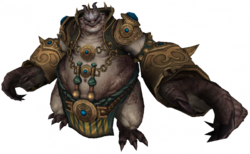
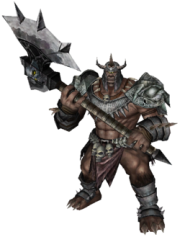
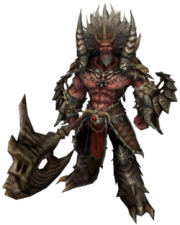
▲ Go to the top ▲
Gautamacliff
| Boss | Respawn time | Where to find | Drops |
|---|---|---|---|
Bone Face |
1 hour | 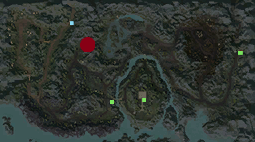
|
|
Captain Shruk |
1 hour | 
|
|
The Great Ogre |
1 hour | 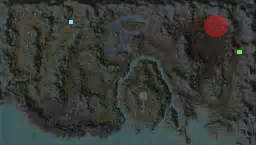
|
|
Lemures Prince |
1 hour | 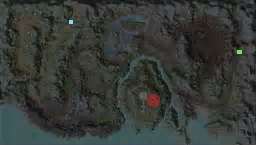
|
|
Lemures Bodyguard |
1 hour | 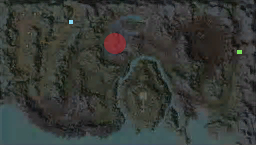
|
|
Aku-Boku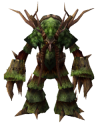
|
2 hours | 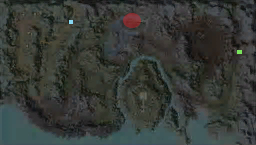
|
|
| Arboretum
|
2 hours | 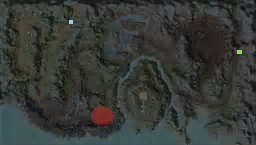
|
|
| Sycomore
|
2 hours | 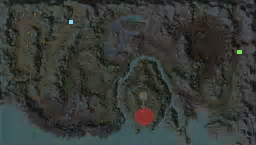
|


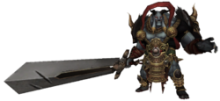
▲ Go to the top ▲
Temple of Ochao
| Boss | Respawn time | Where to find | Drops |
|---|---|---|---|
Ochao Bodyguard |
1 hour | 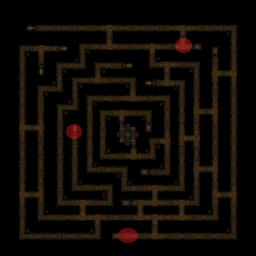
|
|
Ochao Lord |
1 hour | 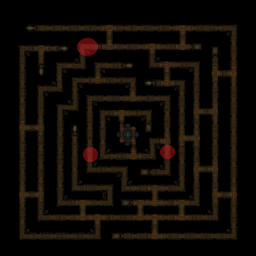
|
|
En-Tai-Guardian |
Always there | Changes location every 5 minutes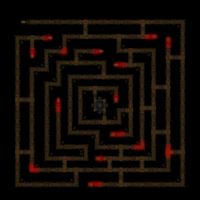
|
Opens up a Portal to enter the Enchanted Forest
|
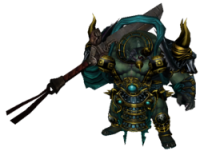

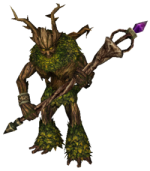
▲ Go to the top ▲
Enchanted Forest
| Boss | Respawn time | Where to find | Drops |
|---|---|---|---|
En-Tai Sovereign |
20 Minutes | 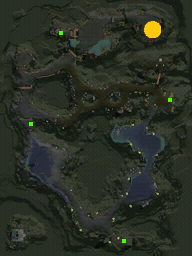
|

▲ Go to the top ▲
New Continent (Yohara)
Abandoned Fortress
| Boss | Respawn time | Where to find | Drops |
|---|---|---|---|
Kao |
1 hour | 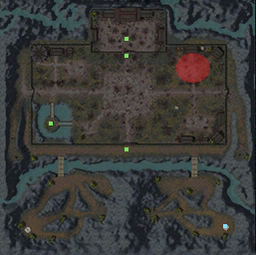
|
|
Kao |
1 hour | 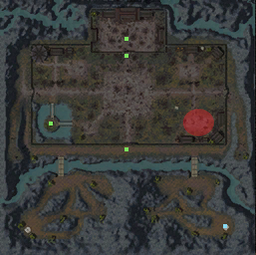
|
|
King Bao |
1 hour | 
|


▲ Go to the top ▲
Dong Gwang Plain
| Boss | Respawn time | Where to find | Drops |
|---|---|---|---|
Natanan |
1 hour | 
|
|
Argos |
1 hour | 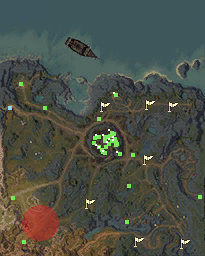
|
|
Argos |
1 hour | 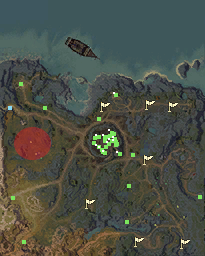
|
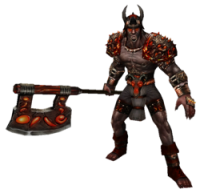
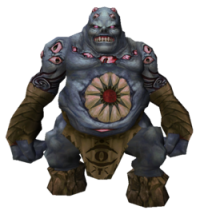

▲ Go to the top ▲
Gnoll Cave Floor 1
| Boss | Respawn time | Where to find | Drops |
|---|---|---|---|
Gnoll Master |
30 minutes | 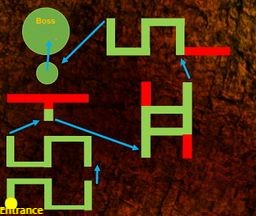
|
|
Gnoll Captain |
1 hour |
|
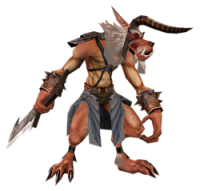
▲ Go to the top ▲
Gnoll Cave Floor 2
| Boss | Respawn time | Where to find | Drops |
|---|---|---|---|
Ahtrin Captain |
45 minutes | 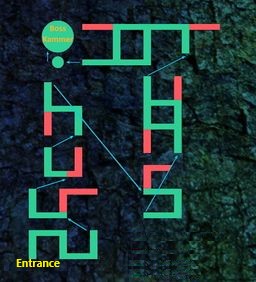
|
|
Ahtrin Captain |
1 hour 30 minutes |
|
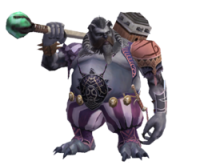

▲ Go to the top ▲
Gnoll Cave Floor 3
| Boss | Respawn time | Where to find | Drops |
|---|---|---|---|
Ahtrin Master |
1 hour | 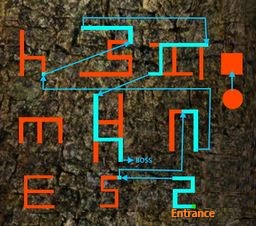
|
|
Ahtrin Grandmaster |
2 hours |
|
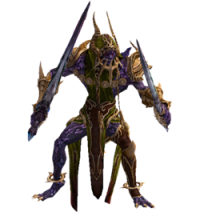
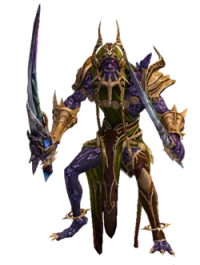
▲ Go to the top ▲
Seo Gwang Wastelands
| Boss | Respawn time | Where to find | Drops |
|---|---|---|---|
Quag Veteran Quag Primus |
1 hour | either Quag Veteran or Quag Primus will spawn at those locations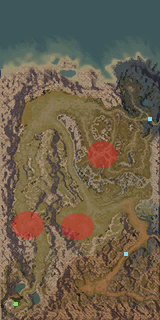
|
Quag Veteran
|
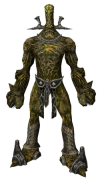
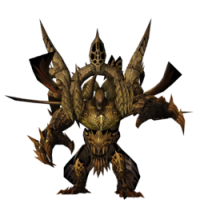
▲ Go to the top ▲
Nam Gwang Chasm
| Boss | Respawn time | Where to find | Drops |
|---|---|---|---|
Natanan |
1 hour | 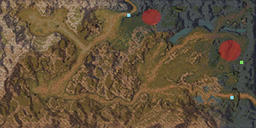
|
|
Quag Veteran Quag Primus |
1 hour | either Quag Veteran or Quag Primus will spawn at those locations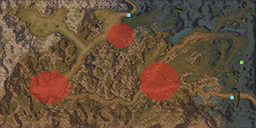
|
Quag Veteran
|
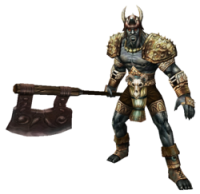
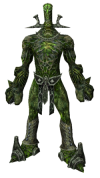

▲ Go to the top ▲
Mysterious Dungeon
| Boss | Respawn time | Where to find | Drops |
|---|---|---|---|
Mysterious Monk Mysterious Monk |
1 hour | Can randomly spawn everywhere There is always 1 Dark & 1 Ice Mysterious Monk 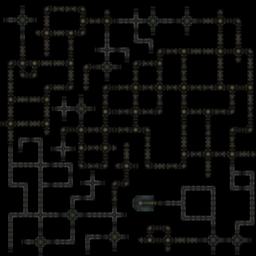
|


▲ Go to the top ▲
Yilad Pass
| Boss | Respawn time | Where to find | Drops |
|---|---|---|---|
Tainted Chief Tainted War Chief (Darkness) |
1 hour | either Tainted Chief (Darkness) or Tainted War Chief (Darkness) will spawn at those locations 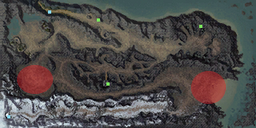
|
Tainted Chief (Darkness)
|
Tainted Chief Tainted War Chief |
1 hour | either Tainted Chief (Earth) or Tainted War Chief (Earth) will spawn at those locations 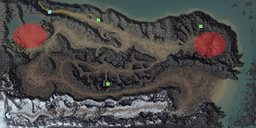
|
Tainted Chief (Earth)
|
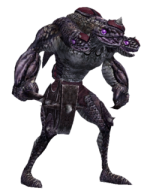
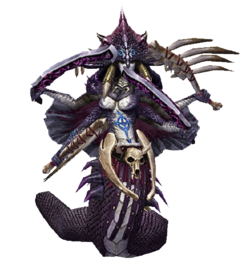
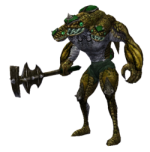
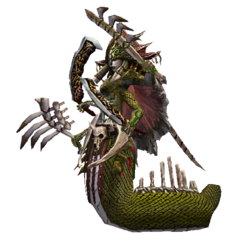
▲ Go to the top ▲
Serpent Temple (Base Floor)
| Boss | Respawn time | Where to find | Drops |
|---|---|---|---|
Kappa-Soldier* |
2 hours | Defeating Kappa-Soldier* has a chance to spawn Mighty Kappa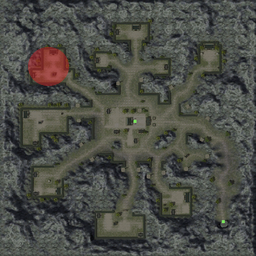
|
|
Mighty Kappa |
2 hours | 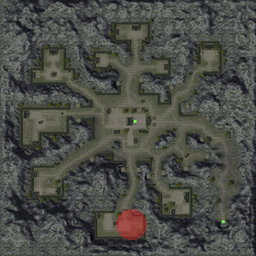
|
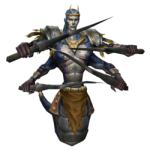
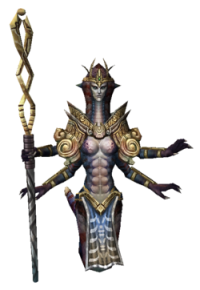
▲ Go to the top ▲
Northwind Canyon
| Boss | Respawn time | Where to find | Drops |
|---|---|---|---|
Frozen Chief |
1 hour | 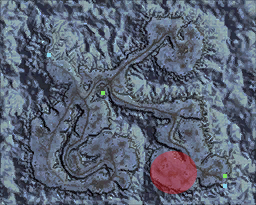
|
|
Frozen War Chief |
1 hour | 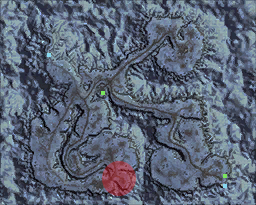
|
|
Frozen Chief |
1 hour | 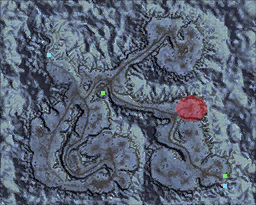
|
|
Frozen War Chief |
1 hour | 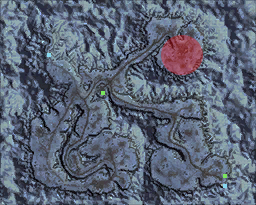
|
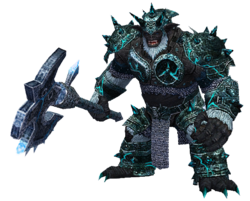

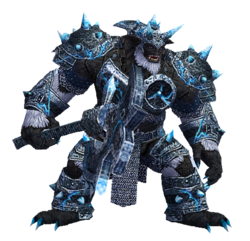
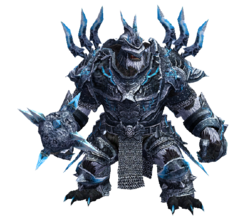
▲ Go to the top ▲
Soul Gorge
| Boss | Respawn time | Where to find | Drops |
|---|---|---|---|
Bigfoot |
1 hour | 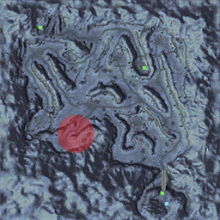
|
|
Northwind War Chief |
1 hour | 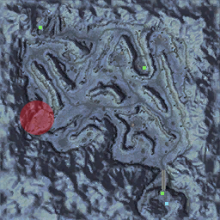
|
|
Bigfoot |
1 hour | 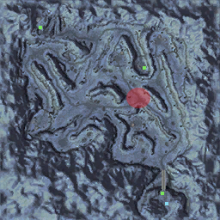
|
|
Northwind War Chief |
1 hour | 
|
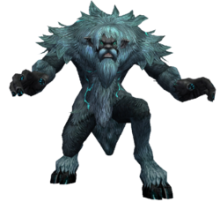

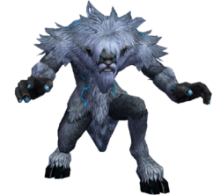
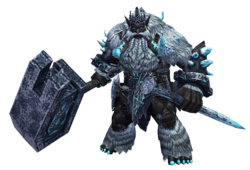
▲ Go to the top ▲
Northwind Shelter
| Boss | Respawn time | Where to find | Drops |
|---|---|---|---|
Northwind Sh. General |
1 hour | 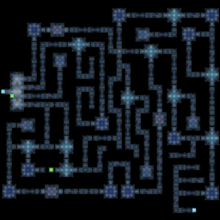
|
|
Northwind Sh. War Chief |
1 hour | 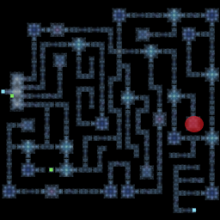
|
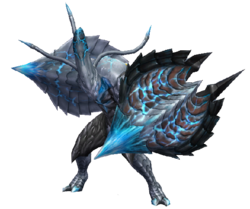
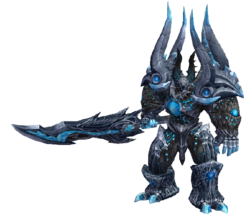
▲ Go to the top ▲
Northwind Depths
| Boss | Respawn time | Where to find | Drops |
|---|---|---|---|
Northwind Sh. General |
2 hours | 
|
|
Northwind Sh. War Chief |
2 hours |
|
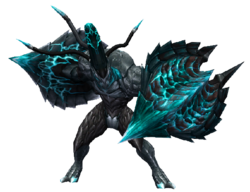

▲ Go to the top ▲