Red Dragon Fortress (TR): Difference between revisions
No edit summary |
|||
| (21 intermediate revisions by 2 users not shown) | |||
| Line 1: | Line 1: | ||
{{Navigation|[[Mid-Level Tier]]|}} | |||
__NOTOC__ | |||
{{Area/LayoutV2 | |||
<!-- Accepted values are: Chunjo Jinno Shinsoo Neutral (with caps)--> | |||
|Empire= Neutral | |||
<!-- name of the header file, don't insert the extension (must be jpg or png) insert only just the name)--> | |||
|Logo= Red Dragon Fortress Header | |||
Requirements to Enter: | <!-- Description and main info about the map--> | ||
|Description= | |||
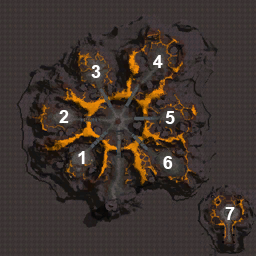
*at least level 110 | Red Dragon Fortess, a dungeon style map, composed by 7 different areas, where you need to perform 7 different tasks to complete the dungeon, all this in 1 hour time limit. You can enter this area by talking to [[Time Rift Statue]] in [[Plateau of Illusions]]. Every member needs a [[File:Stopwatch.png|link=]] [[Pocket Watch]] in their inventory. | ||
* | <br><br> | ||
* | '''Requirements to Enter:''' | ||
*You need to be at least level 110. | |||
*Only the leader of the group can request entry. | |||
*If you leave the dungeon, by disconnection or reviving in city, you have 5 minutes in order to get back in. | |||
*Each groupmember needs 1x[[File:Stopwatch.png|link=]] [[Pocket Watch]] to enter. | |||
<br><br> | |||
The task is randomly given, the order of the below tasks is not in sequence. Except for the last task (7), that task is always the last task. | |||
Venture into the Demon's Ring and emerge the victor. | <br><br> | ||
When you are inside, you can start the run by talking to the [[Am-heh Gorge (TR)]] which is located in the middle. After clearing each task, you have to talk to it again. There is no cooldown. | |||
<br><br> | |||
*'''Task 1:''' ''Venture into the Demon's Ring and emerge the victor.'' | |||
This taks is completed when you kill all the mobs in the designated area. | |||
Find the [[File:Golden_Cog (TR).png|30px|link=]]Golden Cog Wheel and use it to trigger the hidden mechanism in the Isfet Stele. | <br><br> | ||
*'''Task 2:''' ''Find the [[File:Golden_Cog (TR).png|30px|link=]] [[Golden Cog Wheel (TR)]] and use it to trigger the hidden mechanism in the [[Isfet Stele (TR)]].'' | |||
Kill mobs in the designated area and [[File:Golden_Cog (TR).png|30px|link=]]Golden Cog Wheel (TR), drag the wheel | Kill mobs in the designated area and collect [[File:Golden_Cog (TR).png|30px|link=]] [[Golden Cog Wheel (TR)]], drag the wheel to [[Isfet Stele (TR)]], until you have found the correct wheel. | ||
<br><br> | |||
*'''Task 3:''' ''Venture into the Demon's Ring and emerge the victor.'' | |||
Venture into the Demon's Ring and emerge the victor. | Kill all mobs in the designated area | ||
<br><br> | |||
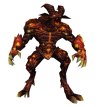
Kill all mobs in the designated area | *'''Task 4:''' ''Defeat Ignitor (TR), Guardian of the Ember.'' | ||
In the designated area, among other mobs kill [[Ignitor (TR)]] | |||
Defeat Ignitor (TR), Guardian of the Ember. | |||
In the designated area, among other mobs kill Ignitor (TR) | |||
[[File:Ignitor.png|100px|link=]] | [[File:Ignitor.png|100px|link=]] | ||
<br><br> | |||
*'''Task 5:''' ''Search for the [[File:Maat_Stone (TR).png|link=]] [[Maat Stones (TR)]] and place them on the seven [[Isfet Steles (TR)]] in the correct order.'' | |||
By killing mobs in the designated area, your group will collect [[File:Maat_Stone (TR).png|link=]] [[Maat Stones (TR)]]. Drag them to [[Isfet Steles (TR)]] to try and open them. There's a correct order to do so. If you choose the wrong Stele, the stone will disappear and the Stele will remain. If you choose the right Stele, both stone and Stele disappear. Task ends when all Steles are gone. | |||
<br><br> | |||
*'''Task 6:''' ''Only those who shy not from the singing heat will be able to defeat the Purgatory Fire Metin (TR).'' | |||
Destroy the [[Purgatory Fire Metin (TR)]] in the designated area | |||
<br><br> | |||
*'''Task 7:''' ''Awaken the [[Am-heh Gorge (TR)]]'' | |||
(After clearing the previous 6 tasks) | |||
Defeat [[Razador (TR)]] | |||
= | <!-- link template for interactive map or full link (with brackets) for image--> | ||
|Map= [[file:Red Dragon Fortress.png]] | |||
<!-- list available metins on this map, leave empty if none--> | |||
|Metins= | |||
*[[Purgatory Fire Metin (TR)]] | |||
<!-- list available ore veins on this map, leave empty if none--> | |||
|Ores= | |||
<!-- list available monsters on this map, leave empty if none--> | |||
|Monster= | |||
<ul> | |||
*[[Ember Flame Ghost (TR)]] | |||
*[[Ember Flame Tiger (TR)]] | |||
*[[Ember Flame (TR)]] | |||
*[[Ember Flame Warrior (TR)]] | |||
*[[Ember Flame King (TR)]] | |||
*[[Ember Flame Troll (TR)]] | |||
*[[Ember Flame Beard (TR)]] | |||
*[[Ember Flame General (TR)]] | |||
*[[Ember Flame Chief. (TR)]] | |||
*[[Ignitor (TR)]] | |||
*'''[[Razador (TR)]]''' | |||
</ul> | |||
= | <!-- list available NPC's on this map, leave empty if none--> | ||
|NPC=<ul> | |||
*[[Am-heh Gorge (TR)]] | |||
*[[Isfet Stele (TR)]] | |||
*[[Destiny Lock (TR)]] | |||
*[[Dragon Gate (TR)]] | |||
*[[Taramor Gravestone (TR)]] | |||
*[[Wounded Soldier (TR)]] | |||
</ul> | |||
<!-- aditional map1, if title empty, default will be "Monsters Distribution", use full link for image, leave empty if none--> | |||
|Map-1-title=Boss Loot | |||
|Map-1= | |||
* 24x - 30x [[File:Razador's_Chest.png|link=Razador's Chest]] [[Razador's Chest]] | |||
* 1x [[File:Razador's_Egg.png]] Razador's Egg | |||
* 1x [[File:Aura Fire Rune (10).png|link=]] [[Aura Fire Rune (10)]] | |||
* 1x [[File:Aura Fire Rune (10).png|link=]] [[Aura Fire Rune (50)]] | |||
* 5x [[File:Leafes of Life.png|link=]] [[Leaves of Life]] | |||
* 1x [[File:Gaya Market Expansion.png|link=]] Gaya Market Expansion | |||
* 1x [[File:Stopwatch.png|link=]] [[Pocket Watch]] | |||
* 1x [[File:Chunk of Ice.png|link=]] Chunk of Ice | |||
* 1x [[File:Rainbow Powershard.png|link=]] [[Rainbow Powershard]] | |||
* 1x [[File:Lucent Yellow Powershard.png|link=]] [[Lucent Yellow Powershard]] | |||
* 1x [[File:Time Spiral.png|link=]] [[Time Spiral (30)]] | |||
<!-- aditional map2, if title empty, default will be Metin Areas, use full link for image, leave empty if none--> | |||
|Map-2-title= | |||
|Map-2= | |||
<!-- adjacent areas in alphabetical order, leave empty if none --> | |||
|Areas= | |||
<!-- list of npc OLD MAN that teleport to this location, leave empty if none --> | |||
|Old Man= | |||
<!-- list of npc TELEPORTER that teleport to this location, leave empty if none --> | |||
|Teleporter= | |||
| | |||
}} | |||
Latest revision as of 15:29, 5 December 2024

|
INFORMATION |
Red Dragon Fortess, a dungeon style map, composed by 7 different areas, where you need to perform 7 different tasks to complete the dungeon, all this in 1 hour time limit. You can enter this area by talking to Time Rift Statue in Plateau of Illusions. Every member needs a
This taks is completed when you kill all the mobs in the designated area.
Kill mobs in the designated area and collect
Kill all mobs in the designated area
In the designated area, among other mobs kill Ignitor (TR)
By killing mobs in the designated area, your group will collect
Destroy the Purgatory Fire Metin (TR) in the designated area
(After clearing the previous 6 tasks) Defeat Razador (TR) |
Interactive Map
|
||||||||

|
||||||||||
|
||||||||||
| Other Information | ||||||
|
||||||
|
Adjacent areas
|
Old Man
|
Teleporter
|
||||
|
No adjacent areas to this map
|
You cannot reach this area via the Old Man
|
You cannot reach this area via the Teleporter
|
||||
